Ricoh Aficio SP 8300DN Manuals - Page 67
Storing a Document, Storing a Document with Windows
 |
View all Ricoh Aficio SP 8300DN manuals
Add to My Manuals
Save this manual to your list of manuals |
Page 67 highlights
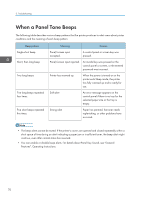
Storing a Document Storing a Document Storing a Document with Windows 1. After creating a document, open the [Printing Preferences] dialog box in the document's native application. For details about displaying the [Printing Preferences] dialog box, see p.28 "Displaying the Printing Preferences dialog box in an application". 2. In the "Job Type:" list, select a job type. • Select [Sample Print] to store the document as a Sample Print file. • Select [Locked Print] to store the document as a Locked Print file. • Select [Hold Print] to store the document as a Hold Print file. • Two options are available when storing a Stored Print file: Select [Stored Print] to store the document in the printer and print it later using the control panel. Select [Store and Print] to store and print the document at the same time. 3. Click [Details...]. 4. Enter a User ID in the "User ID:" box. • When storing a Locked Print file, enter a password in the "Password:" box. • When storing a Hold Print file, specify a file name and print time as necessary. To specify the time when the document is printed, select the [Set Print Time] check box, and then specify the time. • When storing a Stored Print file, specify a file name and password as necessary. 5. Click [OK]. 6. Change any other print settings as necessary. 7. Click [OK]. 8. Start printing from the application's [Print] dialog box. • The printer might not print a Hold Print file at the specified time under the following conditions: • When the specified print time is close to the time in the printer's built-in clock, printing may start immediately. • When the main power of the printer is turned off, printing will not start even if it is the specified print time. To print a document whose specified time has already passed, set [Jobs Not Printed As Machn. Was Off] to [On] on [System] under [Printer Features]. For details, see "System", Operating Instructions. 65
-
 1
1 -
2
-
3
-
4
-
5
-
6
-
7
-
8
-
9
-
10
-
11
-
12
-
13
-
14
-
15
-
16
-
17
-
18
-
19
-
20
-
21
-
22
-
23
-
24
-
25
-
26
-
27
-
28
-
29
-
30
-
31
-
32
-
33
-
34
-
35
-
36
-
37
-
38
-
39
-
40
-
41
-
42
-
43
-
44
-
45
-
46
-
47
-
48
-
49
-
50
-
51
-
52
-
53
-
54
-
55
-
56
-
57
-
58
-
59
-
60
-
61
-
 62
62 -
 63
63 -
 64
64 -
 65
65 -
 66
66 -
 67
67 -
 68
68 -
 69
69 -
 70
70 -
 71
71 -
 72
72 -
73
-
74
-
75
-
76
-
77
-
78
-
79
-
80
-
81
-
82
-
83
-
84
-
85
-
86
-
87
-
88
-
89
-
90
-
91
-
92
-
93
-
94
-
95
-
96
-
97
-
98
-
99
-
100
-
101
-
102
-
103
-
104
-
105
-
106
-
107
-
108
-
109
-
110
-
111
-
112
-
113
-
114
-
115
-
116
-
117
-
118
-
119
-
120
-
121
-
122
-
123
-
124
-
125
-
126
-
127
-
128
-
129
-
130
-
131
-
132
 |
 |
