Ricoh Aficio SP 8300DN Manuals - Page 68
Storing a Document with Mac OS X, If an error message is displayed on the control panel
 |
View all Ricoh Aficio SP 8300DN manuals
Add to My Manuals
Save this manual to your list of manuals |
Page 68 highlights
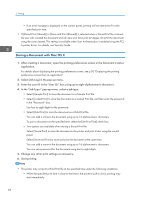
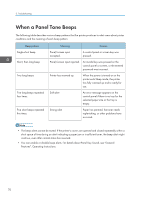
2. Printing • If an error message is displayed on the control panel, printing will not start even if it is the specified print time. • If [Stored Print (Shared)] or [Store and Print (Shared)] is selected when a Stored Print file is stored, the user who created the document and all users who have print privileges can print the document using the control panel. This setting is available when User Authentication is enabled using the PCL 6 printer driver. For details, see Security Guide. Storing a Document with Mac OS X 1. After creating a document, open the printing preferences screen in the document's native application. For details about displaying the printing preferences screen, see p.30 "Displaying the printing preferences screen from an application". 2. Select [Job Log] in the pop-up menu. 3. Enter the user ID in the "User ID:" box using up to eight alphanumeric characters. 4. In the "Job Type:" pop-up menu, select a job type. • Select [Sample Print] to store the document as a Sample Print file. • Select [Locked Print] to store the document as a Locked Print file, and then enter the password in the "Password:" box. Use four to eight digits for the password. • Select [Hold Print] to store the document as a Hold Print file. You can add a name to the document using up to 16 alphanumeric characters. To print a document on the specified time, select the [Set Print Time] check box. • Two options are available when storing a Stored Print file: Select [Stored Print] to store the document in the printer and print it later using the control panel. Select [Store and Print] to store and print the document at the same time. You can add a name to the document using up to 16 alphanumeric characters. You can set a password for the document using four to eight digits. 5. Change any other print settings as necessary. 6. Start printing. • The printer may not print a Hold Print file at the specified time under the following conditions: • When the specified print time is close to the time in the printer's built-in clock, printing may start immediately. 66
-
 1
1 -
2
-
3
-
4
-
5
-
6
-
7
-
8
-
9
-
10
-
11
-
12
-
13
-
14
-
15
-
16
-
17
-
18
-
19
-
20
-
21
-
22
-
23
-
24
-
25
-
26
-
27
-
28
-
29
-
30
-
31
-
32
-
33
-
34
-
35
-
36
-
37
-
38
-
39
-
40
-
41
-
42
-
43
-
44
-
45
-
46
-
47
-
48
-
49
-
50
-
51
-
52
-
53
-
54
-
55
-
56
-
57
-
58
-
59
-
60
-
61
-
62
-
 63
63 -
 64
64 -
 65
65 -
 66
66 -
 67
67 -
 68
68 -
 69
69 -
 70
70 -
 71
71 -
 72
72 -
 73
73 -
74
-
75
-
76
-
77
-
78
-
79
-
80
-
81
-
82
-
83
-
84
-
85
-
86
-
87
-
88
-
89
-
90
-
91
-
92
-
93
-
94
-
95
-
96
-
97
-
98
-
99
-
100
-
101
-
102
-
103
-
104
-
105
-
106
-
107
-
108
-
109
-
110
-
111
-
112
-
113
-
114
-
115
-
116
-
117
-
118
-
119
-
120
-
121
-
122
-
123
-
124
-
125
-
126
-
127
-
128
-
129
-
130
-
131
-
132
 |
 |
