Samsung SCH-I545 User Manual Verizon Wireless Sch-i545 Galaxy S 4 English User - Page 19
Turning the Device On and Off, Smart Switch, Your Google Account, Your Samsung Account, Power/Lock - sync
 |
View all Samsung SCH-I545 manuals
Add to My Manuals
Save this manual to your list of manuals |
Page 19 highlights
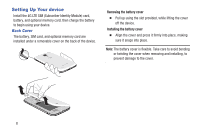
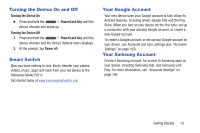
Turning the Device On and Off Turning the Device On Ⅲ Press and hold the Power/Lock Key until the device vibrates and starts up. Turning the Device Off 1. Press and hold the Power/Lock Key until the device vibrates and the Device Options menu displays. 2. At the prompt, tap Power off. Smart Switch Now you have nothing to lose. Easily transfer your photos, videos, music, apps and more from your old device to the Samsung Galaxy S® 4. Get started today at www.samsungsmartswitch.com Your Google Account Your new device uses your Google account to fully utilize its Android features, including Gmail, Google Talk and the Play Store. When you turn on your device for the first time, set up a connection with your existing Google account, or create a new Google account. To create a Google account, or set up your Google account on your device, use Accounts and sync settings (see "Accounts Settings" on page 165). Your Samsung Account Create a Samsung account, for access to Samsung apps on your device, including Samsung Hub, and Samsung Link Play. For more information, see "Accounts Settings" on page 165. Getting Started 13
-
 1
1 -
2
-
3
-
4
-
5
-
6
-
7
-
8
-
9
-
10
-
11
-
12
-
13
-
 14
14 -
 15
15 -
 16
16 -
 17
17 -
 18
18 -
 19
19 -
 20
20 -
 21
21 -
 22
22 -
 23
23 -
 24
24 -
25
-
26
-
27
-
28
-
29
-
30
-
31
-
32
-
33
-
34
-
35
-
36
-
37
-
38
-
39
-
40
-
41
-
42
-
43
-
44
-
45
-
46
-
47
-
48
-
49
-
50
-
51
-
52
-
53
-
54
-
55
-
56
-
57
-
58
-
59
-
60
-
61
-
62
-
63
-
64
-
65
-
66
-
67
-
68
-
69
-
70
-
71
-
72
-
73
-
74
-
75
-
76
-
77
-
78
-
79
-
80
-
81
-
82
-
83
-
84
-
85
-
86
-
87
-
88
-
89
-
90
-
91
-
92
-
93
-
94
-
95
-
96
-
97
-
98
-
99
-
100
-
101
-
102
-
103
-
104
-
105
-
106
-
107
-
108
-
109
-
110
-
111
-
112
-
113
-
114
-
115
-
116
-
117
-
118
-
119
-
120
-
121
-
122
-
123
-
124
-
125
-
126
-
127
-
128
-
129
-
130
-
131
-
132
-
133
-
134
-
135
-
136
-
137
-
138
-
139
-
140
-
141
-
142
-
143
-
144
-
145
-
146
-
147
-
148
-
149
-
150
-
151
-
152
-
153
-
154
-
155
-
156
-
157
-
158
-
159
-
160
-
161
-
162
-
163
-
164
-
165
-
166
-
167
-
168
-
169
-
170
-
171
-
172
-
173
-
174
-
175
-
176
-
177
-
178
-
179
-
180
-
181
-
182
-
183
-
184
-
185
-
186
-
187
-
188
-
189
-
190
-
191
-
192
-
193
-
194
-
195
-
196
-
197
-
198
-
199
-
200
-
201
-
202
-
203
-
204
-
205
-
206
-
207
-
208
-
209
-
210
-
211
-
212
-
213
-
214
-
215
-
216
-
217
-
218
-
219
-
220
-
221
-
222
-
223
 |
 |