Samsung SCX-5935NX Quick Guide Easy Manual Ver.1.0 (English) - Page 104
In the multi-purpose tray, Inside the machine, In exit area, Troubleshooting
 |
View all Samsung SCX-5935NX manuals
Add to My Manuals
Save this manual to your list of manuals |
Page 104 highlights
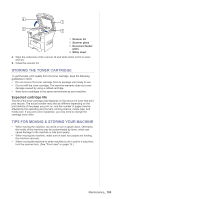
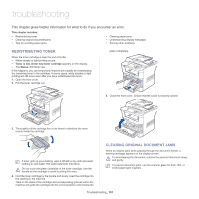
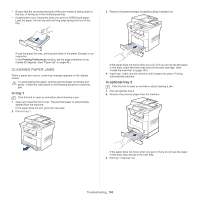
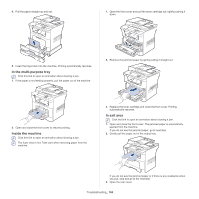
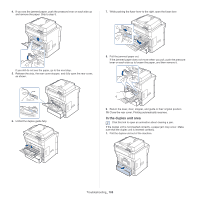
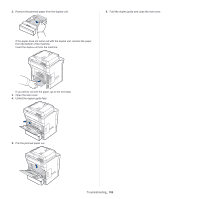
4. Pull the paper straight up and out. 1. Open the front cover and pull the toner cartridge out, lightly pushing it down. 5. Insert the trays back into the machine. Printing automatically resumes. In the multi-purpose tray Click this link to open an animation about clearing a jam. 1. If the paper is not feeding properly, pull the paper out of the machine. 2. Remove the jammed paper by gently pulling it straight out. 2. Open and close the front cover to resume printing. Inside the machine Click this link to open an animation about clearing a jam. The fuser area is hot. Take care when removing paper from the machine. 3. Replace the toner cartridge and close the front cover. Printing automatically resumes. In exit area Click this link to open an animation about clearing a jam. 1. Open and close the front cover. The jammed paper is automatically ejected from the machine. If you do not see the jammed paper, go to next step. 2. Gently pull the paper out of the output tray. If you do not see the jammed paper or if there is any resistance when you pull, stop and go to the next step. 3. Open the rear cover. Troubleshooting_ 104
-
 1
1 -
2
-
3
-
4
-
5
-
6
-
7
-
8
-
9
-
10
-
11
-
12
-
13
-
14
-
15
-
16
-
17
-
18
-
19
-
20
-
21
-
22
-
23
-
24
-
25
-
26
-
27
-
28
-
29
-
30
-
31
-
32
-
33
-
34
-
35
-
36
-
37
-
38
-
39
-
40
-
41
-
42
-
43
-
44
-
45
-
46
-
47
-
48
-
49
-
50
-
51
-
52
-
53
-
54
-
55
-
56
-
57
-
58
-
59
-
60
-
61
-
62
-
63
-
64
-
65
-
66
-
67
-
68
-
69
-
70
-
71
-
72
-
73
-
74
-
75
-
76
-
77
-
78
-
79
-
80
-
81
-
82
-
83
-
84
-
85
-
86
-
87
-
88
-
89
-
90
-
91
-
92
-
93
-
94
-
95
-
96
-
97
-
98
-
 99
99 -
 100
100 -
 101
101 -
 102
102 -
 103
103 -
 104
104 -
 105
105 -
 106
106 -
 107
107 -
 108
108 -
 109
109 -
110
-
111
-
112
-
113
-
114
-
115
-
116
-
117
-
118
-
119
-
120
-
121
-
122
-
123
-
124
-
125
-
126
-
127
-
128
-
129
-
130
-
131
-
132
-
133
 |
 |
