Samsung SCX-5935NX Quick Guide Easy Manual Ver.1.0 (English) - Page 95
Using SetIP Program, Installing the program, Printing out the machine's MAC address
 |
View all Samsung SCX-5935NX manuals
Add to My Manuals
Save this manual to your list of manuals |
Page 95 highlights
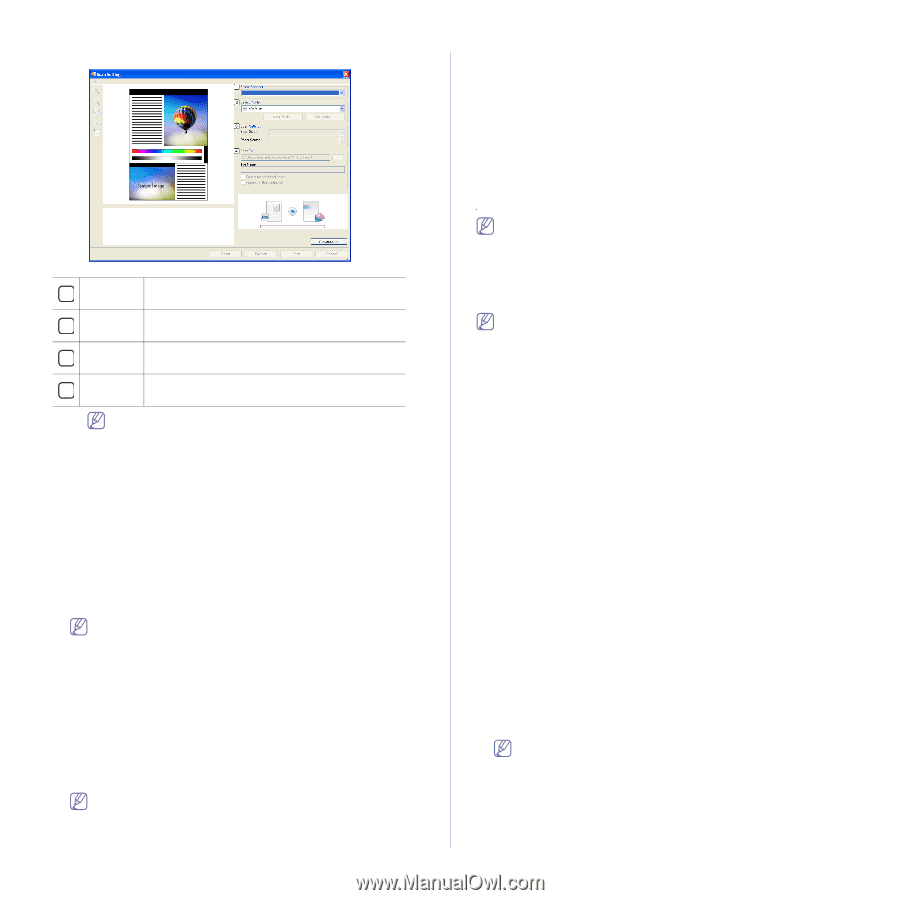
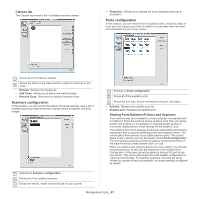
2. Scan Setting window opens. Select 1 Scanner Select 2 Profile Scan 3 Settings Scan To 4 Allows you to select between the Local or Network scanner. Allows you to save settings frequently used for future use. Click New Profile to save the setting. Allows you to customize settings for Scan Size and Paper Source. Allows you to customize settings for File Name and location to send scanned data. Click Advanced button to set more scan options. 3. Set scan settings and click Scan. For more information, click Help > SmarThru Office help. Send to FTP You can upload files to an FTP server while working on SmarThru Office. 1. Select File > Send to > Send By FTP. 2. Send By FTP window opens. 3. Add your file and click Upload. Email You can send email while working on SmarThru Office. You need an email client program, such as Outlook Express, to send email in SmarThru Office. Procedure for sending email may differ depending on email client program you are using. 1. Select File > Send to> Send By E-mail. 2. An email client opens. 3. Type in necessary information and send your email. Fax You can send emails while working on SmarThru Office. 1. Select File > Send to > Send By Fax. 2. Send Fax window opens. 3. Type in necessary information and click Send Fax. For more information about SmarThru Office, click Help > SmarThru Office help. The SmarThru Office Help window appears; you can view on screen help supplied on the SmarThru program. Follow the steps below to uninstall SmarThru Office. Before you begin the uninstall, ensure that all applications are closed on your computer. a) From the Start menu, select Programs or All Programs. b) Select SmarThru Office, and then select Uninstall SmarThru Office. c) When your computer asks you to confirm your selection, read the statement and click OK. d) Click Finish. USING SETIP PROGRAM Macintosh and Linux do not support this program. This program is for the network IP setting using the MAC address which is the hardware serial number of the network printer card or interface. It is especially for the network administrator to set several network IPs at the same time. You can only use the SetIP program when your machine is connected to a network. Installing the program 1. Insert the software CD provided with your machine. When the software CD runs automatically, close the window. 2. From the Start menu select My Computer and open the X drive. ( X represents your CD-ROM drive.) 3. Double click Application > SetIP. 4. Double-click Setup.exe to install this program. 5. Click OK. 6. If necessary, select a language from the drop-down list.. 7. Follow the instructions in the window to complete the installation. Printing out the machine's MAC address 1. Press Machine Setup on the control panel. 2. Press Machine Status > the Machine Info tab > Print/Report. 3. Press System Report. 4. Scroll down the list on the right and select Network Configuration Report. 5. Press Print Setting network values 1. Print the machine's Network Configuration Report to find your machine's MAC address. 2. From the Windows Start menu, select Programe or All Programs > Samsung Network Printer Utilities > SetIP > SetIP. 3. Click to open the TCP/IP configuration window. 4. Enter the network card's MAC address, IP address, subnet mask, default gateway, and then click Apply. When you enter the MAC address, enter it without a colon(:). 5. Click OK. The machine prints the network information. Confirm the settings are correct. 6. Click Exit. Management tools_ 95
-
 1
1 -
2
-
3
-
4
-
5
-
6
-
7
-
8
-
9
-
10
-
11
-
12
-
13
-
14
-
15
-
16
-
17
-
18
-
19
-
20
-
21
-
22
-
23
-
24
-
25
-
26
-
27
-
28
-
29
-
30
-
31
-
32
-
33
-
34
-
35
-
36
-
37
-
38
-
39
-
40
-
41
-
42
-
43
-
44
-
45
-
46
-
47
-
48
-
49
-
50
-
51
-
52
-
53
-
54
-
55
-
56
-
57
-
58
-
59
-
60
-
61
-
62
-
63
-
64
-
65
-
66
-
67
-
68
-
69
-
70
-
71
-
72
-
73
-
74
-
75
-
76
-
77
-
78
-
79
-
80
-
81
-
82
-
83
-
84
-
85
-
86
-
87
-
88
-
89
-
 90
90 -
 91
91 -
 92
92 -
 93
93 -
 94
94 -
 95
95 -
 96
96 -
 97
97 -
 98
98 -
 99
99 -
 100
100 -
101
-
102
-
103
-
104
-
105
-
106
-
107
-
108
-
109
-
110
-
111
-
112
-
113
-
114
-
115
-
116
-
117
-
118
-
119
-
120
-
121
-
122
-
123
-
124
-
125
-
126
-
127
-
128
-
129
-
130
-
131
-
132
-
133
 |
 |