Samsung SCX-5935NX Quick Guide Easy Manual Ver.1.0 (English) - Page 42
Setting the paper size and type, Using the output support, Machine Setup, Admin Setting, General
 |
View all Samsung SCX-5935NX manuals
Add to My Manuals
Save this manual to your list of manuals |
Page 42 highlights
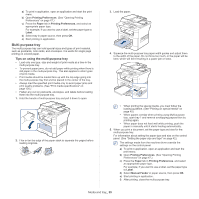
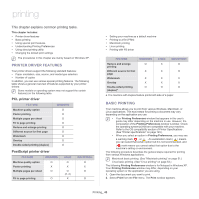
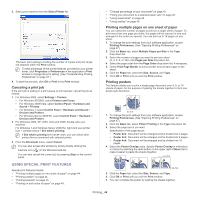
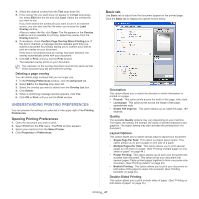
SETTING THE PAPER SIZE AND TYPE After loading paper in the paper tray, set the paper size and type using the control panel. These settings will apply to copy and fax modes. For computer printing, select the paper size and type in the application program you use on your computer. (See "Paper tab" on page 48.) The settings made from the machine driver override the settings on the control panel. 1. Press Machine Setup on the control panel. 2. Press Admin Setting. 3. When the login message appears, enter password with number keypad and press OK. (See "Setting the authentication password" on page 33.) 4. Press the General tab. 5. Press the down arrow to switch the screen, press Tray Management. 6. Select tray and its options such as paper size and type. 7. Press OK. If you want to use special-sized paper-such as a billing paper, select Custom in the Paper tab in the Printing Preferences. (See "Paper tab" on page 48.) USING THE OUTPUT SUPPORT The surface of the output tray may become hot if you print a large number of pages at once. Make sure that you do not touch the surface, and do not allow children near it. The printed pages stack on the output support, and the output support will help the printed pages to align. Pull out the output support and expand it. If paper coming out of the output try has problems, such as excessive curl, try printing to the rear cover. The rear cover can only hold one piece of paper at a time, do not let the papers stack on the rear cover. Media and tray_ 42
-
 1
1 -
2
-
3
-
4
-
5
-
6
-
7
-
8
-
9
-
10
-
11
-
12
-
13
-
14
-
15
-
16
-
17
-
18
-
19
-
20
-
21
-
22
-
23
-
24
-
25
-
26
-
27
-
28
-
29
-
30
-
31
-
32
-
33
-
34
-
35
-
36
-
 37
37 -
 38
38 -
 39
39 -
 40
40 -
 41
41 -
 42
42 -
 43
43 -
 44
44 -
 45
45 -
 46
46 -
 47
47 -
48
-
49
-
50
-
51
-
52
-
53
-
54
-
55
-
56
-
57
-
58
-
59
-
60
-
61
-
62
-
63
-
64
-
65
-
66
-
67
-
68
-
69
-
70
-
71
-
72
-
73
-
74
-
75
-
76
-
77
-
78
-
79
-
80
-
81
-
82
-
83
-
84
-
85
-
86
-
87
-
88
-
89
-
90
-
91
-
92
-
93
-
94
-
95
-
96
-
97
-
98
-
99
-
100
-
101
-
102
-
103
-
104
-
105
-
106
-
107
-
108
-
109
-
110
-
111
-
112
-
113
-
114
-
115
-
116
-
117
-
118
-
119
-
120
-
121
-
122
-
123
-
124
-
125
-
126
-
127
-
128
-
129
-
130
-
131
-
132
-
133
 |
 |