Samsung SCX-5935NX Quick Guide Easy Manual Ver.1.0 (English) - Page 86
OPTION, DESCRIPTION, First In, First Out
 |
View all Samsung SCX-5935NX manuals
Add to My Manuals
Save this manual to your list of manuals |
Page 86 highlights
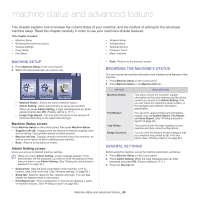
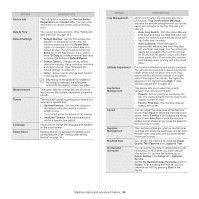
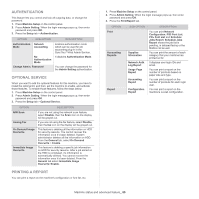
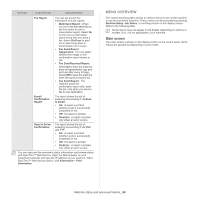
OPTION Device Info Date & Time Default Settings Measurements Timers Language Power Saver DESCRIPTION The sub-options available are Service Center Registration and Contact Info. You may enter information on service center and purchasing point. You can set the date and time. (See "Setting the date and time" on page 33.) • Default Window: Set the first window that appears on the display screen after the machine wakes up from the Power Save mode. For example, if you select Fax as a default window, the first window will be the Basic tab of the Fax feature. If you want to show ID Copy as a default window, you need to enable this feature in Default Option. • Default Option: Changes all the default values for copying, faxing, emailing, scanning and paper at once. (See "Changing the default settings" on page 34.) • Home: Allows user to arrange each function in the display screen. Depending on the optional kit installed or the category selected, the selectable options on the display screen may differ. This option lets you change the unit of (mm or inch) and set the numeric separation (comma or period). The machine cancels a printing job if data is not received in specific time. • System Timeout: The machine returns to the default value after waiting a certain length of time. You can set a time for maximum 10 minutes. • Held Job Timeout: The machine holds a job for a specific time period. Allows you to change the language that appears on the touch screen. Reduce energy consumption by setting power saving features. (See "Using power saving feature" on page 34.) OPTION Tray Management Altitude Adjustment Contention Management Sound Supplies Management Machine Test On Demand Overwrite DESCRIPTION Allows you to select the tray and paper for a printing job. Tray Confirmation Message activates the window asking whether you set the paper size and type for the tray that was just opened. • Auto Tray Switch: With this option On and both tray1 and tray2 are filled with letter size paper, the machine automatically prints from tray2 after tray1 is empty. • Auto Continue: When the paper is mismatched, meaning that tray1 has filled with the letter size paper, but the printing job needs A4 size paper, the machine will wait for 30 seconds for paper in tray1 with proper sized paper. After 30 seconds, the machine automatically starts printing with letter-sized paper. Print quality is affected by atmospheric pressure. The atmospheric pressure is determined by the height of the machine above sea level. This feature lets you adjust the altitude in a height district. The higher the altitude, the higher the adjustment, the highest being High 1. (See "Altitude adjustment" on page 33.) This feature lets you to select the priority between copy jobs and print jobs. • Priority: Set the priority by numbering the job. The machine starts from the least to the highest number in order. • First In, First Out: The machine does an asked job in order. You can adjust the noise level of the machine sound. Press Fault to adjust the machine's error sound. Select Conflict if you pressed the wrong option. Press Selection to have the machine make a sound whenever you press the selection from your touch screen. The machine notifies you when to reorder toner cartridge and resets the used fuser counter, bias transfer roller, feed roller and document feeder friction pad counter. You can test the machine by using the Image Quality Test Patterns and Loopback Test. You can set the machine to delete previous job information on HDD when you store new job information. To activate this feature, go to Admin Setting > the Setup tab > Optional Service. Set the On Demand Image Overwrite option to Enable. After activating this feature, you can overwrite an HDD by pressing Start in the display. Machine status and advanced feature_ 86
-
 1
1 -
2
-
3
-
4
-
5
-
6
-
7
-
8
-
9
-
10
-
11
-
12
-
13
-
14
-
15
-
16
-
17
-
18
-
19
-
20
-
21
-
22
-
23
-
24
-
25
-
26
-
27
-
28
-
29
-
30
-
31
-
32
-
33
-
34
-
35
-
36
-
37
-
38
-
39
-
40
-
41
-
42
-
43
-
44
-
45
-
46
-
47
-
48
-
49
-
50
-
51
-
52
-
53
-
54
-
55
-
56
-
57
-
58
-
59
-
60
-
61
-
62
-
63
-
64
-
65
-
66
-
67
-
68
-
69
-
70
-
71
-
72
-
73
-
74
-
75
-
76
-
77
-
78
-
79
-
80
-
 81
81 -
 82
82 -
 83
83 -
 84
84 -
 85
85 -
 86
86 -
 87
87 -
 88
88 -
 89
89 -
 90
90 -
 91
91 -
92
-
93
-
94
-
95
-
96
-
97
-
98
-
99
-
100
-
101
-
102
-
103
-
104
-
105
-
106
-
107
-
108
-
109
-
110
-
111
-
112
-
113
-
114
-
115
-
116
-
117
-
118
-
119
-
120
-
121
-
122
-
123
-
124
-
125
-
126
-
127
-
128
-
129
-
130
-
131
-
132
-
133
 |
 |
