Samsung SCX-5935NX Quick Guide Easy Manual Ver.1.0 (English) - Page 77
Resolution, Original Size, Color Mode, Erase Background, Darkness, Scan to Edge, Quality, File Format
 |
View all Samsung SCX-5935NX manuals
Add to My Manuals
Save this manual to your list of manuals |
Page 77 highlights
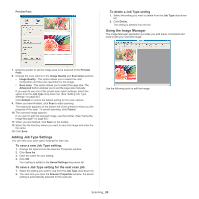
Resolution You can adjust document resolution. Press Scan > Scan to Email (or Scan to PC or Scan to Server) > the Basic tab > Resolution. Use left/right arrows to toggle the values. The higher value you select, clearer the result. But the scanning time may take longer. 100 dpi, 200 dpi and 300 dpi resolution are available only when Color Mode is set to Color or Gray. FEATURE Scan to Email Scan to PC Scan to Server RESOLUTION (DPI) FILE FORMAT 100, 200, 300, 400, 600 100, 200, 300, 400, 600 100, 200, 300, 400, 600 PDF, Single-Page TIFF, Multi-Page TIFF, JPEG PDF, TIFF, JPEG PDF, Single-Page TIFF, Multi-Page TIFF, JPEG Original Size You can specify the scanning area on the originals by selecting the pre-defined size, putting in the margin value or Auto. If you set this option to Auto, the machine senses and determines the size of the original. From the main screen, press Scan > Scan to Email (or Scan to PC or Scan to Server) > the Advanced tab > Original Size. Use up/down arrows to go to the next screen. Select the appropriate option and press OK. Original Type You can set the original document type in order to enhance the quality of a document being scanned. Press Scan > Scan to Email (or Scan to PC or Scan to Server) > the Image tab > Original Type. Select the appropriate option and press OK. • Text: For originals that have text or line art. • Text/Photo: For originals that have both text and photographs together. • Photo: For originals that are continuous tone photographs. Color Mode Use this option to scan the original in Mono, Gray or Color Mode. Press Scan > Scan to Email (or Scan to PC or Scan to Server) > the Image tab > Color. Select the appropriate option and press OK. • Color: Displays an image in color. 24 bits per pixel. • Gray: Displays an image in gray. 8 bits per pixel. • Mono: Displays an image in black and white. 1 bit per pixel. The file format JPEG cannot be selected in the File Format option, if Mono has been selected for Color Mode. Erase Background You can lighten, reduce or deletes the dark background from scanning colored paper or newspaper originals. Press Scan > Scan to Email (or Scan to PC or Scan to Server) > the Image tab > Erase Background. Select On and press OK. • Off: Sets this option off. • Auto: Automatically adjusts background brightness. • Enhance: Darkens the background. Use left/right arrows to toggle the values. • Erase: Lightens the background. Use left/right arrows to toggle the values. Darkness You can select the degree of darkness of the scanned output. If your original document is light or faded, press the right arrow to make the output darker. Press Scan > Scan to Email (or Scan to PC or Scan to Server) > the Image tab > Darkness. Press right arrow to enhance the darkness degree , then press OK. Erase Background You can lighten, reduce or delete the dark background from scanning colored paper or newspaper originals. Press Scan > Scan to Email (or Scan to PC or Scan to Server) > the Image tab > Erase Background. Select the appropriate option and press OK. • Off: Sets this option off. • Auto: Automatically adjusts background brightness. • Enhance: Darkens the background. Use left/right arrows to toggle the values. The higher the number is, the more vivid the background is. • Erase: Lightens the background. Use left/right arrows to toggle the values. The higher the number is, the lighter the background is. Scan to Edge You can set the machine to scan full size of a page as it is. Usually, the machine scans a page except edges, which means the margin, especially when you do the copy job with certain sized paper in the tray. But if you scan and sent it right away via the network, as the file, the machine does not need to exclude the edges from the originals. Press Scan > Scan to Email (or Scan to PC or Scan to Server) > the Image tab > Scan to Edge. Select On and press OK. Quality You can use this option to produce a high quality document. The higher the quality you select, the larger the file size. Press Scan > Scan to Email (or Scan to PC or Scan to Server) > the Output tab > Quality. When you set Color Mode to Mono, the Quality option is grayed out. File Format You can select the file format before you proceed with the scanning job. Press Scan > Scan to Email (or Scan to PC or Scan to Server) > the Output tab > File Format. • PDF: Scans originals in PDF format. • Single-Page TIFF: Scans originals in TIFF (Tagged Image File Format), but several originals are scanned as one file. • Multi-Page TIFF: Scans the originals in TIFF (Tagged Image File Format), and several originals are scanned as several file. Scanning_ 77
-
 1
1 -
2
-
3
-
4
-
5
-
6
-
7
-
8
-
9
-
10
-
11
-
12
-
13
-
14
-
15
-
16
-
17
-
18
-
19
-
20
-
21
-
22
-
23
-
24
-
25
-
26
-
27
-
28
-
29
-
30
-
31
-
32
-
33
-
34
-
35
-
36
-
37
-
38
-
39
-
40
-
41
-
42
-
43
-
44
-
45
-
46
-
47
-
48
-
49
-
50
-
51
-
52
-
53
-
54
-
55
-
56
-
57
-
58
-
59
-
60
-
61
-
62
-
63
-
64
-
65
-
66
-
67
-
68
-
69
-
70
-
71
-
 72
72 -
 73
73 -
 74
74 -
 75
75 -
 76
76 -
 77
77 -
 78
78 -
 79
79 -
 80
80 -
 81
81 -
 82
82 -
83
-
84
-
85
-
86
-
87
-
88
-
89
-
90
-
91
-
92
-
93
-
94
-
95
-
96
-
97
-
98
-
99
-
100
-
101
-
102
-
103
-
104
-
105
-
106
-
107
-
108
-
109
-
110
-
111
-
112
-
113
-
114
-
115
-
116
-
117
-
118
-
119
-
120
-
121
-
122
-
123
-
124
-
125
-
126
-
127
-
128
-
129
-
130
-
131
-
132
-
133
 |
 |
