Samsung SCX-5935NX Quick Guide Easy Manual Ver.1.0 (English) - Page 62
Faxing, Preparing to fax, Understanding the fax screen
 |
View all Samsung SCX-5935NX manuals
Add to My Manuals
Save this manual to your list of manuals |
Page 62 highlights
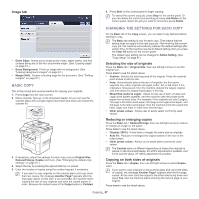
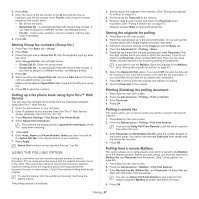
faxing 14. This chapter gives you information about using your machine as a fax machine. This chapter includes: • Preparing to fax • Understanding the fax screen • Sending a fax • Receiving a fax • Adjusting the document settings • Setting up a fax phone book • Using the polling option • Using mailbox • Printing a report after sending a fax • Sending a fax in toll save time • Forwarding a fax to other destination • Setting up the fax ending tone • We recommend you to use traditional analog phone services (PSTN: public switched telephone network) when connecting telephone lines to use Fax. If you use other Internet services (DSL, ISDN, VolP), you can improve the connection quality by using the Micro-filter. The Micro-filter eliminates unnecessary noise signals and improves connection quality or Internet quality. Since the DSL Micro-filter is not provided with the machine, contact your Internet Service provider for use on DSL Micro-filter. UNDERSTANDING THE FAX SCREEN To use the fax feature, press Fax on the main screen. If the screen displays an other menu, press to go to the main screen. 1 Line port 2 Micro filter 3 DSL modem / Telephone line • To use advanced features of the fax, press Machine Setup on the control panel and Admin Setting > Setup > Fax Setup. (See "Fax Setup" on page 87.) PREPARING TO FAX Before you send or receive a fax, you need to connect the supplied line cord to the wall jack. Refer to the Quick Install Guide how to make a connection. The method of making a telephone connection is varies from one country to another. Basic tab • Fax number input area: Shows the recipient's fax number using the number keypad on the control panel. If you configured the phone book, press Individual or Group. (See "Setting up a fax phone book" on page 66.) • Add No: Lets you add more destinations.: • : Deletes the last digit entered. Faxing_ 62
-
 1
1 -
2
-
3
-
4
-
5
-
6
-
7
-
8
-
9
-
10
-
11
-
12
-
13
-
14
-
15
-
16
-
17
-
18
-
19
-
20
-
21
-
22
-
23
-
24
-
25
-
26
-
27
-
28
-
29
-
30
-
31
-
32
-
33
-
34
-
35
-
36
-
37
-
38
-
39
-
40
-
41
-
42
-
43
-
44
-
45
-
46
-
47
-
48
-
49
-
50
-
51
-
52
-
53
-
54
-
55
-
56
-
 57
57 -
 58
58 -
 59
59 -
 60
60 -
 61
61 -
 62
62 -
 63
63 -
 64
64 -
 65
65 -
 66
66 -
 67
67 -
68
-
69
-
70
-
71
-
72
-
73
-
74
-
75
-
76
-
77
-
78
-
79
-
80
-
81
-
82
-
83
-
84
-
85
-
86
-
87
-
88
-
89
-
90
-
91
-
92
-
93
-
94
-
95
-
96
-
97
-
98
-
99
-
100
-
101
-
102
-
103
-
104
-
105
-
106
-
107
-
108
-
109
-
110
-
111
-
112
-
113
-
114
-
115
-
116
-
117
-
118
-
119
-
120
-
121
-
122
-
123
-
124
-
125
-
126
-
127
-
128
-
129
-
130
-
131
-
132
-
133
 |
 |
