Samsung SCX-5935NX Quick Guide Easy Manual Ver.1.0 (English) - Page 98
Maintenance, Printing a machine report, Monitoring the supplies life, Finding the serial number
 |
View all Samsung SCX-5935NX manuals
Add to My Manuals
Save this manual to your list of manuals |
Page 98 highlights
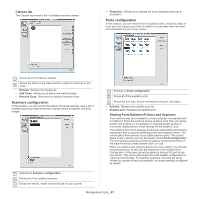
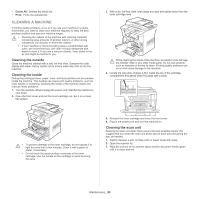
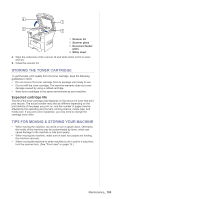
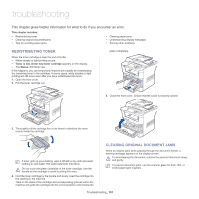
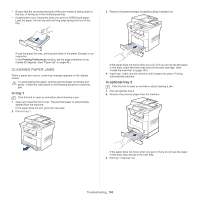
maintenance 19. This chapter provides information for maintaining your machine and the toner cartridge. This chapter includes: • Printing a machine report • Monitoring the supplies life • Finding the serial number • Clearing fax memory • Sending the toner reorder notification • Checking Stored Documents • Cleaning a machine • Storing the toner cartridge • Tips for moving & storing your machine PRINTING A MACHINE REPORT You can print the machine's information and job report. 1. Press Machine Setup on the control panel. 2. Press Machine Status > the Machine Info tab > Print/Report. 3. Select the report type, then the right side of the screen shows the list to print. 4. Select the list to print. 5. Press Print. • If you want to print the machine's network information or font list, press Machine Setup > Admin Setting > the Print/Report tab > Report. If you select the Configuration Report, press Print to print the report. The Fax Report, E-mail Confirmation Report, and Scan to Server Confirmation options do not provide the print, these are only for report setup. • You can use SyncThru™ Web Service to print the machine's configuration or browse the status. Open the web browser in the networked computer and type the machine's IP address. When SyncThru™ Web Service opens, click Information > Print Information. MONITORING THE SUPPLIES LIFE To view the supply life indicators, follow the steps below: 1. Press Machine Setup on the control panel. 2. Press Machine Status. 3. Check the used count of each supply item. FINDING THE SERIAL NUMBER To check your serial number from the screen, follow the steps below: 1. Press Machine Setup on the control panel. 2. Press Machine Status > the Machine Info tab > Machine Details. CLEARING FAX MEMORY You can erase fax memory. There are two ways to erasing fax memory, follow the steps below: If you are clearing fax memory without printing a fax job, you are erasing it without checking the content. Be careful not to an erase important document. Clearing fax memory by printing a fax job Print received fax job. Fax memory will automatically be erased. Clearing fax memory without printing a fax job From the Job Status > Current Job tab in the fax's main LCD. • To erase all the jobs on the list, click Delete All. This option erases all the jobs in the memory, be careful not to erase jobs other than a fax job. • To erase only fax jobs on the list, select fax jobs with in the Job Type list and click Delete. SENDING THE TONER REORDER NOTIFICATION To set the machine to alert when the toner level is low and needs to be reordered, do the following: 1. Press Machine Setup on the control panel. 2. Press Admin Setting. When the login message pops up, enter the password and press OK. 3. Press the General tab > Supplies Management > Toner Cartridge Reorder Notification. 4. Press Toner Reorder at Life Remaining and select a percentage. 5. Press OK. CHECKING STORED DOCUMENTS The machine shows the document list of the print or fax job. Press Stored Documents on the main screen. If the screen displays another menu, press ( ) to go to the main screen. • Public tab: Shows the job list of delay print and store print job. • Secured tab: Shows the job list of secure print, secure receive, and secure store print job. • User Name: Shows the user name who registered the job. • File Name: Shows the job name, which is registered as the job information. For computer printing, the file name shows. • Date: Shows the date the job was registered. • Page: Shows the total page number of the job. • Detail: A separate message appears showing the basic job information with file size, paper size and paper type. • Edit: Lets you modify the file name. • Delete: Deletes the selected list. Maintenance_ 98
-
 1
1 -
2
-
3
-
4
-
5
-
6
-
7
-
8
-
9
-
10
-
11
-
12
-
13
-
14
-
15
-
16
-
17
-
18
-
19
-
20
-
21
-
22
-
23
-
24
-
25
-
26
-
27
-
28
-
29
-
30
-
31
-
32
-
33
-
34
-
35
-
36
-
37
-
38
-
39
-
40
-
41
-
42
-
43
-
44
-
45
-
46
-
47
-
48
-
49
-
50
-
51
-
52
-
53
-
54
-
55
-
56
-
57
-
58
-
59
-
60
-
61
-
62
-
63
-
64
-
65
-
66
-
67
-
68
-
69
-
70
-
71
-
72
-
73
-
74
-
75
-
76
-
77
-
78
-
79
-
80
-
81
-
82
-
83
-
84
-
85
-
86
-
87
-
88
-
89
-
90
-
91
-
92
-
 93
93 -
 94
94 -
 95
95 -
 96
96 -
 97
97 -
 98
98 -
 99
99 -
 100
100 -
 101
101 -
 102
102 -
 103
103 -
104
-
105
-
106
-
107
-
108
-
109
-
110
-
111
-
112
-
113
-
114
-
115
-
116
-
117
-
118
-
119
-
120
-
121
-
122
-
123
-
124
-
125
-
126
-
127
-
128
-
129
-
130
-
131
-
132
-
133
 |
 |