Samsung SCX-5935NX Quick Guide Easy Manual Ver.1.0 (English) - Page 119
Replacing the toner cartridge, Necessary precautions to take when installing accessories, PARTS
 |
View all Samsung SCX-5935NX manuals
Add to My Manuals
Save this manual to your list of manuals |
Page 119 highlights
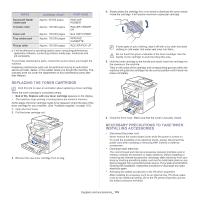
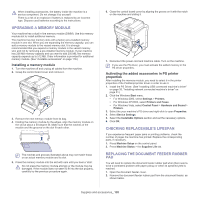
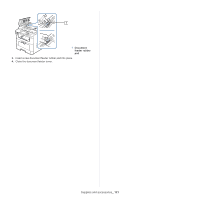
PARTS AVERAGE YIELDA PART NAME Document feeder rubber pad Transfer roller Fuser unit Tray rubber pad Pickup roller Approx. 50,000 pages Approx. 100,000 pages Approx. 100,000 pages Approx. 100,000 pages Approx. 150,000 pages RMO ADF RUBBER ROLLER-TRANSF ER ELA UNIT-FUSER RPR-PAD CASSETTE ROLLER-PICK UP a. It will be affected by operating system used, computing performance, application software, connecting method, media type, media size and job complexity. To purchase maintenance parts, contact the source where you bought the machine. Replacing maintenance parts can be performed only by an authorized service provider, dealer, or the retailer where you bought the machine. The warranty does not cover the replacement of any maintenance parts after their lifespan. REPLACING THE TONER CARTRIDGE Click this link to open an animation about replacing a toner cartridge. When the toner cartridge is completely empty: • End of life, Replace with new toner cartridge appears on the display. • The machine stops printing. Incoming faxes are saved in memory. At this stage, the toner cartridge needs to be replaced. Check the type of the toner cartridge for your machine. (See "Available supplies" on page 118.) 1. Open the front cover. 2. Pull the toner cartridge out. 3. Remove the new toner cartridge from its bag. 4. Slowly shake the cartridge five or six times to distribute the toner evenly inside the cartridge. It will assure maximum copies per cartridge. If toner gets on your clothing, wipe it off with a dry cloth and wash clothing in cold water. Hot water sets toner into fabric. Do not touch the green underside of the toner cartridge. Use the handle on the cartridge to avoid touching this area. 5. Hold the toner cartridge by the handle and slowly insert the cartridge into the opening in the machine. Tabs on the sides of the cartridge and corresponding grooves within the machine will guide the cartridge into the correct position until it locks into place completely. 6. Close the front cover. Make sure that the cover is securely closed. NECESSARY PRECAUTIONS TO TAKE WHEN INSTALLING ACCESSORIES • Disconnect the power cord. Never remove the control board cover while the power is turned on. To avoid the possibility of an electrical shock, always disconnect the power cord when installing or removing ANY internal or external accessories. • Discharge static electricity. The control board and internal accessories (network interface card or memory module) are sensitive to static electricity. Before installing or removing any internal accessories, discharge static electricity from your body by touching something metal, such as the metal back plate on any device plugged into a grounded power source. If you walk around before finishing the installation, repeat this procedure to discharge any static electricity again. • Activating the added accessories in the PS driver properties. After installing an accessory such as an optional tray, PS driver users must do the additional setting. Go to the PS printer properties and set the added accesorry activated. Supplies and accessories_ 119
-
 1
1 -
2
-
3
-
4
-
5
-
6
-
7
-
8
-
9
-
10
-
11
-
12
-
13
-
14
-
15
-
16
-
17
-
18
-
19
-
20
-
21
-
22
-
23
-
24
-
25
-
26
-
27
-
28
-
29
-
30
-
31
-
32
-
33
-
34
-
35
-
36
-
37
-
38
-
39
-
40
-
41
-
42
-
43
-
44
-
45
-
46
-
47
-
48
-
49
-
50
-
51
-
52
-
53
-
54
-
55
-
56
-
57
-
58
-
59
-
60
-
61
-
62
-
63
-
64
-
65
-
66
-
67
-
68
-
69
-
70
-
71
-
72
-
73
-
74
-
75
-
76
-
77
-
78
-
79
-
80
-
81
-
82
-
83
-
84
-
85
-
86
-
87
-
88
-
89
-
90
-
91
-
92
-
93
-
94
-
95
-
96
-
97
-
98
-
99
-
100
-
101
-
102
-
103
-
104
-
105
-
106
-
107
-
108
-
109
-
110
-
111
-
112
-
113
-
 114
114 -
 115
115 -
 116
116 -
 117
117 -
 118
118 -
 119
119 -
 120
120 -
 121
121 -
 122
122 -
 123
123 -
 124
124 -
125
-
126
-
127
-
128
-
129
-
130
-
131
-
132
-
133
 |
 |
