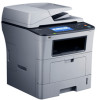
Samsung SCX-5935NX Quick Guide Easy Manual Ver.1.0 (English) - Page 29
Macintosh, Setting up a client computer
 |
View all Samsung SCX-5935NX manuals
Add to My Manuals
Save this manual to your list of manuals |
Page 29 highlights
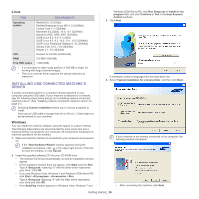
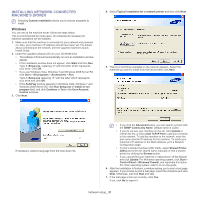
Setting up a client computer 1. Install your printer driver. (See "Installing USB connected machine's driver" on page 26 , "Installing network connected machine's driver" on page 31.) 2. Click the Windows Start menu. 3. Select All programs > Accessories > Window Explorer. 4. Enter in IP address of the host computer and press Enter in your keyboard. In case host computer requires User name and Password, fill in User ID and password of the host computer account. 5. Right click the printer icon you want to share and select Connect. 6. If a set up complete message appears, click OK. 7. Open the file you want to print and start printing. Macintosh The following steps are for Mac OS X 10.5~10.6. Refer to Mac Help for other OS versions. Setting up a host computer 1. Install your printer driver. (See "Installing USB connected machine's driver" on page 26 , "Installing network connected machine's driver" on page 31.) 2. Open the Applications folder > System Preferences and click Print & Fax. 3. Select the printer to share in the Printers list. 4. Select "Share this printer". Setting up a client computer 1. Install your printer driver. (See "Installing USB connected machine's driver" on page 26 , "Installing network connected machine's driver" on page 31.) 2. Open the Applications folder > System Preferences and click Print & Fax. 3. Press the "+" icon. A display window showing the name of your shared printer appears. 4. Select your machine and click Add. Getting started_ 29
-
 1
1 -
2
-
3
-
4
-
5
-
6
-
7
-
8
-
9
-
10
-
11
-
12
-
13
-
14
-
15
-
16
-
17
-
18
-
19
-
20
-
21
-
22
-
23
-
 24
24 -
 25
25 -
 26
26 -
 27
27 -
 28
28 -
 29
29 -
 30
30 -
 31
31 -
 32
32 -
 33
33 -
 34
34 -
35
-
36
-
37
-
38
-
39
-
40
-
41
-
42
-
43
-
44
-
45
-
46
-
47
-
48
-
49
-
50
-
51
-
52
-
53
-
54
-
55
-
56
-
57
-
58
-
59
-
60
-
61
-
62
-
63
-
64
-
65
-
66
-
67
-
68
-
69
-
70
-
71
-
72
-
73
-
74
-
75
-
76
-
77
-
78
-
79
-
80
-
81
-
82
-
83
-
84
-
85
-
86
-
87
-
88
-
89
-
90
-
91
-
92
-
93
-
94
-
95
-
96
-
97
-
98
-
99
-
100
-
101
-
102
-
103
-
104
-
105
-
106
-
107
-
108
-
109
-
110
-
111
-
112
-
113
-
114
-
115
-
116
-
117
-
118
-
119
-
120
-
121
-
122
-
123
-
124
-
125
-
126
-
127
-
128
-
129
-
130
-
131
-
132
-
133
 |
 |