Samsung SCX-5935NX Quick Guide Easy Manual Ver.1.0 (English) - Page 79
Linux Scanning, Scanning with network, Scanning
 |
View all Samsung SCX-5935NX manuals
Add to My Manuals
Save this manual to your list of manuals |
Page 79 highlights
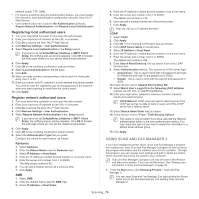
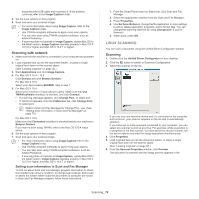
disconnect the USB cable and reconnect it. If the problem continues,refer to the Image Capture's help. 4. Set the scan options on this program. 5. Scan and save your scanned image. • For more information about using Image Capture, refer to the Image Capture's help. • Use TWAIN-compliant softwares to apply more scan options. • You can also scan using TWAIN-compliant software, such as Adobe Photoshop. • If scanning does not operate in Image Capture, update Mac OS to the latest version. Image Capture operates properly in Mac OS X 10.3.9 or higher and Mac OS X 10.4.7 or higher. Scanning with network 1. Make sure that the machine is connected to your computer and powered on. 2. Load originals face up into the document feeder , or place a single original face down on the scanner glass. (See "Loading originals" on page 36.) 3. Start Applications and click Image Capture. 4. For Mac OS X 10.4 ~ 10.5 Click Devices and click Browse Devices. For Mac OS X 10.6 Select your device below SHARED. Skip to step 7. 5. For Mac OS X 10.4: Select your machine in Twain devices option. Make sure that Use TWAIN software checkbox is checked, and click Connect. • If a warning message appears, click Change Port.. to select port. • If TWAIN UI appears, from the Preference tab, click Change Port.. to select port. Refer to Scan and Fax Manager for Change Port.. use. (See "Setting scan information in Scan and Fax Manager" on page 79.) For Mac OS X 10.5: Make sure that Connected checkbox is checked beside your machine in Bonjour Devices. If you want to scan using TWAIN, refer to the Mac OS X10.4 steps above. 6. Set the scan options on this program. 7. Scan and save your scanned image. • For more information about using Image Capture,refer to the Image Capture's help. • Use TWAIN-compliant softwares to apply more scan options. • You can also scan using TWAIN-compliant softwares, such as Adobe Photoshop. • If scanning does not operate in Image Capture, update Mac OS to the latest version. Image Capture operates properly in Mac OS X 10.3.9 or higher and Mac OS X 10.4.7 or higher. Setting scan information in Scan and Fax Manager To find out about Scan and Fax Manager program information, to check the installed scan driver's condition, to change scan settings. and to add or delete the folders where scanned documents to computer are saved in Scan and Fax Manager program, follow these instructions: 1. From the Smart Panel menu on Status bar, click Scan and Fax Manager. 2. Select the appropriate machine from the Scan and Fax Manager . 3. Press Properties. 4. Use Set Scan Button to change the file destination or scan settings, to add or delete application programs, and to format files. You can change the scanning machine by using Change port. (Local or Network) 5. When done, press OK. LINUX SCANNING You can scan a document using the Unified Driver Configurator window. Scanning 1. Double-click the Unified Driver Configurator on your desktop. 2. Click the button to switch to Scanners Configuration. 3. Select the scanner on the list. If you use only one machine device and it is connected to the computer and turned on, your scanner appears on the list and is automatically selected. If you have two or more scanners connected to your computer, you can select any scanner to work at any time. For example, while acquisition is in progress on the first scanner, you may select the second scanner, set the device options and start the image acquisition simultaneously. 4. Click Properties. 5. Load originals face up into the document feeder, or place a single original face down on the scanner glass. (See "Loading originals" on page 36.) 6. From the Scanner Properties window, click Preview. The document is scanned and the image preview appears in the Scanning_ 79
-
 1
1 -
2
-
3
-
4
-
5
-
6
-
7
-
8
-
9
-
10
-
11
-
12
-
13
-
14
-
15
-
16
-
17
-
18
-
19
-
20
-
21
-
22
-
23
-
24
-
25
-
26
-
27
-
28
-
29
-
30
-
31
-
32
-
33
-
34
-
35
-
36
-
37
-
38
-
39
-
40
-
41
-
42
-
43
-
44
-
45
-
46
-
47
-
48
-
49
-
50
-
51
-
52
-
53
-
54
-
55
-
56
-
57
-
58
-
59
-
60
-
61
-
62
-
63
-
64
-
65
-
66
-
67
-
68
-
69
-
70
-
71
-
72
-
73
-
 74
74 -
 75
75 -
 76
76 -
 77
77 -
 78
78 -
 79
79 -
 80
80 -
 81
81 -
 82
82 -
 83
83 -
 84
84 -
85
-
86
-
87
-
88
-
89
-
90
-
91
-
92
-
93
-
94
-
95
-
96
-
97
-
98
-
99
-
100
-
101
-
102
-
103
-
104
-
105
-
106
-
107
-
108
-
109
-
110
-
111
-
112
-
113
-
114
-
115
-
116
-
117
-
118
-
119
-
120
-
121
-
122
-
123
-
124
-
125
-
126
-
127
-
128
-
129
-
130
-
131
-
132
-
133
 |
 |