Samsung SCX-5935NX Quick Guide Easy Manual Ver.1.0 (English) - Page 73
Scanning originals and sending to your computer (Scan to PC), Storing email addresses
 |
View all Samsung SCX-5935NX manuals
Add to My Manuals
Save this manual to your list of manuals |
Page 73 highlights
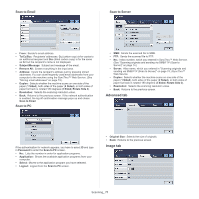
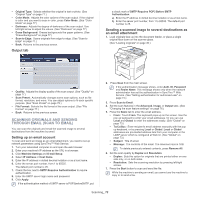
Storing email addresses There are two kinds of email addresses - Local on your machine's memory and Global on the LDAP server - which differ depending on where they are stored. Local means email addresses are stored in the machine's memory, and Global means email addresses are stored in a specified (LDAP) server. Through the SyncThru™ Web Service, you can easily enter and store email addresses from your computer. Storing on your local machine This method means that you store email addresses on your machine's memory. You can add addresses, as well as group them in particular catagories. Individual 1. Turn your networked computer on and open the web browser. 2. Enter your machine's IP address as the URL in a browser. 3. Click Go to access the SyncThru™ Web Service. 4. Click Machine Settings > E-mail Setup > Individual Address Book. The screen shows Individual Address Book on the right side of the screen. 5. Click Add. 6. When the Add E-Mail screen appears, select the Index number, enter User Name and E-mail Address. 7. Click Apply. 8. To check if the emails are correctly stored and listed on your machine, press Local and select Individual using the left/rigt arrow. 9. Press the first alphabet of the address you are looking for. Or press Search to type in the full email address and press OK. When the search is completed, screen displays the search results. Group 1. Access to the SyncThru™ Web Service from your computer. 2. Make sure you have configured Individual Address Book. 3. Click Machine Settings > E-mail Setup > Group Address Book. Then the screen shows Group Address Book on the right side. 4. Click Add. 5. Select the Group number and enter Group Name. 6. Select email addresses by clicking the check boxes. 7. Click Apply. 8. To check if the emails are correctly stored and listed on your machine, press Local and select Group using the left/rigt arrow. 9. Press the first alphabet of the address you are looking for. Or press Search to type in the full email address and press OK. When the search is completed, screen displays the search results. Global Email addresses stored in Global in your machine are processed by the LDAP server. 1. Turn your networked computer on and open the web browser. 2. Enter your machine's IP address as the URL in a browser. 3. Click Go to access the SyncThru™ Web Service. 4. Click Machine Settings > LDAP Server Setup. Then the LDAP Server screen shows on the right side. 5. Select IP Address or Host Name and enter LDAP server and Port. 6. Enter optional information. 7. Click Apply. The LDAP server administrator must store the email address data. The method of storing varies depending on the server and the operating systems. Entering email addresses by the address book Once you have stored the frequently used addresses into the address book, you can enter email addresses singly, as follows: 1. Press Local or Global from the Basic tab of Scan to Email. 2. Press the first alphabet of the address you are looking for. Or press Search to type in the full email address and press OK. When the search is completed, screen displays the search results. 3. Press From and select the email address you want from the email list and press Apply. Do the same to enter To, Cc or Bcc. 4. Press OK. Entering email addresses by the keyboard When you press the input field for From, To, Cc, or Message, the keyboard shows on the display screen. The following procedure is an example of entering "[email protected]". 1. Press From in the Basic tab of the Scan to Email. 2. Press a, b, c, d, e, f, g. 3. Press @. 4. Press a, b, c. 5. Press. and press c, o, m. To enter contents in other fields, press left/right arrow on the upper left of the keyboard. 6. Press OK after entering all the contents. SCANNING ORIGINALS AND SENDING TO YOUR COMPUTER (SCAN TO PC) You can scan an image on the machine via the Scan and Fax Manager 2 program that is installed in your networked computer. For USB connected machine This is a basic scanning method for usb connected machine. 1. Make sure that the machine is connected to your computer and powered on. 2. Load originals face up into the document feeder, or place a single original face down on the scanner glass. (See "Loading originals" on page 36.) 3. Press Scan from the main screen. 4. Press Scan to PC. 5. Make sure Local PC is shown. If necessary, press the right arrow to toggle from Network PC to Local PC. 6. Press Login. 7. Select an application from the application list and press Select. 8. Press the Start button on the control panel to start scanning. 9. The original will be scanned and sent to your computer. For network connected machine Make sure the printer driver is installed on your computer using the software CD, since the printer driver includes the scan program. (See "Installing network connected machine's driver" on page 31. ) Scanning_ 73
-
 1
1 -
2
-
3
-
4
-
5
-
6
-
7
-
8
-
9
-
10
-
11
-
12
-
13
-
14
-
15
-
16
-
17
-
18
-
19
-
20
-
21
-
22
-
23
-
24
-
25
-
26
-
27
-
28
-
29
-
30
-
31
-
32
-
33
-
34
-
35
-
36
-
37
-
38
-
39
-
40
-
41
-
42
-
43
-
44
-
45
-
46
-
47
-
48
-
49
-
50
-
51
-
52
-
53
-
54
-
55
-
56
-
57
-
58
-
59
-
60
-
61
-
62
-
63
-
64
-
65
-
66
-
67
-
 68
68 -
 69
69 -
 70
70 -
 71
71 -
 72
72 -
 73
73 -
 74
74 -
 75
75 -
 76
76 -
 77
77 -
 78
78 -
79
-
80
-
81
-
82
-
83
-
84
-
85
-
86
-
87
-
88
-
89
-
90
-
91
-
92
-
93
-
94
-
95
-
96
-
97
-
98
-
99
-
100
-
101
-
102
-
103
-
104
-
105
-
106
-
107
-
108
-
109
-
110
-
111
-
112
-
113
-
114
-
115
-
116
-
117
-
118
-
119
-
120
-
121
-
122
-
123
-
124
-
125
-
126
-
127
-
128
-
129
-
130
-
131
-
132
-
133
 |
 |