Dell PowerVault MD3200 CLI Guide - Page 68
Creating a Snapshot Virtual Disk with Software-Assigned Physical Disks, create snapshotVirtualDisk
 |
View all Dell PowerVault MD3200 manuals
Add to My Manuals
Save this manual to your list of manuals |
Page 68 highlights
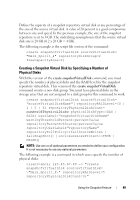
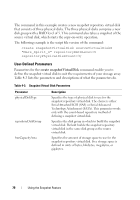
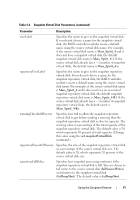
Creating a Snapshot Virtual Disk with Software-Assigned Physical Disks This version of the create snapshotVirtualDisk command lets you choose an existing disk group in which to place the snapshot repository virtual disk. The storage management software determines which physical disks to use. You can also define how much space to assign to the repository virtual disk. Because you are using an existing disk group, the RAID level for the snapshot virtual disk defaults to the RAID level of the disk group in which you place it. You cannot define the RAID level for the snapshot virtual disk. The general syntax for this command is: create snapshotVirtualDisk sourceVirtualDisk= "sourceVirtualDiskName" [repositoryDiskGroup= diskGroupNumber freeCapacityArea= freeCapacityIndexNumber userLabel= "snapshotVirtualDiskName" warningThresholdPercent=percentValue repositoryPercentOfSource=percentValue repositoryUserLabel="repositoryName" repositoryFullPolicy=(failSourceWrites | failSnapShot)] [enclosureLossProtect=(TRUE | FALSE)] NOTE: Use one or all of the optional parameters as needed to define your configuration. It is not necessary to use any optional parameters. The following example is a command in which software assigns the physical disks: client>smcli 123.45.67.89 -c "create snapshotVirtualDisk sourceVirtualDisk= \"Mars_Spirit_4\" repositoryDiskGroup=2 freeCapacityArea=2;" The command in this example creates a new snapshot repository virtual disk in disk group 2. The source virtual disk is Mars_Spirit_4. The size of the snapshot repository is 4 GB. This command also takes a snapshot of the source virtual disk, which starts the copy-on-write operation. 68 Using the Snapshot Feature
-
 1
1 -
2
-
3
-
4
-
5
-
6
-
7
-
8
-
9
-
10
-
11
-
12
-
13
-
14
-
15
-
16
-
17
-
18
-
19
-
20
-
21
-
22
-
23
-
24
-
25
-
26
-
27
-
28
-
29
-
30
-
31
-
32
-
33
-
34
-
35
-
36
-
37
-
38
-
39
-
40
-
41
-
42
-
43
-
44
-
45
-
46
-
47
-
48
-
49
-
50
-
51
-
52
-
53
-
54
-
55
-
56
-
57
-
58
-
59
-
60
-
61
-
62
-
 63
63 -
 64
64 -
 65
65 -
 66
66 -
 67
67 -
 68
68 -
 69
69 -
 70
70 -
 71
71 -
 72
72 -
 73
73 -
74
-
75
-
76
-
77
-
78
-
79
-
80
-
81
-
82
-
83
-
84
-
85
-
86
-
87
-
88
-
89
-
90
-
91
-
92
-
93
-
94
-
95
-
96
-
97
-
98
-
99
-
100
-
101
-
102
-
103
-
104
-
105
-
106
-
107
-
108
-
109
-
110
-
111
-
112
-
113
-
114
-
115
-
116
-
117
-
118
-
119
-
120
-
121
-
122
-
123
-
124
-
125
-
126
-
127
-
128
-
129
-
130
-
131
-
132
-
133
-
134
-
135
-
136
-
137
-
138
-
139
-
140
-
141
-
142
-
143
-
144
-
145
-
146
-
147
-
148
-
149
-
150
-
151
-
152
-
153
-
154
-
155
-
156
-
157
-
158
-
159
-
160
-
161
-
162
-
163
-
164
-
165
-
166
-
167
-
168
-
169
-
170
-
171
-
172
-
173
-
174
-
175
-
176
-
177
-
178
-
179
-
180
-
181
-
182
-
183
-
184
-
185
-
186
-
187
-
188
-
189
-
190
-
191
-
192
-
193
-
194
-
195
-
196
-
197
-
198
-
199
-
200
-
201
-
202
-
203
-
204
-
205
-
206
-
207
-
208
-
209
-
210
-
211
-
212
-
213
-
214
-
215
-
216
-
217
-
218
-
219
-
220
-
221
-
222
-
223
-
224
-
225
-
226
-
227
-
228
-
229
-
230
-
231
-
232
-
233
-
234
-
235
-
236
-
237
-
238
-
239
-
240
-
241
-
242
-
243
-
244
-
245
-
246
-
247
-
248
-
249
-
250
-
251
-
252
-
253
-
254
-
255
-
256
-
257
-
258
-
259
-
260
-
261
-
262
-
263
-
264
-
265
-
266
-
267
-
268
-
269
-
270
-
271
-
272
-
273
-
274
-
275
-
276
-
277
-
278
-
279
 |
 |
