HP Color LaserJet Enterprise CM4540 HP Color LaserJet Enterprise CM4540 MFP - - Page 162
Troubleshooting the product setup, Nearest Size & Scale
 |
View all HP Color LaserJet Enterprise CM4540 manuals
Add to My Manuals
Save this manual to your list of manuals |
Page 162 highlights
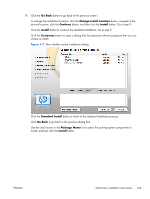
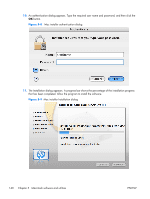
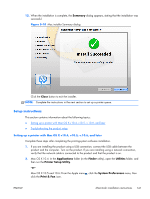
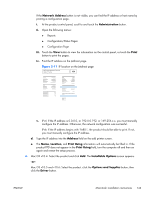
7. In the Optional Trays: drop-down menu, select the trays that are installed on the product. In Mac OSv 10.5 and v10.6 each tray is listed with a checkbox. 8. For Mac OS v10.4: In the Collation in Printer: drop-down menu, select the amount of memory and hard disk combination that is installed in the product. -or- For Mac OS v10.5 and v10.6: In the Collation in Printer: drop-down menu, select the checkbox next to the printer disk. The amount of memory is set automatically. 9. If the product has a hard disk, select Installed from the Printer Hard Disk drop-down menu. 10. If the product has a duplex unit, select the Duplex Unit check box. 11. In the Accessory Output Bins: drop-down menu, select the output bins that are installed on the product. 12. In the Paper Matching: drop-down menu, select one of the following options: ● Prompt User for correct size ● Nearest Size & Scale ● Nearest Size & Crop 13. After you have selected the settings in the Installable Options screen, click Continue. The product name appears in the Printer List and the setup is complete. Troubleshooting the product setup If the product does not appear in the printer list after an installation: Complete each one of these solutions in the order given, and restart the setup process after each one to see if the issue has been resolved. ● Verify that the USB or network cable is connected between the product and the computer and that the product is powered on. ● Try disconnecting and reconnecting the cable. If the computer has more than one USB port, try a different USB port. ● Turn the product off and then back on. ● Turn the computer off and then back on. ● If you are using a USB hub on the computer, disconnect any other USB devices from the hub. If the wrong PPD appears in the Kind column in the printer list after installation: 1. Unplug the USB cable. 2. Delete the print queue with the incorrect type (for example, Generic PostScript Printer). 3. Reinstall the printing-system software. 144 Chapter 5 Macintosh software and utilities ENWW
-
 1
1 -
2
-
3
-
4
-
5
-
6
-
7
-
8
-
9
-
10
-
11
-
12
-
13
-
14
-
15
-
16
-
17
-
18
-
19
-
20
-
21
-
22
-
23
-
24
-
25
-
26
-
27
-
28
-
29
-
30
-
31
-
32
-
33
-
34
-
35
-
36
-
37
-
38
-
39
-
40
-
41
-
42
-
43
-
44
-
45
-
46
-
47
-
48
-
49
-
50
-
51
-
52
-
53
-
54
-
55
-
56
-
57
-
58
-
59
-
60
-
61
-
62
-
63
-
64
-
65
-
66
-
67
-
68
-
69
-
70
-
71
-
72
-
73
-
74
-
75
-
76
-
77
-
78
-
79
-
80
-
81
-
82
-
83
-
84
-
85
-
86
-
87
-
88
-
89
-
90
-
91
-
92
-
93
-
94
-
95
-
96
-
97
-
98
-
99
-
100
-
101
-
102
-
103
-
104
-
105
-
106
-
107
-
108
-
109
-
110
-
111
-
112
-
113
-
114
-
115
-
116
-
117
-
118
-
119
-
120
-
121
-
122
-
123
-
124
-
125
-
126
-
127
-
128
-
129
-
130
-
131
-
132
-
133
-
134
-
135
-
136
-
137
-
138
-
139
-
140
-
141
-
142
-
143
-
144
-
145
-
146
-
147
-
148
-
149
-
150
-
151
-
152
-
153
-
154
-
155
-
156
-
 157
157 -
 158
158 -
 159
159 -
 160
160 -
 161
161 -
 162
162 -
 163
163 -
 164
164 -
 165
165 -
 166
166 -
 167
167 -
168
-
169
-
170
-
171
-
172
-
173
-
174
-
175
-
176
-
177
-
178
-
179
-
180
-
181
-
182
-
183
-
184
-
185
-
186
-
187
-
188
-
189
-
190
-
191
-
192
-
193
-
194
-
195
-
196
-
197
-
198
-
199
-
200
-
201
-
202
-
203
-
204
-
205
-
206
-
207
-
208
-
209
-
210
-
211
-
212
-
213
-
214
-
215
-
216
 |
 |