Kyocera KM-C2030 FieryX3e+ User Software Install Guide - Page 57
Enable LPD or Port 9100 from the Fiery X3e Control Panel.
 |
View all Kyocera KM-C2030 manuals
Add to My Manuals
Save this manual to your list of manuals |
Page 57 highlights
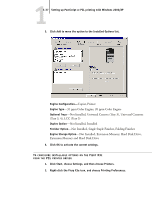
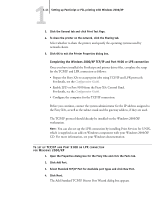
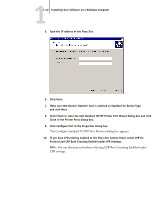
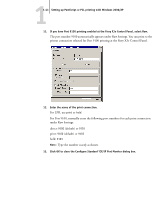
11-41 Setting up PostScript or PCL printing with Windows 2000/XP 3. Click the General tab and click Print Test Page. 4. To share the printer on the network, click the Sharing tab. Select whether to share the printer, and specify the operating systems used by network clients. 5. Click OK to exit the Printer Properties dialog box. Completing the Windows 2000/XP TCP/IP and Port 9100 or LPR connection Once you have installed the PostScript and printer driver files, complete the setup for the TCP/IP and LPR connection as follows: • Prepare the Fiery X3e to accept print jobs using TCP/IP and LPR protocols. For details, see the Configuration Guide. • Enable LPD or Port 9100 from the Fiery X3e Control Panel. For details, see the Configuration Guide. • Configure the computer for the TCP/IP connection. Before you continue, contact the system administrator for the IP address assigned to the Fiery X3e, as well as the subnet mask and the gateway address, if they are used. The TCP/IP protocol should already be installed on the Windows 2000/XP workstation. NOTE: You can also set up the LPR connection by installing Print Services for UNIX, which is supplied as an add-on Windows component with your Windows 2000/XP CD. For more information, see your Windows documentation. TO SET UP TCP/IP AND PORT 9100 OR LPR CONNECTION FOR WINDOWS 2000/XP 1. Open the Properties dialog box for the Fiery X3e and click the Ports tab. 2. Click Add Port. 3. Select Standard TCP/IP Port for Available port types and click New Port. 4. Click Next. The Add Standard TCP/IP Printer Port Wizard dialog box appears.
-
 1
1 -
2
-
3
-
4
-
5
-
6
-
7
-
8
-
9
-
10
-
11
-
12
-
13
-
14
-
15
-
16
-
17
-
18
-
19
-
20
-
21
-
22
-
23
-
24
-
25
-
26
-
27
-
28
-
29
-
30
-
31
-
32
-
33
-
34
-
35
-
36
-
37
-
38
-
39
-
40
-
41
-
42
-
43
-
44
-
45
-
46
-
47
-
48
-
49
-
50
-
51
-
 52
52 -
 53
53 -
 54
54 -
 55
55 -
 56
56 -
 57
57 -
 58
58 -
 59
59 -
 60
60 -
 61
61 -
 62
62 -
63
-
64
-
65
-
66
-
67
-
68
-
69
-
70
-
71
-
72
-
73
-
74
-
75
-
76
-
77
-
78
-
79
-
80
-
81
-
82
-
83
-
84
-
85
-
86
-
87
-
88
-
89
-
90
-
91
-
92
-
93
-
94
-
95
-
96
-
97
-
98
-
99
-
100
-
101
-
102
-
103
-
104
-
105
-
106
-
107
-
108
-
109
-
110
-
111
-
112
-
113
-
114
-
115
-
116
 |
 |
