Motorola i365 User Guide - Nextel - Page 123
F. Tools, Enter the date you want.
 |
View all Motorola i365 manuals
Add to My Manuals
Save this manual to your list of manuals |
Page 123 highlights
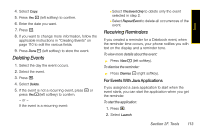
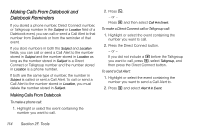
3. If you want to assign a location to the event, select Location and: Ⅲ Enter the location. - or - Enter a phone number, Direct Connect number, or Talkgroup number. After the event is stored, you can call this number. Ⅲ When you are finished, press r. 4. The start time automatically assigned to an event is the beginning of the day. If you want to change the start time or assign no start time: Ⅲ Select Start. Ⅲ Enter the start time you want. - or - Press No Time - (right softkey) to assign no start time. 5. If you want to assign a duration to the event, select Duration and: Ⅲ Select the duration you want. - or - Select Custom to enter a duration. 6. The date automatically assigned to an event is the date that was highlighted or selected when you began creating the event. To change the date of the event: Ⅲ Select Date. Ⅲ Enter the date you want. 7. If you want to make the event a recurring event: Ⅲ Select Repeat. Ⅲ Select the repeat cycle you want. ● If the event occurs more than once a week, select Multiple Day, and select the days you want. ● Press Done - (right softkey). Ⅲ In the End field, select the date you want this event to stop recurring. 8. If you want to create a reminder for this event: Ⅲ Select Reminder. Ⅲ Select the reminder time you want. - or - Select Custom to enter a reminder time. Section 2F. Tools 111 Tools
-
 1
1 -
2
-
3
-
4
-
5
-
6
-
7
-
8
-
9
-
10
-
11
-
12
-
13
-
14
-
15
-
16
-
17
-
18
-
19
-
20
-
21
-
22
-
23
-
24
-
25
-
26
-
27
-
28
-
29
-
30
-
31
-
32
-
33
-
34
-
35
-
36
-
37
-
38
-
39
-
40
-
41
-
42
-
43
-
44
-
45
-
46
-
47
-
48
-
49
-
50
-
51
-
52
-
53
-
54
-
55
-
56
-
57
-
58
-
59
-
60
-
61
-
62
-
63
-
64
-
65
-
66
-
67
-
68
-
69
-
70
-
71
-
72
-
73
-
74
-
75
-
76
-
77
-
78
-
79
-
80
-
81
-
82
-
83
-
84
-
85
-
86
-
87
-
88
-
89
-
90
-
91
-
92
-
93
-
94
-
95
-
96
-
97
-
98
-
99
-
100
-
101
-
102
-
103
-
104
-
105
-
106
-
107
-
108
-
109
-
110
-
111
-
112
-
113
-
114
-
115
-
116
-
117
-
 118
118 -
 119
119 -
 120
120 -
 121
121 -
 122
122 -
 123
123 -
 124
124 -
 125
125 -
 126
126 -
 127
127 -
 128
128 -
129
-
130
-
131
-
132
-
133
-
134
-
135
-
136
-
137
-
138
-
139
-
140
-
141
-
142
-
143
-
144
-
145
-
146
-
147
-
148
-
149
-
150
-
151
-
152
-
153
-
154
-
155
-
156
-
157
-
158
-
159
-
160
-
161
-
162
-
163
-
164
-
165
-
166
-
167
-
168
-
169
-
170
-
171
-
172
-
173
-
174
-
175
-
176
-
177
-
178
-
179
-
180
-
181
-
182
-
183
-
184
-
185
-
186
-
187
-
188
-
189
-
190
-
191
-
192
-
193
-
194
-
195
-
196
-
197
-
198
-
199
-
200
-
201
-
202
-
203
-
204
-
205
-
206
-
207
-
208
-
209
-
210
-
211
-
212
-
213
-
214
-
215
-
216
-
217
-
218
-
219
-
220
-
221
-
222
-
223
-
224
-
225
-
226
-
227
-
228
-
229
-
230
-
231
-
232
-
233
-
234
-
235
-
236
-
237
-
238
-
239
 |
 |