Ricoh SP4100N User Manual - Page 103
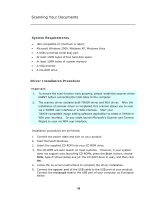
Scanning Your Documents, System Requirements, Driver Installation Procedure
 |
UPC - 026649027994
View all Ricoh SP4100N manuals
Add to My Manuals
Save this manual to your list of manuals |
Page 103 highlights
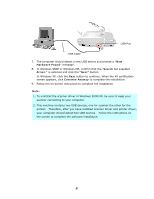
Scanning Your Documents System Requirements • IBM compatible PC (Pentium or later); • Microsoft Windows 2000, Windows XP, Windows Vista • A USB (universal serial bus) port • At least 100M bytes of free hard disk space • At least 128M bytes of system memory • A VGA monitor • A CD-ROM drive Driver Installation Procedure Important: 1. To ensure the scan function work properly, please install the scanner driver FIRST before connecting the USB cable to the computer. 2. The scanner driver contains both TWAIN driver and WIA driver. After the installation of scanner driver is completed, this scanner allows you to scan via a TWAIN user interface or a WIA interface. Start your TWAIN-compatible image editing software application to select a TWAIN or WIA user interface. Or you might launch Microsoft's Scanner and Camera Wizard to scan via WIA user interface. Installation procedures are as follows: 1. Connect the power cable and turn on your product. 2. Start Microsoft Windows. 3. Insert the supplied CD-ROM into your CD ROM drive. 4. The CD-ROM will auto launch on most systems. However, if your system does not support auto launching CD-ROMs, press the Start button, choose RUN, type d:\driver\setup.exe (d: the CD-ROM drive in use), and then click OK. 5. Follow the on-screen instructions to complete the driver installation. 6. Connect the square end of the USB cable to the USB port of your product. Connect the rectangle end to the USB port of your computer as illustrated below. 96
-
 1
1 -
2
-
3
-
4
-
5
-
6
-
7
-
8
-
9
-
10
-
11
-
12
-
13
-
14
-
15
-
16
-
17
-
18
-
19
-
20
-
21
-
22
-
23
-
24
-
25
-
26
-
27
-
28
-
29
-
30
-
31
-
32
-
33
-
34
-
35
-
36
-
37
-
38
-
39
-
40
-
41
-
42
-
43
-
44
-
45
-
46
-
47
-
48
-
49
-
50
-
51
-
52
-
53
-
54
-
55
-
56
-
57
-
58
-
59
-
60
-
61
-
62
-
63
-
64
-
65
-
66
-
67
-
68
-
69
-
70
-
71
-
72
-
73
-
74
-
75
-
76
-
77
-
78
-
79
-
80
-
81
-
82
-
83
-
84
-
85
-
86
-
87
-
88
-
89
-
90
-
91
-
92
-
93
-
94
-
95
-
96
-
97
-
 98
98 -
 99
99 -
 100
100 -
 101
101 -
 102
102 -
 103
103 -
 104
104 -
 105
105 -
 106
106 -
 107
107 -
 108
108 -
109
-
110
-
111
-
112
-
113
-
114
-
115
-
116
-
117
-
118
-
119
-
120
-
121
-
122
-
123
-
124
-
125
-
126
-
127
-
128
-
129
-
130
-
131
-
132
-
133
-
134
-
135
-
136
-
137
-
138
-
139
-
140
-
141
-
142
-
143
-
144
-
145
-
146
-
147
-
148
-
149
-
150
-
151
-
152
-
153
-
154
-
155
-
156
-
157
-
158
-
159
-
160
-
161
-
162
-
163
-
164
 |
 |