Ricoh SP4100N User Manual - Page 105
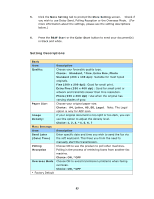
Scanner Operation, Select Source, FACE DOWN, FACE UP, Acquire, Scan Method, Image Type, Resolution - user guide
 |
UPC - 026649027994
View all Ricoh SP4100N manuals
Add to My Manuals
Save this manual to your list of manuals |
Page 105 highlights
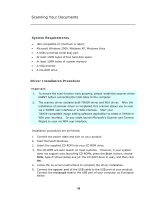
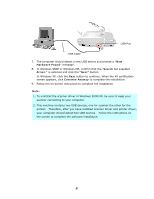
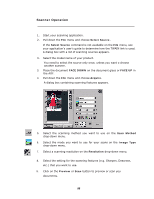
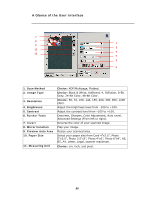
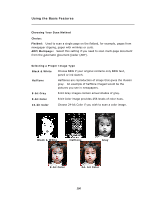
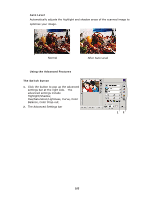
Scanner Operation 1. Start your scanning application. 2. Pull down the File menu and choose Select Source. If the Select Source command is not available on the File menu, see your application's user's guide to determine how the TWAIN link is used. A dialog box with a list of scanning sources appears. 3. Select the model name of your product. You need to select the source only once, unless you want o choose another scanner. 3. Place the document FACE DOWN on the document glass or FACE UP in the ADF. 4. Pull down the File menu and choose Acquire. A dialog box containing scanning features appears. 5. Select the scanning method you want to use on the Scan Method drop-down menu. 6. Select the mode you want to use for your scans on the Image Type drop-down menu. 7. Select a scanning resolution on the Resolution drop-down menu. 8. Select the setting for the scanning features (e.g. Sharpen, Descreen, etc.) that you want to use. 9. Click on the Preview or Scan button to preview or scan you documents. 98
-
 1
1 -
2
-
3
-
4
-
5
-
6
-
7
-
8
-
9
-
10
-
11
-
12
-
13
-
14
-
15
-
16
-
17
-
18
-
19
-
20
-
21
-
22
-
23
-
24
-
25
-
26
-
27
-
28
-
29
-
30
-
31
-
32
-
33
-
34
-
35
-
36
-
37
-
38
-
39
-
40
-
41
-
42
-
43
-
44
-
45
-
46
-
47
-
48
-
49
-
50
-
51
-
52
-
53
-
54
-
55
-
56
-
57
-
58
-
59
-
60
-
61
-
62
-
63
-
64
-
65
-
66
-
67
-
68
-
69
-
70
-
71
-
72
-
73
-
74
-
75
-
76
-
77
-
78
-
79
-
80
-
81
-
82
-
83
-
84
-
85
-
86
-
87
-
88
-
89
-
90
-
91
-
92
-
93
-
94
-
95
-
96
-
97
-
98
-
99
-
 100
100 -
 101
101 -
 102
102 -
 103
103 -
 104
104 -
 105
105 -
 106
106 -
 107
107 -
 108
108 -
 109
109 -
 110
110 -
111
-
112
-
113
-
114
-
115
-
116
-
117
-
118
-
119
-
120
-
121
-
122
-
123
-
124
-
125
-
126
-
127
-
128
-
129
-
130
-
131
-
132
-
133
-
134
-
135
-
136
-
137
-
138
-
139
-
140
-
141
-
142
-
143
-
144
-
145
-
146
-
147
-
148
-
149
-
150
-
151
-
152
-
153
-
154
-
155
-
156
-
157
-
158
-
159
-
160
-
161
-
162
-
163
-
164
 |
 |
