Ricoh SP4100N User Manual - Page 82
Advanced Operation, If not, the Default Subject
 |
UPC - 026649027994
View all Ricoh SP4100N manuals
Add to My Manuals
Save this manual to your list of manuals |
Page 82 highlights
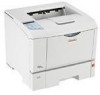
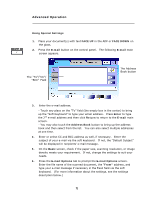
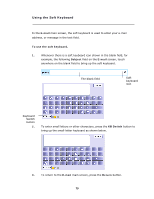
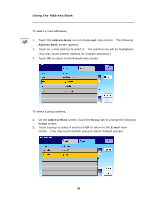
Advanced Operation Using Special Settings 1. Place your document(s) with text FACE UP in the ADF or FACE DOWN on the glass. 2. Press the E-mail button on the control panel. The following E-mail main screen appears. The "To"/"CC"/ "BCC" Field The Address Book button 3. Enter the e-mail address. - Touch any place on the "To" field (the empty box in the center) to bring up the "Soft Keyboard" to type your email address. Press Enter to type the 2nd e-mail address and then click Return to return to the E-mail main screen. - You may also touch the Address Book button to bring up the address book and then select from the list. You can also select multiple addresses at one time. 4. Enter or select CC and BCC address as well, if necessary. Enter the subject of your e-mail via the soft keyboard. If not, the "Default Subject" will be displayed in recipients' e-mail message. 5. On the Basic screen, check if the paper size, scanning resolution, or image density meets your requirement. If not, change the settings to suit your needs. 6. Press the E-mail Options tab to prompt the E-mail Options screen. Enter the file name of the scanned document, the "From" address, and type your e-mail message if necessary in the Text field via the soft keyboard. (For more information about the settings, see the settings description below.) 75
-
 1
1 -
2
-
3
-
4
-
5
-
6
-
7
-
8
-
9
-
10
-
11
-
12
-
13
-
14
-
15
-
16
-
17
-
18
-
19
-
20
-
21
-
22
-
23
-
24
-
25
-
26
-
27
-
28
-
29
-
30
-
31
-
32
-
33
-
34
-
35
-
36
-
37
-
38
-
39
-
40
-
41
-
42
-
43
-
44
-
45
-
46
-
47
-
48
-
49
-
50
-
51
-
52
-
53
-
54
-
55
-
56
-
57
-
58
-
59
-
60
-
61
-
62
-
63
-
64
-
65
-
66
-
67
-
68
-
69
-
70
-
71
-
72
-
73
-
74
-
75
-
76
-
 77
77 -
 78
78 -
 79
79 -
 80
80 -
 81
81 -
 82
82 -
 83
83 -
 84
84 -
 85
85 -
 86
86 -
 87
87 -
88
-
89
-
90
-
91
-
92
-
93
-
94
-
95
-
96
-
97
-
98
-
99
-
100
-
101
-
102
-
103
-
104
-
105
-
106
-
107
-
108
-
109
-
110
-
111
-
112
-
113
-
114
-
115
-
116
-
117
-
118
-
119
-
120
-
121
-
122
-
123
-
124
-
125
-
126
-
127
-
128
-
129
-
130
-
131
-
132
-
133
-
134
-
135
-
136
-
137
-
138
-
139
-
140
-
141
-
142
-
143
-
144
-
145
-
146
-
147
-
148
-
149
-
150
-
151
-
152
-
153
-
154
-
155
-
156
-
157
-
158
-
159
-
160
-
161
-
162
-
163
-
164
 |
 |