Ricoh SP4100N User Manual - Page 57
Start Internet service manager in Control Panel, select Default Web site, IIS
 |
UPC - 026649027994
View all Ricoh SP4100N manuals
Add to My Manuals
Save this manual to your list of manuals |
Page 57 highlights
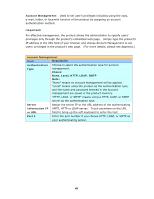
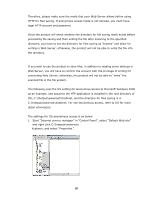
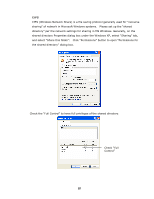
Therefore, please make sure the mode that your Web Server allows before using HTTP for files saving. If anonymous access mode is not allowed, you must have legal HTTP account and password. Since the product will check whether the directory for file saving really exists before proceeding file saving and then writing the file after scanning to the specified directory, you have to set the directory for files saving as "browse" and allow for writing in Web Server; otherwise, the product will not be able to write the file into the directory. If you wish to use the product to save files, in addition to making some settings in Web Server, you will have to confirm the account with the privilege of writing for connecting Web Server; otherwise, the product will not be able to "write" the scanned file in the file system. The following uses the IIS setting for anonymous access to Microsoft Windows 2000 as an example, and assumes the HTP application is installed in the root directory of IIS, C:\Inetpub\wwwroot\Xcabinet, and the directory for files saving is in C:\Inetpub\wwwroot\Xcabinet. For non-anonymous access, refer to IIS for more detail information. The settings for IIS anonymous access is as below: 1. Start "Internet service manager" in "Control Panel", select "Default Web site" and right click C:\Inetpub\wwwroot\ Xcabinet, and select "Properties ". 50
-
 1
1 -
2
-
3
-
4
-
5
-
6
-
7
-
8
-
9
-
10
-
11
-
12
-
13
-
14
-
15
-
16
-
17
-
18
-
19
-
20
-
21
-
22
-
23
-
24
-
25
-
26
-
27
-
28
-
29
-
30
-
31
-
32
-
33
-
34
-
35
-
36
-
37
-
38
-
39
-
40
-
41
-
42
-
43
-
44
-
45
-
46
-
47
-
48
-
49
-
50
-
51
-
 52
52 -
 53
53 -
 54
54 -
 55
55 -
 56
56 -
 57
57 -
 58
58 -
 59
59 -
 60
60 -
 61
61 -
 62
62 -
63
-
64
-
65
-
66
-
67
-
68
-
69
-
70
-
71
-
72
-
73
-
74
-
75
-
76
-
77
-
78
-
79
-
80
-
81
-
82
-
83
-
84
-
85
-
86
-
87
-
88
-
89
-
90
-
91
-
92
-
93
-
94
-
95
-
96
-
97
-
98
-
99
-
100
-
101
-
102
-
103
-
104
-
105
-
106
-
107
-
108
-
109
-
110
-
111
-
112
-
113
-
114
-
115
-
116
-
117
-
118
-
119
-
120
-
121
-
122
-
123
-
124
-
125
-
126
-
127
-
128
-
129
-
130
-
131
-
132
-
133
-
134
-
135
-
136
-
137
-
138
-
139
-
140
-
141
-
142
-
143
-
144
-
145
-
146
-
147
-
148
-
149
-
150
-
151
-
152
-
153
-
154
-
155
-
156
-
157
-
158
-
159
-
160
-
161
-
162
-
163
-
164
 |
 |
