Ricoh SP4100N User Manual - Page 42
Choice for Right or Bottom: *0/0.25/0.5/0.75/1.0, Speed, Text, Photo
 |
UPC - 026649027994
View all Ricoh SP4100N manuals
Add to My Manuals
Save this manual to your list of manuals |
Page 42 highlights
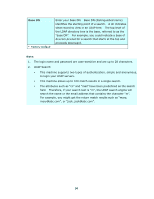
Copier Default: Used to specify the product's default copy settings. Note when system auto reset time is over or the device is turned on and off again, the copy settings will be reset to these values. Item Description Basic Image Density Adjust the image density in seven steps using the control panel. And you can specify the default value of image density in the range of 1 to 7 using the product's Web Page. Increasing the value makes the printouts darker and decreasing the value makes the printouts lighter. Choice: 1, 2, 3, *4, 5, 6, 7 Copy Mode Choose the focus of your copy result. For example, if your document contains many pictures, choose Photo. If your document contains text only, choose Text. Speed mode is a standard mode for all documents. Choice: *Speed, Text, Photo. Image Edit Erase Border Sets the length of border you wish to cut. Choice: *0/0.25/0.5/0.75/1.0 inch or *0/6/13/19/25 mm. Margin The "Margin Adjustment" option will move the copy image Adjustment to the right or/and to the bottom; depending on "Right" and "Bottom" parameters. Choice for Right or Bottom: *0/0.25/0.5/0.75/1.0 inch or *0/6/13/19/25 mm. Unit Choose the unit you wish to use. Choice: *Inch, mm * Factory Default 35
-
 1
1 -
2
-
3
-
4
-
5
-
6
-
7
-
8
-
9
-
10
-
11
-
12
-
13
-
14
-
15
-
16
-
17
-
18
-
19
-
20
-
21
-
22
-
23
-
24
-
25
-
26
-
27
-
28
-
29
-
30
-
31
-
32
-
33
-
34
-
35
-
36
-
 37
37 -
 38
38 -
 39
39 -
 40
40 -
 41
41 -
 42
42 -
 43
43 -
 44
44 -
 45
45 -
 46
46 -
 47
47 -
48
-
49
-
50
-
51
-
52
-
53
-
54
-
55
-
56
-
57
-
58
-
59
-
60
-
61
-
62
-
63
-
64
-
65
-
66
-
67
-
68
-
69
-
70
-
71
-
72
-
73
-
74
-
75
-
76
-
77
-
78
-
79
-
80
-
81
-
82
-
83
-
84
-
85
-
86
-
87
-
88
-
89
-
90
-
91
-
92
-
93
-
94
-
95
-
96
-
97
-
98
-
99
-
100
-
101
-
102
-
103
-
104
-
105
-
106
-
107
-
108
-
109
-
110
-
111
-
112
-
113
-
114
-
115
-
116
-
117
-
118
-
119
-
120
-
121
-
122
-
123
-
124
-
125
-
126
-
127
-
128
-
129
-
130
-
131
-
132
-
133
-
134
-
135
-
136
-
137
-
138
-
139
-
140
-
141
-
142
-
143
-
144
-
145
-
146
-
147
-
148
-
149
-
150
-
151
-
152
-
153
-
154
-
155
-
156
-
157
-
158
-
159
-
160
-
161
-
162
-
163
-
164
 |
 |
