Ricoh SP4100N User Manual - Page 149
Deleting Groups, To delete a group, Address Book Manager, Group, Delete, Cancel, Update
 |
UPC - 026649027994
View all Ricoh SP4100N manuals
Add to My Manuals
Save this manual to your list of manuals |
Page 149 highlights
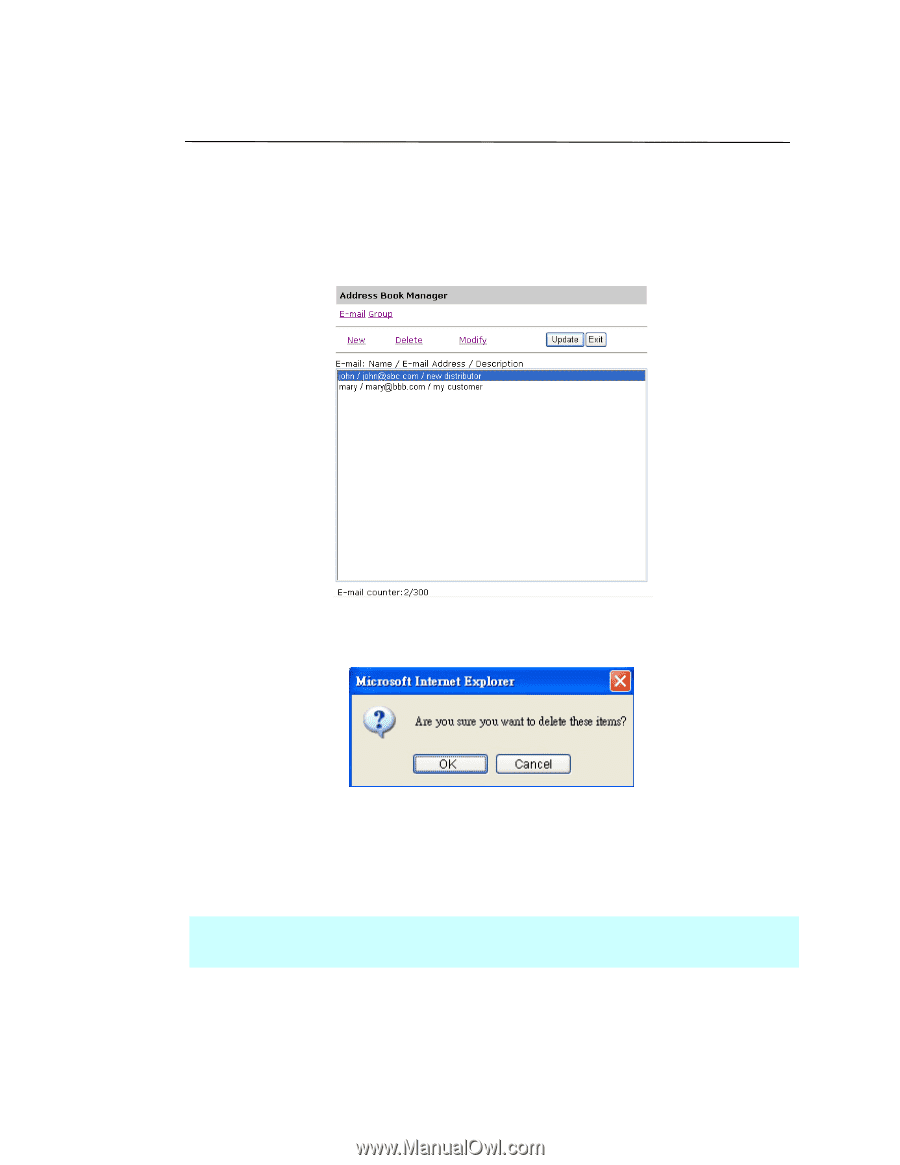
Deleting Groups To delete a group, 1. In the Address Book Manager screen, click the Group icon and choose a group you wish to delete. 2. Click Delete to erase the group. A Confirmation dialog box appears to confirm your deletion. Click OK to delete or Cancel to exit. 3. Click Update to permanently save all the latest data on the product, or Exit to leave the screen without saving any latest data. Note: You can make multiple selections by choosing one group and then pressing the Shift or the Ctrl key to delete them at once. 142
-
 1
1 -
2
-
3
-
4
-
5
-
6
-
7
-
8
-
9
-
10
-
11
-
12
-
13
-
14
-
15
-
16
-
17
-
18
-
19
-
20
-
21
-
22
-
23
-
24
-
25
-
26
-
27
-
28
-
29
-
30
-
31
-
32
-
33
-
34
-
35
-
36
-
37
-
38
-
39
-
40
-
41
-
42
-
43
-
44
-
45
-
46
-
47
-
48
-
49
-
50
-
51
-
52
-
53
-
54
-
55
-
56
-
57
-
58
-
59
-
60
-
61
-
62
-
63
-
64
-
65
-
66
-
67
-
68
-
69
-
70
-
71
-
72
-
73
-
74
-
75
-
76
-
77
-
78
-
79
-
80
-
81
-
82
-
83
-
84
-
85
-
86
-
87
-
88
-
89
-
90
-
91
-
92
-
93
-
94
-
95
-
96
-
97
-
98
-
99
-
100
-
101
-
102
-
103
-
104
-
105
-
106
-
107
-
108
-
109
-
110
-
111
-
112
-
113
-
114
-
115
-
116
-
117
-
118
-
119
-
120
-
121
-
122
-
123
-
124
-
125
-
126
-
127
-
128
-
129
-
130
-
131
-
132
-
133
-
134
-
135
-
136
-
137
-
138
-
139
-
140
-
141
-
142
-
143
-
 144
144 -
 145
145 -
 146
146 -
 147
147 -
 148
148 -
 149
149 -
 150
150 -
 151
151 -
 152
152 -
 153
153 -
 154
154 -
155
-
156
-
157
-
158
-
159
-
160
-
161
-
162
-
163
-
164
 |
 |
142
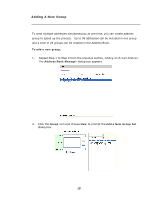
Deleting Groups
To delete a group,
1.
In the
Address Book Manager
screen, click the
Group
icon and choose a
group you wish to delete.
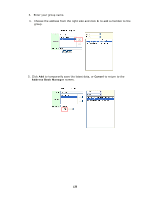
2.
Click
Delete
to erase the group.
A Confirmation dialog box appears to
confirm your deletion. Click
OK
to
delete or
Cancel
to exit.
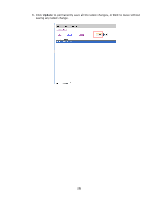
3.
Click
Update
to permanently save all the latest data on the product, or
Exit
to leave the screen without saving any latest data.
Note:
You can make multiple selections by choosing one group and then pressing the
Shift or the Ctrl key to delete them at once.