Ricoh SP4100N User Manual - Page 156
Account, Account List, New Account, Password, Description
 |
UPC - 026649027994
View all Ricoh SP4100N manuals
Add to My Manuals
Save this manual to your list of manuals |
Page 156 highlights
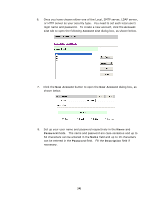
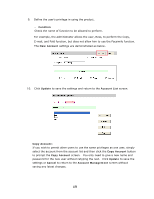
6. Once you have chosen either one of the Local, SMTP server, LDAP server, or HTTP server as your security type. You need to set each local user's login name and password. To create a new account, click the Account List tab to open the following Account List dialog box, as shown below. 7. Click the New Account button to open the New Account dialog box, as shown below. 8. Set up your user name and password respectively in the Name and Password fields. The name and password are case-sensative and up to 64 characters can be entered in the Name field and up to 16 characters can be entered in the Password field. Fill the Description field if necessary. 149
-
 1
1 -
2
-
3
-
4
-
5
-
6
-
7
-
8
-
9
-
10
-
11
-
12
-
13
-
14
-
15
-
16
-
17
-
18
-
19
-
20
-
21
-
22
-
23
-
24
-
25
-
26
-
27
-
28
-
29
-
30
-
31
-
32
-
33
-
34
-
35
-
36
-
37
-
38
-
39
-
40
-
41
-
42
-
43
-
44
-
45
-
46
-
47
-
48
-
49
-
50
-
51
-
52
-
53
-
54
-
55
-
56
-
57
-
58
-
59
-
60
-
61
-
62
-
63
-
64
-
65
-
66
-
67
-
68
-
69
-
70
-
71
-
72
-
73
-
74
-
75
-
76
-
77
-
78
-
79
-
80
-
81
-
82
-
83
-
84
-
85
-
86
-
87
-
88
-
89
-
90
-
91
-
92
-
93
-
94
-
95
-
96
-
97
-
98
-
99
-
100
-
101
-
102
-
103
-
104
-
105
-
106
-
107
-
108
-
109
-
110
-
111
-
112
-
113
-
114
-
115
-
116
-
117
-
118
-
119
-
120
-
121
-
122
-
123
-
124
-
125
-
126
-
127
-
128
-
129
-
130
-
131
-
132
-
133
-
134
-
135
-
136
-
137
-
138
-
139
-
140
-
141
-
142
-
143
-
144
-
145
-
146
-
147
-
148
-
149
-
150
-
 151
151 -
 152
152 -
 153
153 -
 154
154 -
 155
155 -
 156
156 -
 157
157 -
 158
158 -
 159
159 -
 160
160 -
 161
161 -
162
-
163
-
164
 |
 |

149
6.
Once you have chosen either one of the Local, SMTP server, LDAP server,
or HTTP server as your security type.
You need to set each local user’s
login name and password.
To create a new account, click the
Account
List
tab to open the following
Account List
dialog box, as shown below.
7.
Click the
New Account
button to open the
New Account
dialog box, as
shown below.
8.
Set up your user name and password respectively in the
Name
and
Password
fields.
The name and password are case-sensative and up to
64 characters can be entered in the
Name
field and up to 16 characters
can be entered in the
Password
field.
Fill the
Description
field if
necessary.