Ricoh SP4100N User Manual - Page 91
Setting Descriptions, Letter, A5, B5, Legal.
 |
UPC - 026649027994
View all Ricoh SP4100N manuals
Add to My Manuals
Save this manual to your list of manuals |
Page 91 highlights
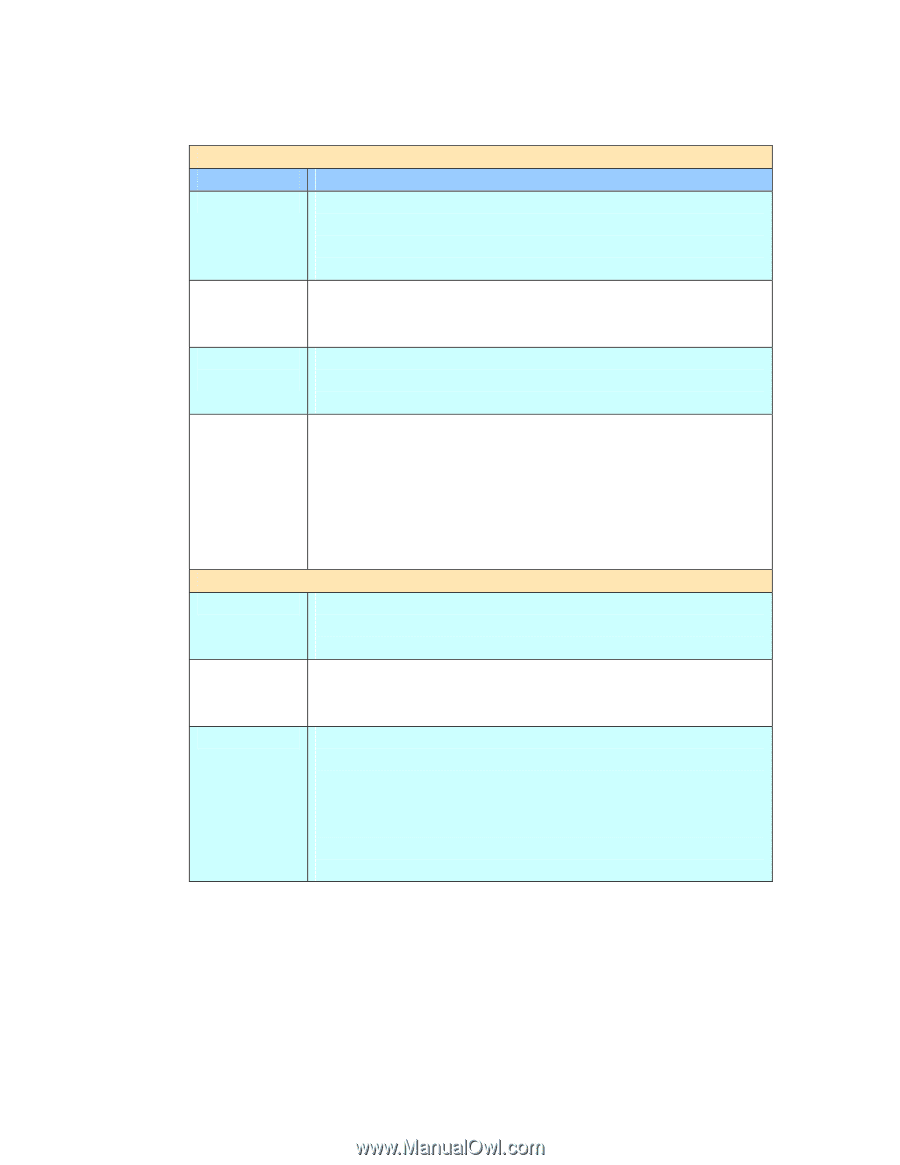
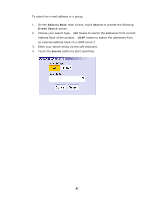
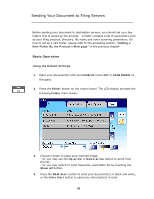
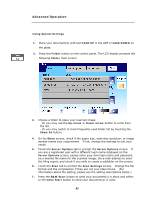
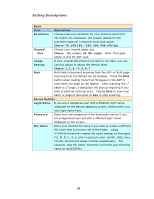
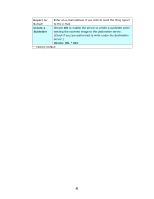
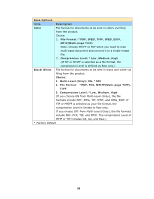
Setting Descriptions Basic Item Description Resolution Choose scanning resolution for your scanned document. The higher the resolution, the greater details for the scanned image yet it requires more disk space. Choice: 75, 100,150, *200, 300, 400, 600 dpi. Original Choose your original paper size. Size Choice: A4, Letter, A5, B5, Legal. Note: The Legal option is only for ADF scan. Image If your original document is too light or too dark, you can Density use this option to adjust the density level. Choice: 1, 2, 3, *4, 5, 6, 7 Bind Multi-batch document scanning from the ADF or Multi-page scanning from the flatbed can be enabled. Press the Bind button when loading more than 50 pages on the ADF or more than one page on the flatbed. After scanning the 1st batch or 1st page, a dialog box will pop up enquiring if you wish to perform continue scan. Choose Bind to scan next batch or page of document or End to stop scanning. Server Options Login Name If you are a registered user with a different login name displayed on the Server Options screen, please enter your own login name here. Password Enter your own password of the destination server if you are a registered user yet with a different login name displayed on the screen. File Name Enter your desired file name if you wish to create a different file name that is previous set in the folder. Using #Y#M#D#h#m#s#n makes file name change as time goes. (Y), M, D, h, m, s, and n represent year, month, date, hour, minute, second and series number respectively.) For example, type file name: test#D#n will bring your filing file name as test0500001 84
-
 1
1 -
2
-
3
-
4
-
5
-
6
-
7
-
8
-
9
-
10
-
11
-
12
-
13
-
14
-
15
-
16
-
17
-
18
-
19
-
20
-
21
-
22
-
23
-
24
-
25
-
26
-
27
-
28
-
29
-
30
-
31
-
32
-
33
-
34
-
35
-
36
-
37
-
38
-
39
-
40
-
41
-
42
-
43
-
44
-
45
-
46
-
47
-
48
-
49
-
50
-
51
-
52
-
53
-
54
-
55
-
56
-
57
-
58
-
59
-
60
-
61
-
62
-
63
-
64
-
65
-
66
-
67
-
68
-
69
-
70
-
71
-
72
-
73
-
74
-
75
-
76
-
77
-
78
-
79
-
80
-
81
-
82
-
83
-
84
-
85
-
 86
86 -
 87
87 -
 88
88 -
 89
89 -
 90
90 -
 91
91 -
 92
92 -
 93
93 -
 94
94 -
 95
95 -
 96
96 -
97
-
98
-
99
-
100
-
101
-
102
-
103
-
104
-
105
-
106
-
107
-
108
-
109
-
110
-
111
-
112
-
113
-
114
-
115
-
116
-
117
-
118
-
119
-
120
-
121
-
122
-
123
-
124
-
125
-
126
-
127
-
128
-
129
-
130
-
131
-
132
-
133
-
134
-
135
-
136
-
137
-
138
-
139
-
140
-
141
-
142
-
143
-
144
-
145
-
146
-
147
-
148
-
149
-
150
-
151
-
152
-
153
-
154
-
155
-
156
-
157
-
158
-
159
-
160
-
161
-
162
-
163
-
164
 |
 |