Ricoh SP4100N User Manual - Page 27
Installing the Printer Driver Using Network, Standard TCP/IP Port
 |
UPC - 026649027994
View all Ricoh SP4100N manuals
Add to My Manuals
Save this manual to your list of manuals |
Page 27 highlights
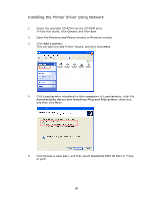
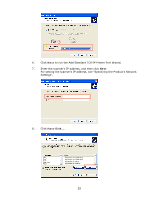
Installing the Printer Driver Using Network 1. Insert the provided CD-ROM into the CD-ROM drive. If Auto Run starts, click Cancel, and then Exit. 2. Open the Printers and Faxes window or Printers window. 3. Click Add a printer. This will start the Add Printer Wizard, and then click Next. 4. Click Local printer attached to this computer or Local printer, clear the Automatically detect and install my Plug and Play printer check box, and then click Next. 5. Click Create a new port, and then select Standard TCP/IP Port in "Type of port". 20
-
 1
1 -
2
-
3
-
4
-
5
-
6
-
7
-
8
-
9
-
10
-
11
-
12
-
13
-
14
-
15
-
16
-
17
-
18
-
19
-
20
-
21
-
 22
22 -
 23
23 -
 24
24 -
 25
25 -
 26
26 -
 27
27 -
 28
28 -
 29
29 -
 30
30 -
 31
31 -
 32
32 -
33
-
34
-
35
-
36
-
37
-
38
-
39
-
40
-
41
-
42
-
43
-
44
-
45
-
46
-
47
-
48
-
49
-
50
-
51
-
52
-
53
-
54
-
55
-
56
-
57
-
58
-
59
-
60
-
61
-
62
-
63
-
64
-
65
-
66
-
67
-
68
-
69
-
70
-
71
-
72
-
73
-
74
-
75
-
76
-
77
-
78
-
79
-
80
-
81
-
82
-
83
-
84
-
85
-
86
-
87
-
88
-
89
-
90
-
91
-
92
-
93
-
94
-
95
-
96
-
97
-
98
-
99
-
100
-
101
-
102
-
103
-
104
-
105
-
106
-
107
-
108
-
109
-
110
-
111
-
112
-
113
-
114
-
115
-
116
-
117
-
118
-
119
-
120
-
121
-
122
-
123
-
124
-
125
-
126
-
127
-
128
-
129
-
130
-
131
-
132
-
133
-
134
-
135
-
136
-
137
-
138
-
139
-
140
-
141
-
142
-
143
-
144
-
145
-
146
-
147
-
148
-
149
-
150
-
151
-
152
-
153
-
154
-
155
-
156
-
157
-
158
-
159
-
160
-
161
-
162
-
163
-
164
 |
 |
20
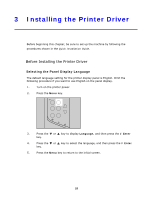
Installing the Printer Driver Using Network
1.
Insert the provided CD-ROM into the CD-ROM drive.
If Auto Run starts, click
Cancel
, and then
Exit
.
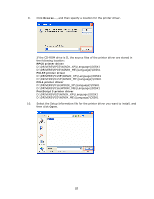
2.
Open the
Printers and Faxes
window or
Printers
window.
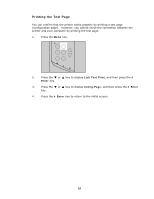
3.
Click
Add a printer
.
This will start the Add Printer Wizard, and then click
Next
.
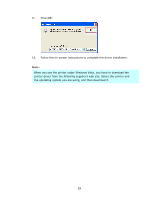
4.
Click
Local printer attached to this computer
or
Local printer
, clear the
Automatically detect and install my Plug and Play printer
check box,
and then click
Next
.
5.
Click
Create a new port
, and then select
Standard TCP/IP Port
in "Type
of port".