Brother International Entrepreneur Pro PR-1000 Users Manual - English - Page 115
Changing the Thread Spools with Designs of Eleven or, More Colors
 |
View all Brother International Entrepreneur Pro PR-1000 manuals
Add to My Manuals
Save this manual to your list of manuals |
Page 115 highlights
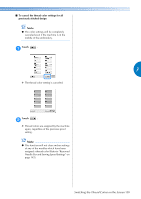
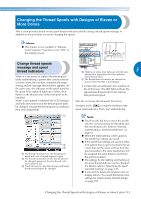
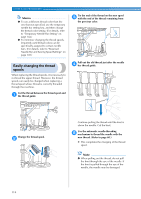
Changing the Thread Spools with Designs of Eleven or More Colors This section provides details on the spool thread indicators and the change thread spools message in addition to the procedure for easily changing the spools. Memo ● This feature is not available if "Manual Color Sequence" has been set to "ON" in the settings screen. 2 Change thread spools message and spool thread indicators When it is necessary to replace the thread spool while embroidering a pattern that contains eleven or more colors, the machine automatically stops 3 1 Flashing in white, then lights up with the next thread color (light turns off when indicates black thread color) 2 The thread does not need to be changed on spools where the LED is not flashing. sewing and the message shown below appears. At the same time, the indicator on the spool stand for the spool to be replaced lights up in white, then flashes in the thread color of the next spool to be installed. • Confirm the actual thread color number on the LCD screen. The LED lights indicate the approximate thread color to be used on that particular spool. When a new pattern is selected, the LCD message and indicators warn you if the thread spools must be changed. Change the thread spools according to their new assignments. After the necessary thread spools have been changed, touch to stop the flashing of the spool stand indicator. Then, start embroidering. 1 2 3 1 The thread information for the thread spool needs not to be changed appears in gray. 2 The thread information for the thread spool to be changed appears in the new thread color and framed in red. 3 Touch this key to close the message indicating that the thread spool be changed. Note ● Touch needle bar key to move the needle into the correct position for threading into the new thread color. Refer to "Moving and threading a selected needle bar" on page 62. ● When the embroidering screen appears, the needle bar settings are saved. ● If the needle bar settings are saved and the next pattern that is opened contains thread colors that are the same as those from the previous pattern, the same needle bars will be assigned the same thread colors from the previous pattern. ● The settings for the lighting and flashing of the spool thread indicator can be changed. For details, refer to "Specifying the spool stand LED setting" on page 230. ● If you wish to delete all assigned color on display refer to "To cancel the thread color settings for all previously stitched design" on page 109. Changing the Thread Spools with Designs of Eleven or More Colors 113
-
 1
1 -
2
-
3
-
4
-
5
-
6
-
7
-
8
-
9
-
10
-
11
-
12
-
13
-
14
-
15
-
16
-
17
-
18
-
19
-
20
-
21
-
22
-
23
-
24
-
25
-
26
-
27
-
28
-
29
-
30
-
31
-
32
-
33
-
34
-
35
-
36
-
37
-
38
-
39
-
40
-
41
-
42
-
43
-
44
-
45
-
46
-
47
-
48
-
49
-
50
-
51
-
52
-
53
-
54
-
55
-
56
-
57
-
58
-
59
-
60
-
61
-
62
-
63
-
64
-
65
-
66
-
67
-
68
-
69
-
70
-
71
-
72
-
73
-
74
-
75
-
76
-
77
-
78
-
79
-
80
-
81
-
82
-
83
-
84
-
85
-
86
-
87
-
88
-
89
-
90
-
91
-
92
-
93
-
94
-
95
-
96
-
97
-
98
-
99
-
100
-
101
-
102
-
103
-
104
-
105
-
106
-
107
-
108
-
109
-
 110
110 -
 111
111 -
 112
112 -
 113
113 -
 114
114 -
 115
115 -
 116
116 -
 117
117 -
 118
118 -
 119
119 -
 120
120 -
121
-
122
-
123
-
124
-
125
-
126
-
127
-
128
-
129
-
130
-
131
-
132
-
133
-
134
-
135
-
136
-
137
-
138
-
139
-
140
-
141
-
142
-
143
-
144
-
145
-
146
-
147
-
148
-
149
-
150
-
151
-
152
-
153
-
154
-
155
-
156
-
157
-
158
-
159
-
160
-
161
-
162
-
163
-
164
-
165
-
166
-
167
-
168
-
169
-
170
-
171
-
172
-
173
-
174
-
175
-
176
-
177
-
178
-
179
-
180
-
181
-
182
-
183
-
184
-
185
-
186
-
187
-
188
-
189
-
190
-
191
-
192
-
193
-
194
-
195
-
196
-
197
-
198
-
199
-
200
-
201
-
202
-
203
-
204
-
205
-
206
-
207
-
208
-
209
-
210
-
211
-
212
-
213
-
214
-
215
-
216
-
217
-
218
-
219
-
220
-
221
-
222
-
223
-
224
-
225
-
226
-
227
-
228
-
229
-
230
-
231
-
232
-
233
-
234
-
235
-
236
-
237
-
238
-
239
-
240
-
241
-
242
-
243
-
244
-
245
-
246
-
247
-
248
-
249
-
250
-
251
-
252
-
253
-
254
-
255
-
256
-
257
-
258
-
259
-
260
-
261
-
262
-
263
-
264
-
265
-
266
-
267
-
268
-
269
-
270
-
271
-
272
-
273
-
274
-
275
-
276
-
277
-
278
-
279
-
280
-
281
-
282
-
283
-
284
-
285
-
286
-
287
-
288
-
289
-
290
-
291
-
292
-
293
-
294
-
295
-
296
-
297
-
298
-
299
-
300
-
301
-
302
-
303
-
304
-
305
-
306
-
307
-
308
-
309
-
310
-
311
-
312
-
313
-
314
-
315
-
316
-
317
-
318
 |
 |
