Brother International Entrepreneur Pro PR-1000 Users Manual - English - Page 275
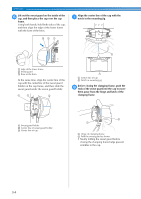
After removing the brim holder, unlock
 |
View all Brother International Entrepreneur Pro PR-1000 manuals
Add to My Manuals
Save this manual to your list of manuals |
Page 275 highlights
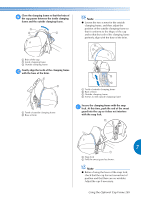
Attach the cap frame to the cap frame 2 driver. Turn the cap frame to the left so the brim of the cap does not hit the embroidery machine. Do not insert the cap frame with the brim pointing to the right, otherwise parts of the cap frame may hit the embroidery machine. ■ Removing the cap frame After embroidering is finished, remove the cap frame, and then remove the cap. Remove the cap frame from the cap frame 1 driver. Place both thumbs on the cap frame holders, grasping the handles on both the right and left side, gently pulling toward you. As shown in the illustration. • Be careful that the cap frame does not hit any nearby parts, such as the presser foot. After turning the cap frame so that the front of the cap faces upward, align the ring of the cap frame with the ring of the cap frame driver. While sliding the cap frame to the left and right, align the notch in the cap frame with the guiding plate on the cap frame driver, and then snap the frame into place. 1 Holder 2 Handle Before removing the cap frame, turn it to the left so that the brim of the cap does not hit the embroidery machine. • Be careful that the cap frame does not hit any nearby parts, such as the presser foot. After removing the brim holder, unlock the 2 snap lock of the clamping frame, remove the clips, and then remove the cap. 7 1 Guiding plate on cap frame driver 2 Notch on cap frame 3 Holder X The cap frame is secured with holders. Make sure that all of the holders on the driver are firmly secured in the frame holes. This completes the installation of the cap frame, and the cap is ready to be embroidered. 1 Brim holder 2 Snap lock 3 Clips Using the Optional Cap Frame 273
-
 1
1 -
2
-
3
-
4
-
5
-
6
-
7
-
8
-
9
-
10
-
11
-
12
-
13
-
14
-
15
-
16
-
17
-
18
-
19
-
20
-
21
-
22
-
23
-
24
-
25
-
26
-
27
-
28
-
29
-
30
-
31
-
32
-
33
-
34
-
35
-
36
-
37
-
38
-
39
-
40
-
41
-
42
-
43
-
44
-
45
-
46
-
47
-
48
-
49
-
50
-
51
-
52
-
53
-
54
-
55
-
56
-
57
-
58
-
59
-
60
-
61
-
62
-
63
-
64
-
65
-
66
-
67
-
68
-
69
-
70
-
71
-
72
-
73
-
74
-
75
-
76
-
77
-
78
-
79
-
80
-
81
-
82
-
83
-
84
-
85
-
86
-
87
-
88
-
89
-
90
-
91
-
92
-
93
-
94
-
95
-
96
-
97
-
98
-
99
-
100
-
101
-
102
-
103
-
104
-
105
-
106
-
107
-
108
-
109
-
110
-
111
-
112
-
113
-
114
-
115
-
116
-
117
-
118
-
119
-
120
-
121
-
122
-
123
-
124
-
125
-
126
-
127
-
128
-
129
-
130
-
131
-
132
-
133
-
134
-
135
-
136
-
137
-
138
-
139
-
140
-
141
-
142
-
143
-
144
-
145
-
146
-
147
-
148
-
149
-
150
-
151
-
152
-
153
-
154
-
155
-
156
-
157
-
158
-
159
-
160
-
161
-
162
-
163
-
164
-
165
-
166
-
167
-
168
-
169
-
170
-
171
-
172
-
173
-
174
-
175
-
176
-
177
-
178
-
179
-
180
-
181
-
182
-
183
-
184
-
185
-
186
-
187
-
188
-
189
-
190
-
191
-
192
-
193
-
194
-
195
-
196
-
197
-
198
-
199
-
200
-
201
-
202
-
203
-
204
-
205
-
206
-
207
-
208
-
209
-
210
-
211
-
212
-
213
-
214
-
215
-
216
-
217
-
218
-
219
-
220
-
221
-
222
-
223
-
224
-
225
-
226
-
227
-
228
-
229
-
230
-
231
-
232
-
233
-
234
-
235
-
236
-
237
-
238
-
239
-
240
-
241
-
242
-
243
-
244
-
245
-
246
-
247
-
248
-
249
-
250
-
251
-
252
-
253
-
254
-
255
-
256
-
257
-
258
-
259
-
260
-
261
-
262
-
263
-
264
-
265
-
266
-
267
-
268
-
269
-
 270
270 -
 271
271 -
 272
272 -
 273
273 -
 274
274 -
 275
275 -
 276
276 -
 277
277 -
 278
278 -
 279
279 -
 280
280 -
281
-
282
-
283
-
284
-
285
-
286
-
287
-
288
-
289
-
290
-
291
-
292
-
293
-
294
-
295
-
296
-
297
-
298
-
299
-
300
-
301
-
302
-
303
-
304
-
305
-
306
-
307
-
308
-
309
-
310
-
311
-
312
-
313
-
314
-
315
-
316
-
317
-
318
 |
 |
