Brother International Entrepreneur Pro PR-1000 Users Manual - English - Page 173
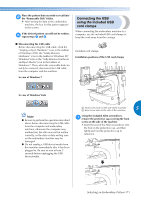
Connecting the USB, using the included USB, cord clamps
 |
View all Brother International Entrepreneur Pro PR-1000 manuals
Add to My Manuals
Save this manual to your list of manuals |
Page 173 highlights
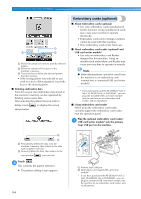
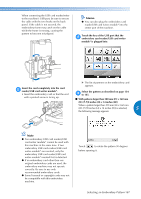
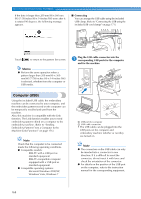
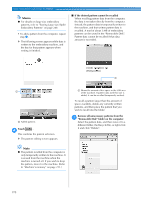
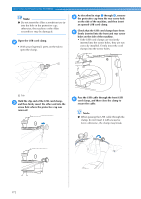
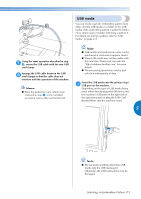
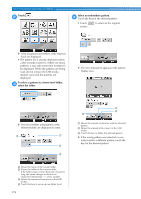
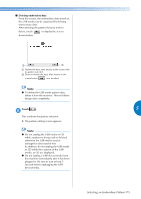
Place the pattern that you wish to recall into 2 the "Removable Disk" folder. X After writing the data to the embroidery machine, the key for that pattern appears in the screen. If the desired pattern can still not be written, 3 repeat steps 1 and 2. Connecting the USB using the included USB cord clamps When connecting the embroidery machine to a computer, use the included USB cord clamps to keep the cord away from the carriage. ■ Disconnecting the USB cable Before disconnecting the USB cable, click the "Unplug or Eject Hardware" icon in the taskbar of Windows 2000, the "Safely Remove Hardware" icon in the taskbar of Windows XP/ Windows Vista or the "Safly Remove Hardware and Eject Media" icon in the taskbar of Windows 7. Then, when the removable disk can safely be removed, disconnect the USB cable from the computer and the machine. In case of Windows 7 Included cord clamps Installation positions of the USB cord clamps 1 2 In case of Windows Vista 1 Front screw hole on the side of the machine 2 Rear screw hole on the side of the machine 5 Note ● Be sure to perform the operation described above before disconnecting the USB cable from the computer and embroidery machine, otherwise the computer may malfunction, the data may not be written correctly, or the data or data writing area on the embroidery machine may be damaged. ● Do not unplug a USB device/media from this machine immediately after it has been plugged in. Be sure to wait at least 5 seconds before unplugging the USB device/media. Using the included Allen screwdriver, 1 remove the protective cap covering the front screw on the side of the machine. • Insert the end of the Allen screwdriver into the hole in the protective cap, and then lightly pull out the protective cap to remove it. Selecting an Embroidery Pattern 171
-
 1
1 -
2
-
3
-
4
-
5
-
6
-
7
-
8
-
9
-
10
-
11
-
12
-
13
-
14
-
15
-
16
-
17
-
18
-
19
-
20
-
21
-
22
-
23
-
24
-
25
-
26
-
27
-
28
-
29
-
30
-
31
-
32
-
33
-
34
-
35
-
36
-
37
-
38
-
39
-
40
-
41
-
42
-
43
-
44
-
45
-
46
-
47
-
48
-
49
-
50
-
51
-
52
-
53
-
54
-
55
-
56
-
57
-
58
-
59
-
60
-
61
-
62
-
63
-
64
-
65
-
66
-
67
-
68
-
69
-
70
-
71
-
72
-
73
-
74
-
75
-
76
-
77
-
78
-
79
-
80
-
81
-
82
-
83
-
84
-
85
-
86
-
87
-
88
-
89
-
90
-
91
-
92
-
93
-
94
-
95
-
96
-
97
-
98
-
99
-
100
-
101
-
102
-
103
-
104
-
105
-
106
-
107
-
108
-
109
-
110
-
111
-
112
-
113
-
114
-
115
-
116
-
117
-
118
-
119
-
120
-
121
-
122
-
123
-
124
-
125
-
126
-
127
-
128
-
129
-
130
-
131
-
132
-
133
-
134
-
135
-
136
-
137
-
138
-
139
-
140
-
141
-
142
-
143
-
144
-
145
-
146
-
147
-
148
-
149
-
150
-
151
-
152
-
153
-
154
-
155
-
156
-
157
-
158
-
159
-
160
-
161
-
162
-
163
-
164
-
165
-
166
-
167
-
 168
168 -
 169
169 -
 170
170 -
 171
171 -
 172
172 -
 173
173 -
 174
174 -
 175
175 -
 176
176 -
 177
177 -
 178
178 -
179
-
180
-
181
-
182
-
183
-
184
-
185
-
186
-
187
-
188
-
189
-
190
-
191
-
192
-
193
-
194
-
195
-
196
-
197
-
198
-
199
-
200
-
201
-
202
-
203
-
204
-
205
-
206
-
207
-
208
-
209
-
210
-
211
-
212
-
213
-
214
-
215
-
216
-
217
-
218
-
219
-
220
-
221
-
222
-
223
-
224
-
225
-
226
-
227
-
228
-
229
-
230
-
231
-
232
-
233
-
234
-
235
-
236
-
237
-
238
-
239
-
240
-
241
-
242
-
243
-
244
-
245
-
246
-
247
-
248
-
249
-
250
-
251
-
252
-
253
-
254
-
255
-
256
-
257
-
258
-
259
-
260
-
261
-
262
-
263
-
264
-
265
-
266
-
267
-
268
-
269
-
270
-
271
-
272
-
273
-
274
-
275
-
276
-
277
-
278
-
279
-
280
-
281
-
282
-
283
-
284
-
285
-
286
-
287
-
288
-
289
-
290
-
291
-
292
-
293
-
294
-
295
-
296
-
297
-
298
-
299
-
300
-
301
-
302
-
303
-
304
-
305
-
306
-
307
-
308
-
309
-
310
-
311
-
312
-
313
-
314
-
315
-
316
-
317
-
318
 |
 |
