Brother International Entrepreneur Pro PR-1000 Users Manual - English - Page 297
compensation or underlay
 |
View all Brother International Entrepreneur Pro PR-1000 manuals
Add to My Manuals
Save this manual to your list of manuals |
Page 297 highlights
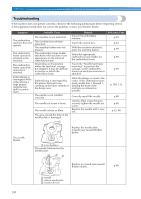
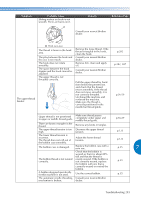
Symptom The embroidery pattern is misaligned. Probable Cause The embroidery frame is not correctly attached to the carriage. The carriage or the embroidery frame is hitting objects. The fabric is caught or pinched. The carriage moved while removing embroidery frame. The design was not digitized correctly. The upper thread tension is low. Remedy Correctly attach the embroidery frame to the carriage. Make sure that the pins on the left and right arms of the embroidery frame holder securely fit into the holes in the handles on the embroidery frame. The pattern may become misaligned if the carriage or embroidery frame is hitting objects. Make sure that there are no objects within the operating field of the embroidery frame. Stop the machine, and then correctly position the fabric. The pattern may become misaligned if the presser foot was hit or the carriage was moved while replacing bobbin thread, changing needle, or working near embroidery frame. Be careful when removing and reattaching the embroidery frame while replacing bobbin thread, changing needle, or working near embroidery frame. If the carriage is moved, turn the machine off, then on again. The correct frame position at the time that the machine was stopped is stored in the machine's memory, and the embroidery frame is returned to the correct position. The design may need more pull compensation or underlay to accommodate stretchy or highnapped fabrics. Reference Page p.51 There are loops in the upper thread. After passing the upper thread through the hole in the presser foot, pull the thread by hand to check the thread tension. If it is p.123 difficult to determine, compare it with other needle bars where 7 looping does not occur. The thread tension does not correspond to the amount that the thread tension knob was tightened. If the thread tension cannot be adjusted, thread wax and dust may have collected in the upper or middle thread guide plates, causing the thread tension guide plates to rise. Clean the thread tension guide plates. p.285 Troubleshooting 295
-
 1
1 -
2
-
3
-
4
-
5
-
6
-
7
-
8
-
9
-
10
-
11
-
12
-
13
-
14
-
15
-
16
-
17
-
18
-
19
-
20
-
21
-
22
-
23
-
24
-
25
-
26
-
27
-
28
-
29
-
30
-
31
-
32
-
33
-
34
-
35
-
36
-
37
-
38
-
39
-
40
-
41
-
42
-
43
-
44
-
45
-
46
-
47
-
48
-
49
-
50
-
51
-
52
-
53
-
54
-
55
-
56
-
57
-
58
-
59
-
60
-
61
-
62
-
63
-
64
-
65
-
66
-
67
-
68
-
69
-
70
-
71
-
72
-
73
-
74
-
75
-
76
-
77
-
78
-
79
-
80
-
81
-
82
-
83
-
84
-
85
-
86
-
87
-
88
-
89
-
90
-
91
-
92
-
93
-
94
-
95
-
96
-
97
-
98
-
99
-
100
-
101
-
102
-
103
-
104
-
105
-
106
-
107
-
108
-
109
-
110
-
111
-
112
-
113
-
114
-
115
-
116
-
117
-
118
-
119
-
120
-
121
-
122
-
123
-
124
-
125
-
126
-
127
-
128
-
129
-
130
-
131
-
132
-
133
-
134
-
135
-
136
-
137
-
138
-
139
-
140
-
141
-
142
-
143
-
144
-
145
-
146
-
147
-
148
-
149
-
150
-
151
-
152
-
153
-
154
-
155
-
156
-
157
-
158
-
159
-
160
-
161
-
162
-
163
-
164
-
165
-
166
-
167
-
168
-
169
-
170
-
171
-
172
-
173
-
174
-
175
-
176
-
177
-
178
-
179
-
180
-
181
-
182
-
183
-
184
-
185
-
186
-
187
-
188
-
189
-
190
-
191
-
192
-
193
-
194
-
195
-
196
-
197
-
198
-
199
-
200
-
201
-
202
-
203
-
204
-
205
-
206
-
207
-
208
-
209
-
210
-
211
-
212
-
213
-
214
-
215
-
216
-
217
-
218
-
219
-
220
-
221
-
222
-
223
-
224
-
225
-
226
-
227
-
228
-
229
-
230
-
231
-
232
-
233
-
234
-
235
-
236
-
237
-
238
-
239
-
240
-
241
-
242
-
243
-
244
-
245
-
246
-
247
-
248
-
249
-
250
-
251
-
252
-
253
-
254
-
255
-
256
-
257
-
258
-
259
-
260
-
261
-
262
-
263
-
264
-
265
-
266
-
267
-
268
-
269
-
270
-
271
-
272
-
273
-
274
-
275
-
276
-
277
-
278
-
279
-
280
-
281
-
282
-
283
-
284
-
285
-
286
-
287
-
288
-
289
-
290
-
291
-
 292
292 -
 293
293 -
 294
294 -
 295
295 -
 296
296 -
 297
297 -
 298
298 -
 299
299 -
 300
300 -
 301
301 -
 302
302 -
303
-
304
-
305
-
306
-
307
-
308
-
309
-
310
-
311
-
312
-
313
-
314
-
315
-
316
-
317
-
318
 |
 |