Brother International Entrepreneur Pro PR-1000 Users Manual - English - Page 222
Changing the display, guides
 |
View all Brother International Entrepreneur Pro PR-1000 manuals
Add to My Manuals
Save this manual to your list of manuals |
Page 222 highlights
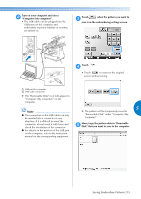
BASIC SETTINGS AND HELP FEATURE ■ Page 5 Note ● Some settings cannot be changed while J sewing. K L M Changing the display guides N The guides in the pattern display area can be set for O the desired embroidery frame. P The guide settings can be specified from page 1/5 Q of the settings screen. J Link function Set the Link function on or off. (Refer to "Sending Embroidery Patterns From a Computer to the Machine (Link Function)" on page 176) K Manual Color Sequence Set the Manual color sequence on or off. (Refer to "Selecting/Managing Thread Colors for Each Needle Bar (Manual Color Sequence)" on page 132) L Units of Measure Enables the units of measurements that appear in the screens to be changed. (Refer to page 231.) M LANGUAGES Enables the display language to be changed. The keys and messages appear in the selected language. (Refer to page 231.) N The Total Count counter shows the total number of stitches sewn, and the Trip Count counter show the number of stitches that have been sewn since the machine's last maintenance. O The Total Time counter shows the total amount of time that the machine has been used, and the Trip Time counter shows the amount of time that the machine has been used since its last maintenance. Use counters N and O as a standard for performing periodic maintenance and for receiving maintenance for the machine. P The "No. ##" is the number for the embroidery machine. Q Version Shows the version of the software installed on this embroidery machine. (Refer to page 309.) Note ● Check with your local authorized Brother dealer or at "http://solutions.brother.com" for details on available updates. Details of each of the settings are described in the following sections. After specifying the desired settings, touch to return to the screen that was displayed before the settings screen was displayed. 220 2 3 1 4 1 How the guides will appear with the specified settings can be previewed here. 2 Type of embroidery frame holder Specifies the type of the embroidery frame holder. 3 Area Specifies the size of the embroidery frame displayed as a guide. The guides that appears does not indicates the size of the embroidery frame that is actually installed. 4 Centerpoint marker or grid lines Display or the grid lines or hides the centerpoint marker of the design. ■ Type of the embroidery frame holder Select the type of the embroidery frame holder according to the embroidery frame you want to use. Embroidery frame holder A/B (included) Cap frame/Cylinder frame (Optional) Embroidery frame holder C (Optional) Refer to "Types of embroidery frames/frame holders and their applications" on page 91 to 92.
-
 1
1 -
2
-
3
-
4
-
5
-
6
-
7
-
8
-
9
-
10
-
11
-
12
-
13
-
14
-
15
-
16
-
17
-
18
-
19
-
20
-
21
-
22
-
23
-
24
-
25
-
26
-
27
-
28
-
29
-
30
-
31
-
32
-
33
-
34
-
35
-
36
-
37
-
38
-
39
-
40
-
41
-
42
-
43
-
44
-
45
-
46
-
47
-
48
-
49
-
50
-
51
-
52
-
53
-
54
-
55
-
56
-
57
-
58
-
59
-
60
-
61
-
62
-
63
-
64
-
65
-
66
-
67
-
68
-
69
-
70
-
71
-
72
-
73
-
74
-
75
-
76
-
77
-
78
-
79
-
80
-
81
-
82
-
83
-
84
-
85
-
86
-
87
-
88
-
89
-
90
-
91
-
92
-
93
-
94
-
95
-
96
-
97
-
98
-
99
-
100
-
101
-
102
-
103
-
104
-
105
-
106
-
107
-
108
-
109
-
110
-
111
-
112
-
113
-
114
-
115
-
116
-
117
-
118
-
119
-
120
-
121
-
122
-
123
-
124
-
125
-
126
-
127
-
128
-
129
-
130
-
131
-
132
-
133
-
134
-
135
-
136
-
137
-
138
-
139
-
140
-
141
-
142
-
143
-
144
-
145
-
146
-
147
-
148
-
149
-
150
-
151
-
152
-
153
-
154
-
155
-
156
-
157
-
158
-
159
-
160
-
161
-
162
-
163
-
164
-
165
-
166
-
167
-
168
-
169
-
170
-
171
-
172
-
173
-
174
-
175
-
176
-
177
-
178
-
179
-
180
-
181
-
182
-
183
-
184
-
185
-
186
-
187
-
188
-
189
-
190
-
191
-
192
-
193
-
194
-
195
-
196
-
197
-
198
-
199
-
200
-
201
-
202
-
203
-
204
-
205
-
206
-
207
-
208
-
209
-
210
-
211
-
212
-
213
-
214
-
215
-
216
-
 217
217 -
 218
218 -
 219
219 -
 220
220 -
 221
221 -
 222
222 -
 223
223 -
 224
224 -
 225
225 -
 226
226 -
 227
227 -
228
-
229
-
230
-
231
-
232
-
233
-
234
-
235
-
236
-
237
-
238
-
239
-
240
-
241
-
242
-
243
-
244
-
245
-
246
-
247
-
248
-
249
-
250
-
251
-
252
-
253
-
254
-
255
-
256
-
257
-
258
-
259
-
260
-
261
-
262
-
263
-
264
-
265
-
266
-
267
-
268
-
269
-
270
-
271
-
272
-
273
-
274
-
275
-
276
-
277
-
278
-
279
-
280
-
281
-
282
-
283
-
284
-
285
-
286
-
287
-
288
-
289
-
290
-
291
-
292
-
293
-
294
-
295
-
296
-
297
-
298
-
299
-
300
-
301
-
302
-
303
-
304
-
305
-
306
-
307
-
308
-
309
-
310
-
311
-
312
-
313
-
314
-
315
-
316
-
317
-
318
 |
 |
