Brother International Entrepreneur Pro PR-1000 Users Manual - English - Page 274
Attaching the cap frame to the embroidery
 |
View all Brother International Entrepreneur Pro PR-1000 manuals
Add to My Manuals
Save this manual to your list of manuals |
Page 274 highlights
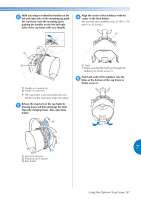
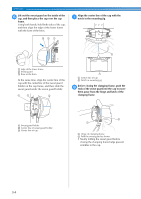
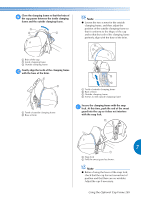
APPENDIX Use the clips to secure the cap. j Remove the cap frame from the mounting l jig. To remove the cap frame from the mounting jig, place both thumbs on the holders on the mounting jig, grasping the handles on both the right and left side of the cap frame, gently pulling toward you. As shown in the illustration. 1 Clips • Attach the clips with their handles folded inward. If the handles are pointed outward, they may be hit by the machine's presser foot. X This completes the positioning of the cap in the cap frame. Return the cap frame to its original position. k • While pulling the lever behind the handle on the right side of the mounting jig toward you, rotate the cap frame to the left. After the cap frame has been rotated 90° and the brim points up, release the lever to lock the cap frame in place. 1 Holder 2 Handle ■ Attaching the cap frame to the embroidery machine The cap frame driver is required in order to attach the cap frame to the embroidery machine. Before attaching the cap frame to the machine, attach the cap frame driver to the carriage. (Refer to "Installing the cap frame driver" on page 260.) Before attaching the cap frame, adjust the position of the cap supports to fit the type (size) of cap to be embroidered. To adjust move the cap supports to the front or back depending on the cap size. Loosen the four screws on the cap supports 1 two or three turns, and then move the cap supports to a position where tension in the cap will be maintained. • Do not remove any of the screws, otherwise they may be lost. Only turn the screws to slightly loosen them. 1 Handle 2 Lever 1 Cap supports 2 Screws 3 Low profile (shorter caps) 4 Standard (taller caps) • Be sure to adjust both the right and left cap supports to the same position. 272
-
 1
1 -
2
-
3
-
4
-
5
-
6
-
7
-
8
-
9
-
10
-
11
-
12
-
13
-
14
-
15
-
16
-
17
-
18
-
19
-
20
-
21
-
22
-
23
-
24
-
25
-
26
-
27
-
28
-
29
-
30
-
31
-
32
-
33
-
34
-
35
-
36
-
37
-
38
-
39
-
40
-
41
-
42
-
43
-
44
-
45
-
46
-
47
-
48
-
49
-
50
-
51
-
52
-
53
-
54
-
55
-
56
-
57
-
58
-
59
-
60
-
61
-
62
-
63
-
64
-
65
-
66
-
67
-
68
-
69
-
70
-
71
-
72
-
73
-
74
-
75
-
76
-
77
-
78
-
79
-
80
-
81
-
82
-
83
-
84
-
85
-
86
-
87
-
88
-
89
-
90
-
91
-
92
-
93
-
94
-
95
-
96
-
97
-
98
-
99
-
100
-
101
-
102
-
103
-
104
-
105
-
106
-
107
-
108
-
109
-
110
-
111
-
112
-
113
-
114
-
115
-
116
-
117
-
118
-
119
-
120
-
121
-
122
-
123
-
124
-
125
-
126
-
127
-
128
-
129
-
130
-
131
-
132
-
133
-
134
-
135
-
136
-
137
-
138
-
139
-
140
-
141
-
142
-
143
-
144
-
145
-
146
-
147
-
148
-
149
-
150
-
151
-
152
-
153
-
154
-
155
-
156
-
157
-
158
-
159
-
160
-
161
-
162
-
163
-
164
-
165
-
166
-
167
-
168
-
169
-
170
-
171
-
172
-
173
-
174
-
175
-
176
-
177
-
178
-
179
-
180
-
181
-
182
-
183
-
184
-
185
-
186
-
187
-
188
-
189
-
190
-
191
-
192
-
193
-
194
-
195
-
196
-
197
-
198
-
199
-
200
-
201
-
202
-
203
-
204
-
205
-
206
-
207
-
208
-
209
-
210
-
211
-
212
-
213
-
214
-
215
-
216
-
217
-
218
-
219
-
220
-
221
-
222
-
223
-
224
-
225
-
226
-
227
-
228
-
229
-
230
-
231
-
232
-
233
-
234
-
235
-
236
-
237
-
238
-
239
-
240
-
241
-
242
-
243
-
244
-
245
-
246
-
247
-
248
-
249
-
250
-
251
-
252
-
253
-
254
-
255
-
256
-
257
-
258
-
259
-
260
-
261
-
262
-
263
-
264
-
265
-
266
-
267
-
268
-
 269
269 -
 270
270 -
 271
271 -
 272
272 -
 273
273 -
 274
274 -
 275
275 -
 276
276 -
 277
277 -
 278
278 -
 279
279 -
280
-
281
-
282
-
283
-
284
-
285
-
286
-
287
-
288
-
289
-
290
-
291
-
292
-
293
-
294
-
295
-
296
-
297
-
298
-
299
-
300
-
301
-
302
-
303
-
304
-
305
-
306
-
307
-
308
-
309
-
310
-
311
-
312
-
313
-
314
-
315
-
316
-
317
-
318
 |
 |
