Brother International Entrepreneur Pro PR-1000 Users Manual - English - Page 135
Using the manual color, sequence, Precautions on the manual, color sequence
 |
View all Brother International Entrepreneur Pro PR-1000 manuals
Add to My Manuals
Save this manual to your list of manuals |
Page 135 highlights
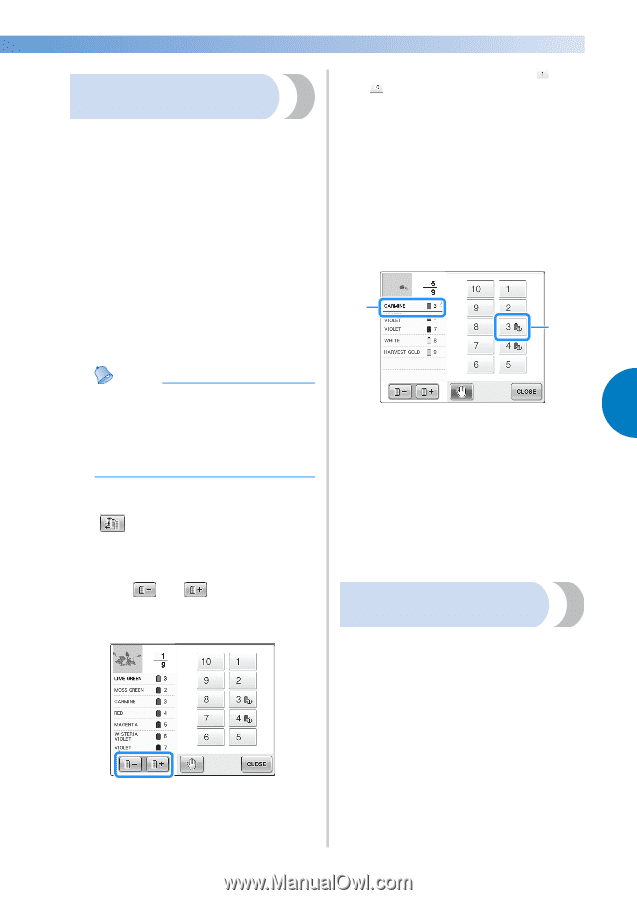
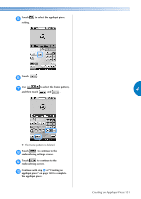
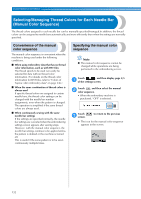
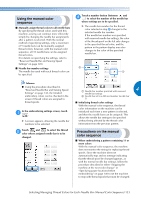
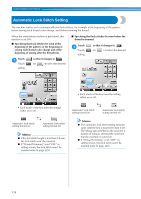
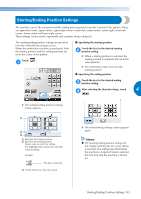
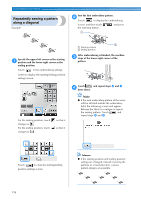
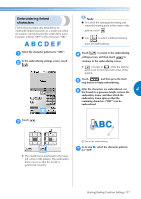
Using the manual color sequence ■ Manually assign thread colors to all needle bars By specifying the thread colors used with this machine, sewing can continue more efficiently simply by changing the needle bar assignments after a pattern is selected. With the normal method of specifying settings, only a maximum of 9 needle bars can be manually assigned thread colors; however, with the manual color sequence, all 10 needle bars can be assigned thread colors. (For details on specifying the settings, refer to "Reserved Needle Bar and Sewing Speed Settings" on page 145.) ■ Needle bar number settings The needle bar used with each thread color can be specified. Touch a number button (between and 3 ) to select the number of the needle bar whose settings are to be specified. X The needle bar number for the thread color selected in step 2 changes to the selected needle bar number. If the needle bar number was specified with reserved needle bar settings, the color of the thread spool on the left side changes to the specified thread color, and the pattern in the pattern display area also changes to the color of the specified needle bar. 2 1 Memo ● Using the procedure described in "Reserved Needle Bar and Sewing Speed Settings" on page 145, the finished embroidery colors can be checked in the screen if thread colors are assigned to 1 Needle bar number specified with reserved 4 needle bar settings 2 Needle bar set to a different number (needle bar 5) thread spools. ■ Initializing thread color settings With the manual color sequence, the thread In the embroidering settings screen, touch 1 . color information on the machine can be initialized each time a new pattern is selected, and then the needle bars can be assigned. This allows the needle bar settings to be specified X A screen appears, allowing the needle bar without being affected by the thread color numbers to be selected. information from the previous pattern. Touch and to select the thread 2 color whose assigned needle bar is to be changed. Precautions on the manual color sequence ■ When embroidering a pattern containing 11 or more colors With the manual color sequence, the machine does not monitor the timing for replacing thread spools. Since the machine does not automatically stop and no message indicating that the thread spool be changed appears, as with the normal needle bar settings, follow the procedure described in either "Stopping the machine at the next color change" or "Specifying pause locations before embroidering" on page 140 to set the machine to stop with thread spools that must be changed. Selecting/Managing Thread Colors for Each Needle Bar (Manual Color Sequence) 133
-
 1
1 -
2
-
3
-
4
-
5
-
6
-
7
-
8
-
9
-
10
-
11
-
12
-
13
-
14
-
15
-
16
-
17
-
18
-
19
-
20
-
21
-
22
-
23
-
24
-
25
-
26
-
27
-
28
-
29
-
30
-
31
-
32
-
33
-
34
-
35
-
36
-
37
-
38
-
39
-
40
-
41
-
42
-
43
-
44
-
45
-
46
-
47
-
48
-
49
-
50
-
51
-
52
-
53
-
54
-
55
-
56
-
57
-
58
-
59
-
60
-
61
-
62
-
63
-
64
-
65
-
66
-
67
-
68
-
69
-
70
-
71
-
72
-
73
-
74
-
75
-
76
-
77
-
78
-
79
-
80
-
81
-
82
-
83
-
84
-
85
-
86
-
87
-
88
-
89
-
90
-
91
-
92
-
93
-
94
-
95
-
96
-
97
-
98
-
99
-
100
-
101
-
102
-
103
-
104
-
105
-
106
-
107
-
108
-
109
-
110
-
111
-
112
-
113
-
114
-
115
-
116
-
117
-
118
-
119
-
120
-
121
-
122
-
123
-
124
-
125
-
126
-
127
-
128
-
129
-
 130
130 -
 131
131 -
 132
132 -
 133
133 -
 134
134 -
 135
135 -
 136
136 -
 137
137 -
 138
138 -
 139
139 -
 140
140 -
141
-
142
-
143
-
144
-
145
-
146
-
147
-
148
-
149
-
150
-
151
-
152
-
153
-
154
-
155
-
156
-
157
-
158
-
159
-
160
-
161
-
162
-
163
-
164
-
165
-
166
-
167
-
168
-
169
-
170
-
171
-
172
-
173
-
174
-
175
-
176
-
177
-
178
-
179
-
180
-
181
-
182
-
183
-
184
-
185
-
186
-
187
-
188
-
189
-
190
-
191
-
192
-
193
-
194
-
195
-
196
-
197
-
198
-
199
-
200
-
201
-
202
-
203
-
204
-
205
-
206
-
207
-
208
-
209
-
210
-
211
-
212
-
213
-
214
-
215
-
216
-
217
-
218
-
219
-
220
-
221
-
222
-
223
-
224
-
225
-
226
-
227
-
228
-
229
-
230
-
231
-
232
-
233
-
234
-
235
-
236
-
237
-
238
-
239
-
240
-
241
-
242
-
243
-
244
-
245
-
246
-
247
-
248
-
249
-
250
-
251
-
252
-
253
-
254
-
255
-
256
-
257
-
258
-
259
-
260
-
261
-
262
-
263
-
264
-
265
-
266
-
267
-
268
-
269
-
270
-
271
-
272
-
273
-
274
-
275
-
276
-
277
-
278
-
279
-
280
-
281
-
282
-
283
-
284
-
285
-
286
-
287
-
288
-
289
-
290
-
291
-
292
-
293
-
294
-
295
-
296
-
297
-
298
-
299
-
300
-
301
-
302
-
303
-
304
-
305
-
306
-
307
-
308
-
309
-
310
-
311
-
312
-
313
-
314
-
315
-
316
-
317
-
318
 |
 |