Brother International Entrepreneur Pro PR-1000 Users Manual - English - Page 76
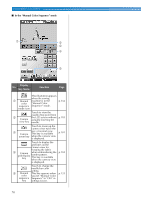
Understanding the pattern editing screen
 |
View all Brother International Entrepreneur Pro PR-1000 manuals
Add to My Manuals
Save this manual to your list of manuals |
Page 76 highlights
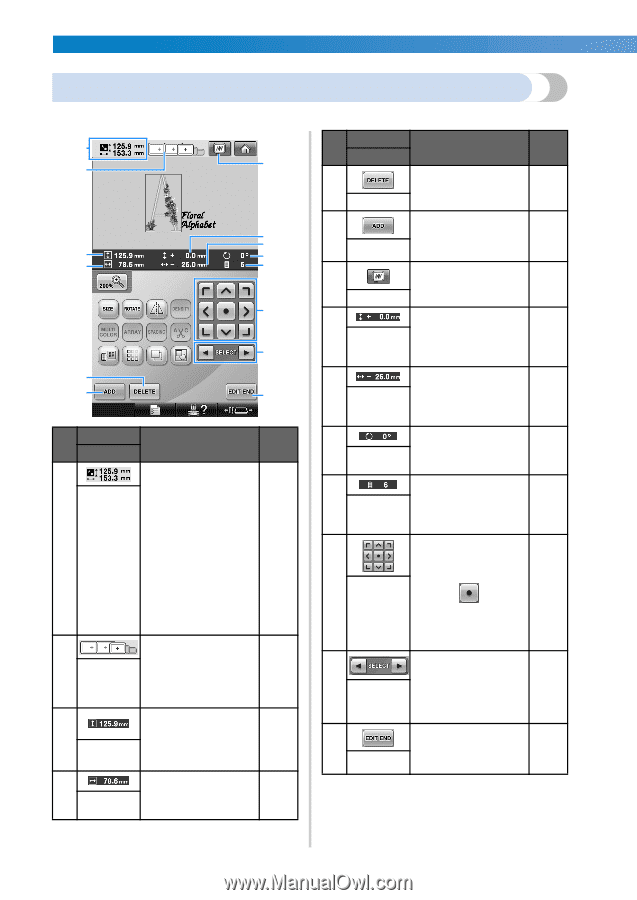
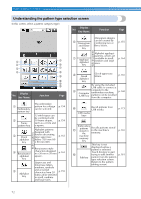
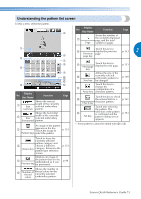
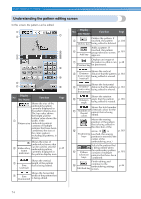
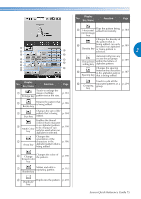
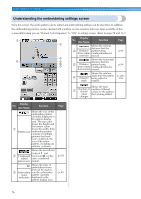
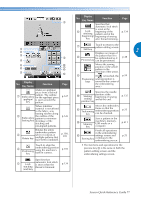
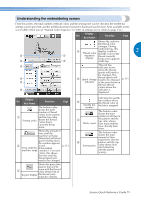
EMBROIDERING TUTORIAL Understanding the pattern editing screen In this screen, the pattern can be edited. 1 7 2 8 9 3 0 4 A B C 5 6 D Display No. Key Name Function Page Shows the size of the embroidery pattern currently displayed in the pattern display area. The top value shows the height and the bottom value shows the 1 width. If the Pattern size embroidery pattern consists of multiple patterns that have been combined, the size of the entire pattern, including all patterns, is shown. Shows the sizes of embroidery frames that 2 Embroidery frame indicators can be used to sew the embroidery pattern currently displayed in the pattern display area. p.49 Shows the vertical 3 length of the pattern Size that is being edited. (vertical) Shows the horizontal 4 Size (horizontal) width of the pattern that is being edited. Display No. Key Name Function Page Deletes the pattern. If 5 touched, the pattern p.204 Delete key being edited is deleted. Adds a pattern. If 6 touched, the pattern group selection screen p.181 Add key appears. Displays an image of 7 the pattern so that it can p.48 Preview key be previewed. Shows the vertical 8 Distance distance that the pattern p.183 from center being edited is moved. (vertical) Shows the horizontal 9 Distance distance that the pattern p.183 from center being edited is moved. (horizontal) Shows the rotation 0 Rotation angle angle that the pattern being edited is rotated. p.185 Shows the total number A Number of thread colors of thread colors for the pattern that is being edited. Moves the sewing position of the pattern that is being edited in the direction of the B arrow. (If is p.183 Positioning touched, the sewing keys position is moved to the center of the embroidering area.) Selects the pattern that is being edited when C Pattern the embroidery pattern consists of multiple p.183 selection patterns that have been keys combined. Finish editing and D continue to the embroidering settings p.46 Edit End key screen. 74
-
 1
1 -
2
-
3
-
4
-
5
-
6
-
7
-
8
-
9
-
10
-
11
-
12
-
13
-
14
-
15
-
16
-
17
-
18
-
19
-
20
-
21
-
22
-
23
-
24
-
25
-
26
-
27
-
28
-
29
-
30
-
31
-
32
-
33
-
34
-
35
-
36
-
37
-
38
-
39
-
40
-
41
-
42
-
43
-
44
-
45
-
46
-
47
-
48
-
49
-
50
-
51
-
52
-
53
-
54
-
55
-
56
-
57
-
58
-
59
-
60
-
61
-
62
-
63
-
64
-
65
-
66
-
67
-
68
-
69
-
70
-
 71
71 -
 72
72 -
 73
73 -
 74
74 -
 75
75 -
 76
76 -
 77
77 -
 78
78 -
 79
79 -
 80
80 -
 81
81 -
82
-
83
-
84
-
85
-
86
-
87
-
88
-
89
-
90
-
91
-
92
-
93
-
94
-
95
-
96
-
97
-
98
-
99
-
100
-
101
-
102
-
103
-
104
-
105
-
106
-
107
-
108
-
109
-
110
-
111
-
112
-
113
-
114
-
115
-
116
-
117
-
118
-
119
-
120
-
121
-
122
-
123
-
124
-
125
-
126
-
127
-
128
-
129
-
130
-
131
-
132
-
133
-
134
-
135
-
136
-
137
-
138
-
139
-
140
-
141
-
142
-
143
-
144
-
145
-
146
-
147
-
148
-
149
-
150
-
151
-
152
-
153
-
154
-
155
-
156
-
157
-
158
-
159
-
160
-
161
-
162
-
163
-
164
-
165
-
166
-
167
-
168
-
169
-
170
-
171
-
172
-
173
-
174
-
175
-
176
-
177
-
178
-
179
-
180
-
181
-
182
-
183
-
184
-
185
-
186
-
187
-
188
-
189
-
190
-
191
-
192
-
193
-
194
-
195
-
196
-
197
-
198
-
199
-
200
-
201
-
202
-
203
-
204
-
205
-
206
-
207
-
208
-
209
-
210
-
211
-
212
-
213
-
214
-
215
-
216
-
217
-
218
-
219
-
220
-
221
-
222
-
223
-
224
-
225
-
226
-
227
-
228
-
229
-
230
-
231
-
232
-
233
-
234
-
235
-
236
-
237
-
238
-
239
-
240
-
241
-
242
-
243
-
244
-
245
-
246
-
247
-
248
-
249
-
250
-
251
-
252
-
253
-
254
-
255
-
256
-
257
-
258
-
259
-
260
-
261
-
262
-
263
-
264
-
265
-
266
-
267
-
268
-
269
-
270
-
271
-
272
-
273
-
274
-
275
-
276
-
277
-
278
-
279
-
280
-
281
-
282
-
283
-
284
-
285
-
286
-
287
-
288
-
289
-
290
-
291
-
292
-
293
-
294
-
295
-
296
-
297
-
298
-
299
-
300
-
301
-
302
-
303
-
304
-
305
-
306
-
307
-
308
-
309
-
310
-
311
-
312
-
313
-
314
-
315
-
316
-
317
-
318
 |
 |