Epson 9880 Printer Guide - Page 106
performance, you can create a custom paper configuration and save it as
 |
UPC - 010343866843
View all Epson 9880 manuals
Add to My Manuals
Save this manual to your list of manuals |
Page 106 highlights
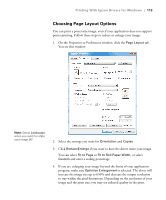
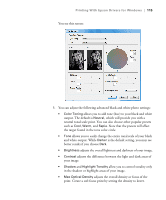
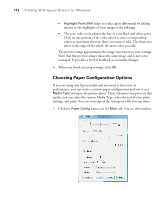
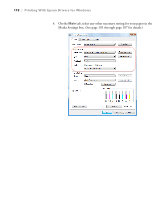
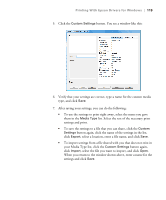
116 | Printing With Epson Drivers for Windows • Highlight Point Shift helps to reduce gloss differential by adding density to the highlights of your image or the full page. • The tone color circle adjusts the hue of your black and white print. Click on any portion of the color wheel or enter corresponding values to customize the tone (hue) you want to add. The closer you select to the edge of the wheel, the more color you add. The preview image approximates the image tone based on your settings. Note that this preview always shows the same image and is not color managed. It provides a level of feedback as you make changes. 6. When you finish selecting settings, click OK. Choosing Paper Configuration Options If you are using non-Epson media and you need to fine-tune its performance, you can create a custom paper configuration and save it as a Media Type setting in the printer driver. Then, whenever you print on that media, you can select the custom Media Type, select the rest of your print settings, and print. You can even export the settings to a file you can share. 1. Click the Paper Config button on the Main tab. You see this window: 116
-
 1
1 -
2
-
3
-
4
-
5
-
6
-
7
-
8
-
9
-
10
-
11
-
12
-
13
-
14
-
15
-
16
-
17
-
18
-
19
-
20
-
21
-
22
-
23
-
24
-
25
-
26
-
27
-
28
-
29
-
30
-
31
-
32
-
33
-
34
-
35
-
36
-
37
-
38
-
39
-
40
-
41
-
42
-
43
-
44
-
45
-
46
-
47
-
48
-
49
-
50
-
51
-
52
-
53
-
54
-
55
-
56
-
57
-
58
-
59
-
60
-
61
-
62
-
63
-
64
-
65
-
66
-
67
-
68
-
69
-
70
-
71
-
72
-
73
-
74
-
75
-
76
-
77
-
78
-
79
-
80
-
81
-
82
-
83
-
84
-
85
-
86
-
87
-
88
-
89
-
90
-
91
-
92
-
93
-
94
-
95
-
96
-
97
-
98
-
99
-
100
-
 101
101 -
 102
102 -
 103
103 -
 104
104 -
 105
105 -
 106
106 -
 107
107 -
 108
108 -
 109
109 -
 110
110 -
 111
111 -
112
-
113
-
114
-
115
-
116
-
117
-
118
-
119
-
120
-
121
-
122
-
123
-
124
-
125
-
126
-
127
-
128
-
129
-
130
-
131
-
132
-
133
-
134
-
135
-
136
-
137
-
138
-
139
-
140
-
141
-
142
-
143
-
144
-
145
-
146
-
147
-
148
-
149
-
150
-
151
-
152
-
153
-
154
-
155
-
156
-
157
-
158
-
159
-
160
-
161
-
162
-
163
-
164
-
165
-
166
-
167
-
168
-
169
-
170
-
171
-
172
-
173
-
174
-
175
-
176
 |
 |