Epson 9880 Printer Guide - Page 124
Running a Power Cleaning Cycle, When cleaning is finished and
 |
UPC - 010343866843
View all Epson 9880 manuals
Add to My Manuals
Save this manual to your list of manuals |
Page 124 highlights
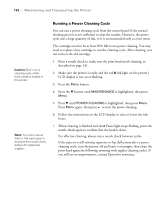
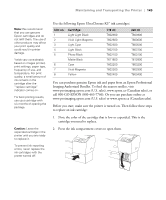
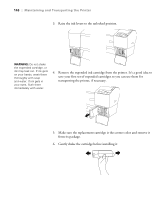
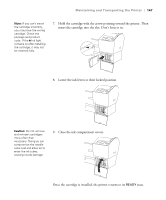
142 | Maintaining and Transporting the Printer Caution: Don't run a cleaning cycle while thick media is loaded in the printer. Note: You must use at least a 10× eye loupe to examine the nozzle check pattern for deflected nozzles. Running a Power Cleaning Cycle You can run a power cleaning cycle from the control panel if the normal cleaning process is not sufficient to clear the nozzles. However, the power cycle uses a large quantity of ink, so it is recommended only as a last resort. The cartridges need to be at least 50% full to use power cleaning. You may need to replace a low cartridge to run the cleaning cycle. After cleaning, you can reinsert the old cartridge. 1. Print a nozzle check to make sure the print head needs cleaning, as described on page 141. 2. Make sure the printer is ready and the red B Ink light on the printer's LCD display is not on or flashing. 3. Press the Menu button. 4. Press the d button until MAINTENANCE is highlighted, then press Menu. 5. Press d until POWER CLEANING is highlighted, then press Menu. Press Menu again, then press to start the power cleaning. 6. Follow the instructions on the LCD display to raise or lower the ink levers. 7. When cleaning is finished and the Pause light stops flashing, print the nozzle check again to confirm that the head is clean. For effective cleaning, always run a nozzle check between cycles. If the pattern is still missing segments or has deflections after a power cleaning cycle, turn the printer off and leave it overnight, then clean the print head again the following morning with regular cleaning cycles. If you still see no improvement, contact Epson for assistance. 142
-
 1
1 -
2
-
3
-
4
-
5
-
6
-
7
-
8
-
9
-
10
-
11
-
12
-
13
-
14
-
15
-
16
-
17
-
18
-
19
-
20
-
21
-
22
-
23
-
24
-
25
-
26
-
27
-
28
-
29
-
30
-
31
-
32
-
33
-
34
-
35
-
36
-
37
-
38
-
39
-
40
-
41
-
42
-
43
-
44
-
45
-
46
-
47
-
48
-
49
-
50
-
51
-
52
-
53
-
54
-
55
-
56
-
57
-
58
-
59
-
60
-
61
-
62
-
63
-
64
-
65
-
66
-
67
-
68
-
69
-
70
-
71
-
72
-
73
-
74
-
75
-
76
-
77
-
78
-
79
-
80
-
81
-
82
-
83
-
84
-
85
-
86
-
87
-
88
-
89
-
90
-
91
-
92
-
93
-
94
-
95
-
96
-
97
-
98
-
99
-
100
-
101
-
102
-
103
-
104
-
105
-
106
-
107
-
108
-
109
-
110
-
111
-
112
-
113
-
114
-
115
-
116
-
117
-
118
-
 119
119 -
 120
120 -
 121
121 -
 122
122 -
 123
123 -
 124
124 -
 125
125 -
 126
126 -
 127
127 -
 128
128 -
 129
129 -
130
-
131
-
132
-
133
-
134
-
135
-
136
-
137
-
138
-
139
-
140
-
141
-
142
-
143
-
144
-
145
-
146
-
147
-
148
-
149
-
150
-
151
-
152
-
153
-
154
-
155
-
156
-
157
-
158
-
159
-
160
-
161
-
162
-
163
-
164
-
165
-
166
-
167
-
168
-
169
-
170
-
171
-
172
-
173
-
174
-
175
-
176
 |
 |