Epson 9880 Printer Guide - Page 131
Remove All Four Ink Cartridges On The Right, Install C/m/y Conversion Cartridges
 |
UPC - 010343866843
View all Epson 9880 manuals
Add to My Manuals
Save this manual to your list of manuals |
Page 131 highlights
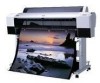
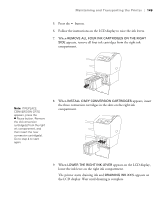
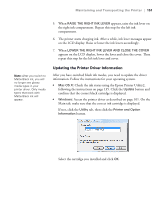
Maintaining and Transporting the Printer | 149 5. Press the button. 6. Follow the instructions on the LCD display to raise the ink levers. 7. When REMOVE ALL FOUR INK CARTRIDGES ON THE RIGHT SIDE appears, remove all four ink cartridges from the right ink compartment. Note: If REPLACE CONVERSION CRTG appears, press the Pause button. Remove the old conversion cartridge(s) from the right ink compartment, and then insert the new conversion cartridge(s). Go to step 4 to start again. 8. When INSTALL C/M/Y CONVERSION CARTRIDGES appears, insert the three conversion cartridges in the slots on the right ink compartment. 9. When LOWER THE RIGHT INK LEVER appears on the LCD display, lower the ink lever on the right ink compartment. The printer starts draining ink and DRAINING INK XX% appears on the LCD display. Wait until draining is complete. 149
-
 1
1 -
2
-
3
-
4
-
5
-
6
-
7
-
8
-
9
-
10
-
11
-
12
-
13
-
14
-
15
-
16
-
17
-
18
-
19
-
20
-
21
-
22
-
23
-
24
-
25
-
26
-
27
-
28
-
29
-
30
-
31
-
32
-
33
-
34
-
35
-
36
-
37
-
38
-
39
-
40
-
41
-
42
-
43
-
44
-
45
-
46
-
47
-
48
-
49
-
50
-
51
-
52
-
53
-
54
-
55
-
56
-
57
-
58
-
59
-
60
-
61
-
62
-
63
-
64
-
65
-
66
-
67
-
68
-
69
-
70
-
71
-
72
-
73
-
74
-
75
-
76
-
77
-
78
-
79
-
80
-
81
-
82
-
83
-
84
-
85
-
86
-
87
-
88
-
89
-
90
-
91
-
92
-
93
-
94
-
95
-
96
-
97
-
98
-
99
-
100
-
101
-
102
-
103
-
104
-
105
-
106
-
107
-
108
-
109
-
110
-
111
-
112
-
113
-
114
-
115
-
116
-
117
-
118
-
119
-
120
-
121
-
122
-
123
-
124
-
125
-
 126
126 -
 127
127 -
 128
128 -
 129
129 -
 130
130 -
 131
131 -
 132
132 -
 133
133 -
 134
134 -
 135
135 -
 136
136 -
137
-
138
-
139
-
140
-
141
-
142
-
143
-
144
-
145
-
146
-
147
-
148
-
149
-
150
-
151
-
152
-
153
-
154
-
155
-
156
-
157
-
158
-
159
-
160
-
161
-
162
-
163
-
164
-
165
-
166
-
167
-
168
-
169
-
170
-
171
-
172
-
173
-
174
-
175
-
176
 |
 |