Epson 9880 Printer Guide - Page 57
Loading Small Cut Sheets or Fine Art Paper
 |
UPC - 010343866843
View all Epson 9880 manuals
Add to My Manuals
Save this manual to your list of manuals |
Page 57 highlights
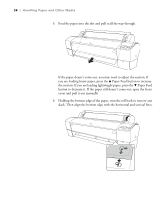
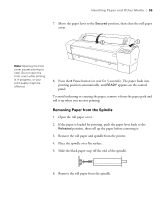
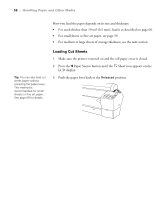
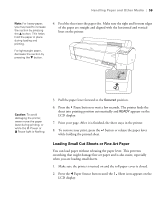
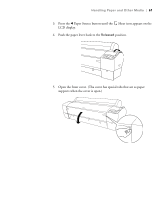
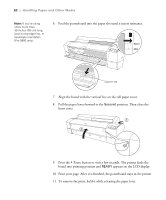
Handling Paper and Other Media | 59 Note: For heavy paper, you may need to increase the suction by pressing the u button. This helps hold the paper in place during loading and printing. For lightweight paper, decrease the suction by pressing the d button. 4. Feed the sheet into the paper slot. Make sure the right and bottom edges of the paper are straight and aligned with the horizontal and vertical lines on the printer. Caution: To avoid damaging the printer, never move the paper lever during printing, or while the P Power or Pause light is flashing. 5. Pull the paper lever forward to the Secured position. 6. Press the Pause button or wait a few seconds. The printer feeds the sheet into printing position automatically and READY appears on the LCD display. 7. Print your page. After it is finished, the sheet stays in the printer. 8. To remove your print, press the button or release the paper lever while holding the printed sheet. Loading Small Cut Sheets or Fine Art Paper You can load paper without releasing the paper lever. This prevents scratching that might damage fine art paper and is also easier, especially when you are loading small sheets. 1. Make sure the printer is turned on and the roll paper cover is closed. 2. Press the l Paper Source button until the Sheet icon appears on the LCD display. 59
-
 1
1 -
2
-
3
-
4
-
5
-
6
-
7
-
8
-
9
-
10
-
11
-
12
-
13
-
14
-
15
-
16
-
17
-
18
-
19
-
20
-
21
-
22
-
23
-
24
-
25
-
26
-
27
-
28
-
29
-
30
-
31
-
32
-
33
-
34
-
35
-
36
-
37
-
38
-
39
-
40
-
41
-
42
-
43
-
44
-
45
-
46
-
47
-
48
-
49
-
50
-
51
-
 52
52 -
 53
53 -
 54
54 -
 55
55 -
 56
56 -
 57
57 -
 58
58 -
 59
59 -
 60
60 -
 61
61 -
 62
62 -
63
-
64
-
65
-
66
-
67
-
68
-
69
-
70
-
71
-
72
-
73
-
74
-
75
-
76
-
77
-
78
-
79
-
80
-
81
-
82
-
83
-
84
-
85
-
86
-
87
-
88
-
89
-
90
-
91
-
92
-
93
-
94
-
95
-
96
-
97
-
98
-
99
-
100
-
101
-
102
-
103
-
104
-
105
-
106
-
107
-
108
-
109
-
110
-
111
-
112
-
113
-
114
-
115
-
116
-
117
-
118
-
119
-
120
-
121
-
122
-
123
-
124
-
125
-
126
-
127
-
128
-
129
-
130
-
131
-
132
-
133
-
134
-
135
-
136
-
137
-
138
-
139
-
140
-
141
-
142
-
143
-
144
-
145
-
146
-
147
-
148
-
149
-
150
-
151
-
152
-
153
-
154
-
155
-
156
-
157
-
158
-
159
-
160
-
161
-
162
-
163
-
164
-
165
-
166
-
167
-
168
-
169
-
170
-
171
-
172
-
173
-
174
-
175
-
176
 |
 |
