Epson 9880 Printer Guide - Page 111
Importing a Custom Settings Group, Loading a Pre-Defined Settings Group
 |
UPC - 010343866843
View all Epson 9880 manuals
Add to My Manuals
Save this manual to your list of manuals |
Page 111 highlights
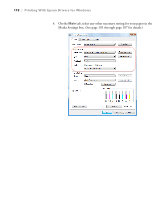
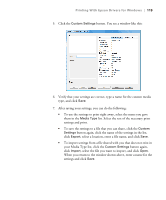
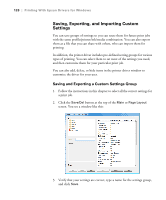
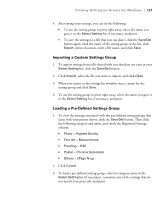
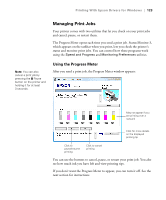
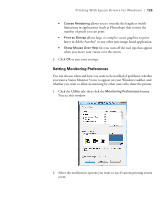
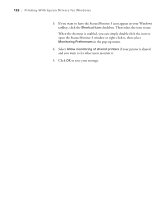
Printing With Epson Drivers for Windows | 121 4. After saving your settings, you can do the following: • To use the setting group to print right away, select the name you gave it in the Select Setting list, if necessary, and print. • To save the settings to a file that you can share, click the Save/Del button again, click the name of the setting group in the list, click Export, select a location, enter a file name, and click Save. Importing a Custom Settings Group 1. To import settings from a file shared with you that does not exist in your Select Setting list, click the Save/Del button. 2. Click Import, select the file you want to import, and click Open. 3. When you return to the settings list window, enter a name for the setting group and click Save. 4. To use the setting group to print right away, select the name you gave it in the Select Setting list, if necessary, and print. Loading a Pre-Defined Settings Group 1. To view the settings associated with the pre-defined setting groups that came with your printer driver, click the Save/Del button. Then click the following category and name, and check the Registered Settings column: • Photo > Highest Quality • Fine Art > Monochrome • Proofing > ICM • Poster > Chroma Saturation • Others > 2Page N-up 2. Click Cancel. 3. To load a pre-defined setting group, select its category name in the Select Setting list (if necessary), customize any of the settings that do not match your print job, and print. 121
-
 1
1 -
2
-
3
-
4
-
5
-
6
-
7
-
8
-
9
-
10
-
11
-
12
-
13
-
14
-
15
-
16
-
17
-
18
-
19
-
20
-
21
-
22
-
23
-
24
-
25
-
26
-
27
-
28
-
29
-
30
-
31
-
32
-
33
-
34
-
35
-
36
-
37
-
38
-
39
-
40
-
41
-
42
-
43
-
44
-
45
-
46
-
47
-
48
-
49
-
50
-
51
-
52
-
53
-
54
-
55
-
56
-
57
-
58
-
59
-
60
-
61
-
62
-
63
-
64
-
65
-
66
-
67
-
68
-
69
-
70
-
71
-
72
-
73
-
74
-
75
-
76
-
77
-
78
-
79
-
80
-
81
-
82
-
83
-
84
-
85
-
86
-
87
-
88
-
89
-
90
-
91
-
92
-
93
-
94
-
95
-
96
-
97
-
98
-
99
-
100
-
101
-
102
-
103
-
104
-
105
-
 106
106 -
 107
107 -
 108
108 -
 109
109 -
 110
110 -
 111
111 -
 112
112 -
 113
113 -
 114
114 -
 115
115 -
 116
116 -
117
-
118
-
119
-
120
-
121
-
122
-
123
-
124
-
125
-
126
-
127
-
128
-
129
-
130
-
131
-
132
-
133
-
134
-
135
-
136
-
137
-
138
-
139
-
140
-
141
-
142
-
143
-
144
-
145
-
146
-
147
-
148
-
149
-
150
-
151
-
152
-
153
-
154
-
155
-
156
-
157
-
158
-
159
-
160
-
161
-
162
-
163
-
164
-
165
-
166
-
167
-
168
-
169
-
170
-
171
-
172
-
173
-
174
-
175
-
176
 |
 |