Epson SureColor S70675 User Manual - Page 112
Saving Media Settings, Choosing a Media Setting Bank
 |
View all Epson SureColor S70675 manuals
Add to My Manuals
Save this manual to your list of manuals |
Page 112 highlights
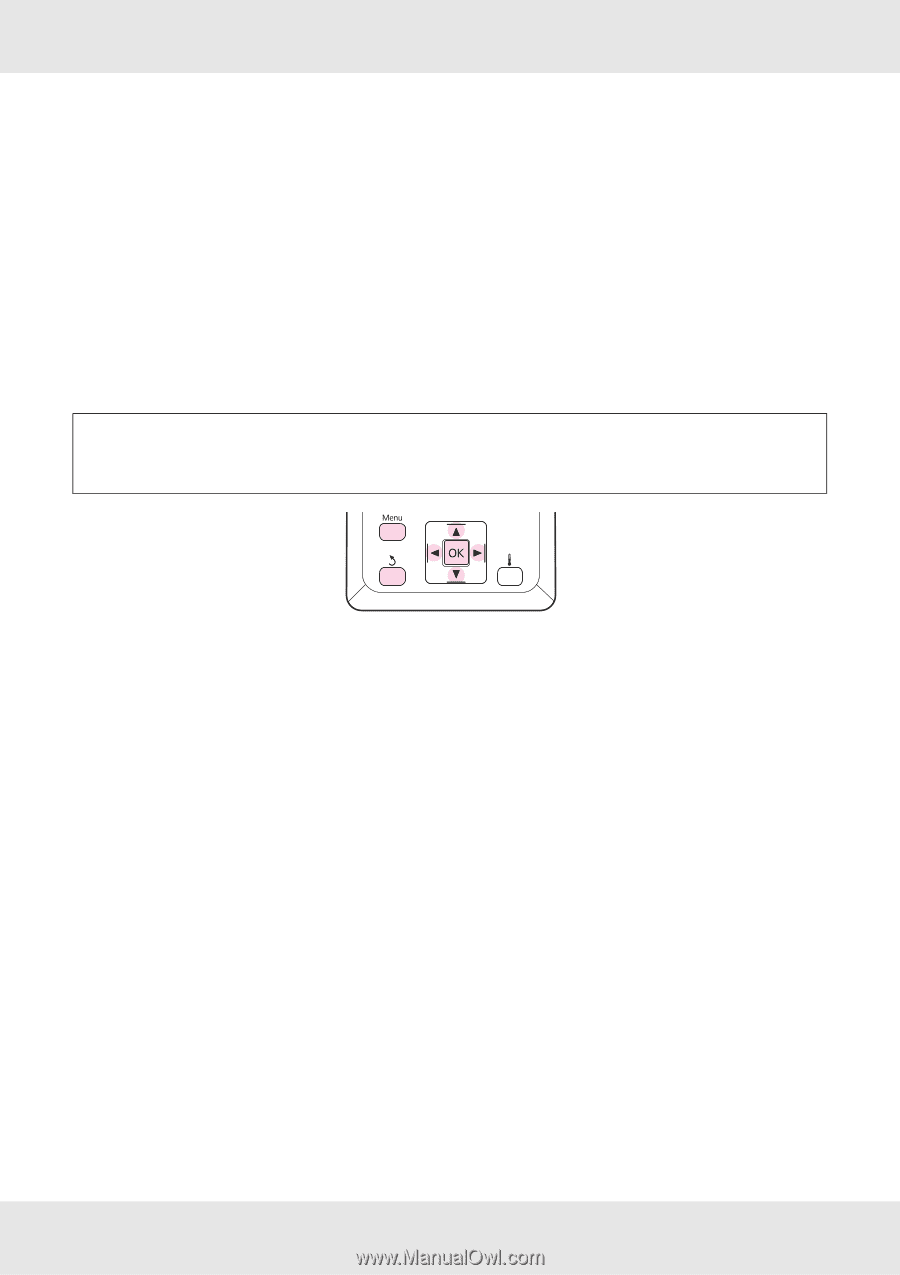
❏ When using the same type of media with different lots, you should reconfigure media settings. ❏ When using the S70675 or S50675, do not use the media part that has been fed and rewound for adjustment. Media that has been fed and then rewound may have traces or other issues from rollers and it may not be possible to adjust correctly. Saving Media Settings The printer offers a total of 30 media setting banks. Follow the steps below to save media settings. Note: The media settings saved in the printer can be changed using EPSON LFP Remote Panel 2. For details, see the EPSON LFP Remote Panel 2 help. Choosing a Media Setting Bank 1. After confirming that the printer is ready, press the Menu button. The settings menu will be displayed. 2. Select Media Setup and press the Z button. 3. Use the d/u buttons to select Customize Settings and press the Z button. 4. Use the d/u buttons to select the desired media number, and press the Z button. If a number with existing settings is selected, the existing settings are overwritten. Naming the Media Setting Bank Using distinctive names makes it easier to select banks for use. 1. Select Setting Name and press the Z button. 2. Use the d/u buttons to display letters and symbols. When the desired character is displayed, press the r button to select the next entry position. Basic Operations 112
-
 1
1 -
2
-
3
-
4
-
5
-
6
-
7
-
8
-
9
-
10
-
11
-
12
-
13
-
14
-
15
-
16
-
17
-
18
-
19
-
20
-
21
-
22
-
23
-
24
-
25
-
26
-
27
-
28
-
29
-
30
-
31
-
32
-
33
-
34
-
35
-
36
-
37
-
38
-
39
-
40
-
41
-
42
-
43
-
44
-
45
-
46
-
47
-
48
-
49
-
50
-
51
-
52
-
53
-
54
-
55
-
56
-
57
-
58
-
59
-
60
-
61
-
62
-
63
-
64
-
65
-
66
-
67
-
68
-
69
-
70
-
71
-
72
-
73
-
74
-
75
-
76
-
77
-
78
-
79
-
80
-
81
-
82
-
83
-
84
-
85
-
86
-
87
-
88
-
89
-
90
-
91
-
92
-
93
-
94
-
95
-
96
-
97
-
98
-
99
-
100
-
101
-
102
-
103
-
104
-
105
-
106
-
 107
107 -
 108
108 -
 109
109 -
 110
110 -
 111
111 -
 112
112 -
 113
113 -
 114
114 -
 115
115 -
 116
116 -
 117
117 -
118
-
119
-
120
-
121
-
122
-
123
-
124
-
125
-
126
-
127
-
128
-
129
-
130
-
131
-
132
-
133
-
134
-
135
-
136
-
137
-
138
-
139
-
140
-
141
-
142
-
143
-
144
-
145
-
146
-
147
-
148
-
149
-
150
-
151
-
152
-
153
-
154
-
155
-
156
-
157
-
158
-
159
-
160
-
161
-
162
-
163
-
164
-
165
-
166
-
167
-
168
-
169
-
170
-
171
-
172
-
173
-
174
-
175
-
176
-
177
-
178
-
179
-
180
-
181
-
182
-
183
-
184
-
185
-
186
-
187
-
188
-
189
-
190
-
191
-
192
-
193
-
194
-
195
-
196
-
197
-
198
-
199
-
200
-
201
-
202
-
203
-
204
-
205
-
206
-
207
-
208
-
209
-
210
-
211
-
212
-
213
-
214
-
215
-
216
-
217
-
218
-
219
-
220
-
221
-
222
-
223
-
224
-
225
-
226
-
227
-
228
-
229
-
230
-
231
-
232
-
233
-
234
-
235
-
236
-
237
-
238
-
239
-
240
-
241
-
242
-
243
-
244
-
245
-
246
-
247
-
248
-
249
-
250
-
251
-
252
-
253
-
254
-
255
 |
 |