Epson SureColor S70675 User Manual - Page 211
The Maintenance Menu, The Maintenance menu can be accessed directly by pressing the, button.
 |
View all Epson SureColor S70675 manuals
Add to My Manuals
Save this manual to your list of manuals |
Page 211 highlights
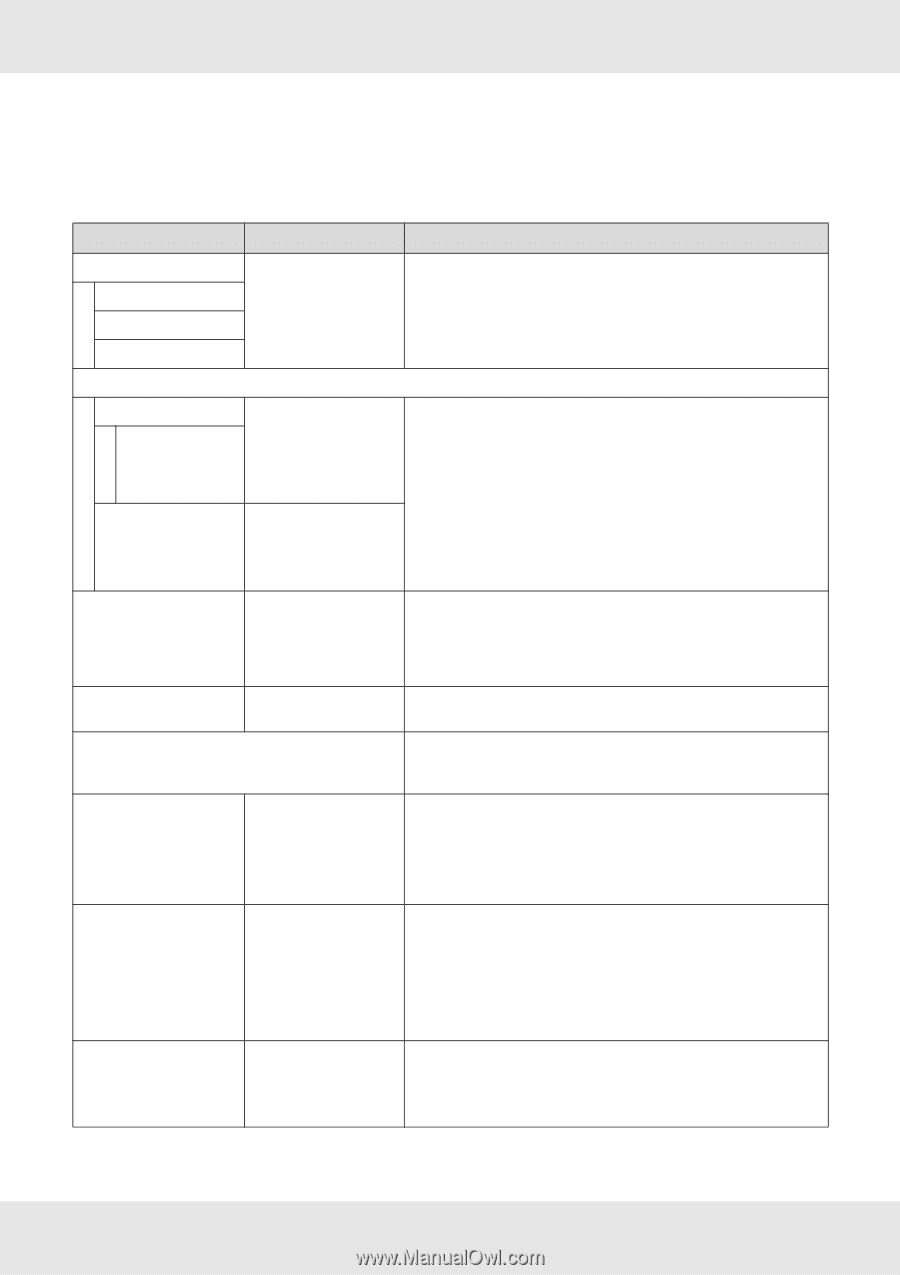
The Maintenance Menu The Maintenance menu can be accessed directly by pressing the # button. Item Nozzle Check Print At Right Print At Center Print At Left Cleaning All Nozzles Head 1/Head 22 Head 12 Head 22 Selected Nozzles Head Maintenance Waste Ink Counter Ink Circulation1 Ink Refresh Head Washing Pre-Storage Maint. Parameter Print Explanation A nozzle pattern will be printed. Inspect the pattern visually and perform head cleaning if you detect faint or missing colors. See "Checking for Clogged Nozzles" on page 181. The options available vary with the option selected for Media Size Check and the width of the media used. Execute (Light)/ Execute (Medium)/ Execute (Heavy) Execute (Light)/Execute (Medium)/Execute (Heavy) Move Head - All Nozzles, All (except MS/WH)4, All (except WH)1, MS/WH4, WH1 XX/XX3, 4, Head1 XX/XX2, Head 2 XX/XX2, Head1 All Nozzles2, Head2 All Nozzles2, All Nozzles (XX indicates an ink color code.) WH/MS4 WH1 All Nozzles The options displayed vary with the printer model. Note the numbers of patterns that contain faint or missing colors and clean all or selected nozzles. Select All Nozzles to clean all nozzles (or all nozzles in the selected print head). Choose Selected Nozzles to clean only the nozzles in selected arrays. The level of cleaning can be selected from Execute (Light), Execute (Medium), and Execute (Heavy). Select Execute (Light) first. If the problem persists after you have used Execute (Light), choose Execute (Medium). If the problem persists after you have used Execute (Medium), choose Execute (Heavy). See "Head Cleaning" on page 183. Position the print head for maintenance. Perform such maintenance as cleaning the wiper, caps, and the area around print head only after using this option to position the head for cleaning. Moving the print head manually could cause malfunction. See "Regular Cleaning" on page 137. If you replace the waste ink bottle before being prompted by a message in the control panel, run the Waste Ink Counter after replacement. Circulate spot color ink to prevent sedimentation in the print head or tube. This function is available when avoiding an operation interrupt by the auto ink circulation function of the printer. This function is available when tint unevenness (areas of uneven density) are detected in printing results. The displayed menu varies depending on your model or the specified color mode. See "Ink Refresh" on page 188. Use this function if nozzle clogs cannot be cleared even after performing head cleaning several times or cleaning around the print head. The displayed menu varies depending on your model or the specified color mode. For details, see "Head Washing" on page 186. Always perform pre-storage maintenance if the printer will not be used for an extended period (and switched off). If the storage interval is short, you can perform pre-storage maintenance for spot color ink only. See "Long-Term Storage (Pre-Storage Maintenance)" on page 189. Using the Control Panel Menu 211
-
 1
1 -
2
-
3
-
4
-
5
-
6
-
7
-
8
-
9
-
10
-
11
-
12
-
13
-
14
-
15
-
16
-
17
-
18
-
19
-
20
-
21
-
22
-
23
-
24
-
25
-
26
-
27
-
28
-
29
-
30
-
31
-
32
-
33
-
34
-
35
-
36
-
37
-
38
-
39
-
40
-
41
-
42
-
43
-
44
-
45
-
46
-
47
-
48
-
49
-
50
-
51
-
52
-
53
-
54
-
55
-
56
-
57
-
58
-
59
-
60
-
61
-
62
-
63
-
64
-
65
-
66
-
67
-
68
-
69
-
70
-
71
-
72
-
73
-
74
-
75
-
76
-
77
-
78
-
79
-
80
-
81
-
82
-
83
-
84
-
85
-
86
-
87
-
88
-
89
-
90
-
91
-
92
-
93
-
94
-
95
-
96
-
97
-
98
-
99
-
100
-
101
-
102
-
103
-
104
-
105
-
106
-
107
-
108
-
109
-
110
-
111
-
112
-
113
-
114
-
115
-
116
-
117
-
118
-
119
-
120
-
121
-
122
-
123
-
124
-
125
-
126
-
127
-
128
-
129
-
130
-
131
-
132
-
133
-
134
-
135
-
136
-
137
-
138
-
139
-
140
-
141
-
142
-
143
-
144
-
145
-
146
-
147
-
148
-
149
-
150
-
151
-
152
-
153
-
154
-
155
-
156
-
157
-
158
-
159
-
160
-
161
-
162
-
163
-
164
-
165
-
166
-
167
-
168
-
169
-
170
-
171
-
172
-
173
-
174
-
175
-
176
-
177
-
178
-
179
-
180
-
181
-
182
-
183
-
184
-
185
-
186
-
187
-
188
-
189
-
190
-
191
-
192
-
193
-
194
-
195
-
196
-
197
-
198
-
199
-
200
-
201
-
202
-
203
-
204
-
205
-
 206
206 -
 207
207 -
 208
208 -
 209
209 -
 210
210 -
 211
211 -
 212
212 -
 213
213 -
 214
214 -
 215
215 -
 216
216 -
217
-
218
-
219
-
220
-
221
-
222
-
223
-
224
-
225
-
226
-
227
-
228
-
229
-
230
-
231
-
232
-
233
-
234
-
235
-
236
-
237
-
238
-
239
-
240
-
241
-
242
-
243
-
244
-
245
-
246
-
247
-
248
-
249
-
250
-
251
-
252
-
253
-
254
-
255
 |
 |