Epson SureColor S70675 User Manual - Page 123
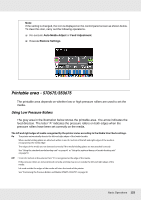
Printable area - S70675/S50675, Using Low Pressure Rollers
 |
View all Epson SureColor S70675 manuals
Add to My Manuals
Save this manual to your list of manuals |
Page 123 highlights
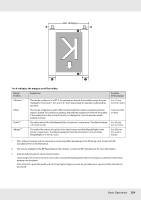
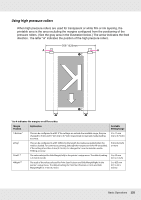
Note: If the setting is changed, the icon is displayed on the control panel screen as shown below. To clear this icon, carry out the following operations. ❏ Re-execute Auto Media Adjust or Feed Adjustment. ❏ Execute Restore Settings. Printable area - S70675/S50675 The printable area depends on whether low or high pressure rollers are used to set the media. Using Low Pressure Rollers The gray area in the illustration below shows the printable area. The arrow indicates the feed direction. The letter "A" indicates the pressure rollers on both edges when the pressure rollers have been set correctly on the media. The left and right edges of media recognized by the printer varies according to the Media Size Check settings. On The printer automatically detects the left and right edges of the loaded media. When media holding plates are attached, within 5 mm (0.2 inches) of the left and right edges of the media is recognized as the media edge. The edges of the media are not detected correctly if the media holding plates are not attached correctly. See "Using the standard media feeding unit" on page 41 or "Using the optional heavy roll media feeding unit" on page 53 Off : 5 mm (0.2 inches) at the exterior from "A" is recognized as the edge of the media. If the pressure rollers are not positioned correctly, printing may occur outside the left and right edges of the media. Ink used outside the edges of the media will stain the inside of the printer. See "Positioning the Pressure Rollers and Media (S70675, S50675)" on page 40. Basic Operations 123
-
 1
1 -
2
-
3
-
4
-
5
-
6
-
7
-
8
-
9
-
10
-
11
-
12
-
13
-
14
-
15
-
16
-
17
-
18
-
19
-
20
-
21
-
22
-
23
-
24
-
25
-
26
-
27
-
28
-
29
-
30
-
31
-
32
-
33
-
34
-
35
-
36
-
37
-
38
-
39
-
40
-
41
-
42
-
43
-
44
-
45
-
46
-
47
-
48
-
49
-
50
-
51
-
52
-
53
-
54
-
55
-
56
-
57
-
58
-
59
-
60
-
61
-
62
-
63
-
64
-
65
-
66
-
67
-
68
-
69
-
70
-
71
-
72
-
73
-
74
-
75
-
76
-
77
-
78
-
79
-
80
-
81
-
82
-
83
-
84
-
85
-
86
-
87
-
88
-
89
-
90
-
91
-
92
-
93
-
94
-
95
-
96
-
97
-
98
-
99
-
100
-
101
-
102
-
103
-
104
-
105
-
106
-
107
-
108
-
109
-
110
-
111
-
112
-
113
-
114
-
115
-
116
-
117
-
 118
118 -
 119
119 -
 120
120 -
 121
121 -
 122
122 -
 123
123 -
 124
124 -
 125
125 -
 126
126 -
 127
127 -
 128
128 -
129
-
130
-
131
-
132
-
133
-
134
-
135
-
136
-
137
-
138
-
139
-
140
-
141
-
142
-
143
-
144
-
145
-
146
-
147
-
148
-
149
-
150
-
151
-
152
-
153
-
154
-
155
-
156
-
157
-
158
-
159
-
160
-
161
-
162
-
163
-
164
-
165
-
166
-
167
-
168
-
169
-
170
-
171
-
172
-
173
-
174
-
175
-
176
-
177
-
178
-
179
-
180
-
181
-
182
-
183
-
184
-
185
-
186
-
187
-
188
-
189
-
190
-
191
-
192
-
193
-
194
-
195
-
196
-
197
-
198
-
199
-
200
-
201
-
202
-
203
-
204
-
205
-
206
-
207
-
208
-
209
-
210
-
211
-
212
-
213
-
214
-
215
-
216
-
217
-
218
-
219
-
220
-
221
-
222
-
223
-
224
-
225
-
226
-
227
-
228
-
229
-
230
-
231
-
232
-
233
-
234
-
235
-
236
-
237
-
238
-
239
-
240
-
241
-
242
-
243
-
244
-
245
-
246
-
247
-
248
-
249
-
250
-
251
-
252
-
253
-
254
-
255
 |
 |
