Epson SureColor S70675 User Manual - Page 228
When printing banners, Media Tension, S70675 or S50675
 |
View all Epson SureColor S70675 manuals
Add to My Manuals
Save this manual to your list of manuals |
Page 228 highlights
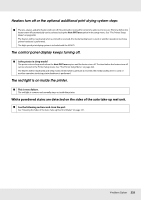
❏ Set the Media Tension value to 2 temporarily. ❏ Print and check if the print results have improved. ❏ If the problem is not resolved, raise the setting value one level. Repeat Steps 3 and 4 until print results are improved in the range up to a setting value of 5. If the measures above do not resolve the problem, return the Media Tension setting to default and continue with the next step. On the S30675, if adjusting Media Tension does not resolve the problem, return the Media Tension setting to default and continue with the next step. When printing banners Find the procedure for your printer model below and adjust the Media Tension. S70675 or S50675 ❏ Set the setting value to 2 temporarily. See "Customize Settings" on page 204. ❏ Print and check if the print results have improved. ❏ If the problem is not resolved, raise the setting value one level. Repeat Steps 2 and 3 until print results are improved in the range up to a setting value of 5. If changing Media Tension does not resolve the problem, return the Media Tension setting to default and continue with the next step. S30675 ❏ Set the setting value to 40. See "Customize Settings" on page 204. ❏ Print and check if the print results have improved. If changing Media Tension does not resolve the problem, return the Media Tension setting to default and continue with the next step. 5. Check that the media is loaded correctly in the auto take-up reel unit If the method for attaching the media to the take-up roll core or the method for attaching the counterweights is inappropriate, media may move around during take-up, which may cause wrinkles and raised sections. Problem Solver 228
-
 1
1 -
2
-
3
-
4
-
5
-
6
-
7
-
8
-
9
-
10
-
11
-
12
-
13
-
14
-
15
-
16
-
17
-
18
-
19
-
20
-
21
-
22
-
23
-
24
-
25
-
26
-
27
-
28
-
29
-
30
-
31
-
32
-
33
-
34
-
35
-
36
-
37
-
38
-
39
-
40
-
41
-
42
-
43
-
44
-
45
-
46
-
47
-
48
-
49
-
50
-
51
-
52
-
53
-
54
-
55
-
56
-
57
-
58
-
59
-
60
-
61
-
62
-
63
-
64
-
65
-
66
-
67
-
68
-
69
-
70
-
71
-
72
-
73
-
74
-
75
-
76
-
77
-
78
-
79
-
80
-
81
-
82
-
83
-
84
-
85
-
86
-
87
-
88
-
89
-
90
-
91
-
92
-
93
-
94
-
95
-
96
-
97
-
98
-
99
-
100
-
101
-
102
-
103
-
104
-
105
-
106
-
107
-
108
-
109
-
110
-
111
-
112
-
113
-
114
-
115
-
116
-
117
-
118
-
119
-
120
-
121
-
122
-
123
-
124
-
125
-
126
-
127
-
128
-
129
-
130
-
131
-
132
-
133
-
134
-
135
-
136
-
137
-
138
-
139
-
140
-
141
-
142
-
143
-
144
-
145
-
146
-
147
-
148
-
149
-
150
-
151
-
152
-
153
-
154
-
155
-
156
-
157
-
158
-
159
-
160
-
161
-
162
-
163
-
164
-
165
-
166
-
167
-
168
-
169
-
170
-
171
-
172
-
173
-
174
-
175
-
176
-
177
-
178
-
179
-
180
-
181
-
182
-
183
-
184
-
185
-
186
-
187
-
188
-
189
-
190
-
191
-
192
-
193
-
194
-
195
-
196
-
197
-
198
-
199
-
200
-
201
-
202
-
203
-
204
-
205
-
206
-
207
-
208
-
209
-
210
-
211
-
212
-
213
-
214
-
215
-
216
-
217
-
218
-
219
-
220
-
221
-
222
-
 223
223 -
 224
224 -
 225
225 -
 226
226 -
 227
227 -
 228
228 -
 229
229 -
 230
230 -
 231
231 -
 232
232 -
 233
233 -
234
-
235
-
236
-
237
-
238
-
239
-
240
-
241
-
242
-
243
-
244
-
245
-
246
-
247
-
248
-
249
-
250
-
251
-
252
-
253
-
254
-
255
 |
 |
