Epson SureColor S70675 User Manual - Page 22
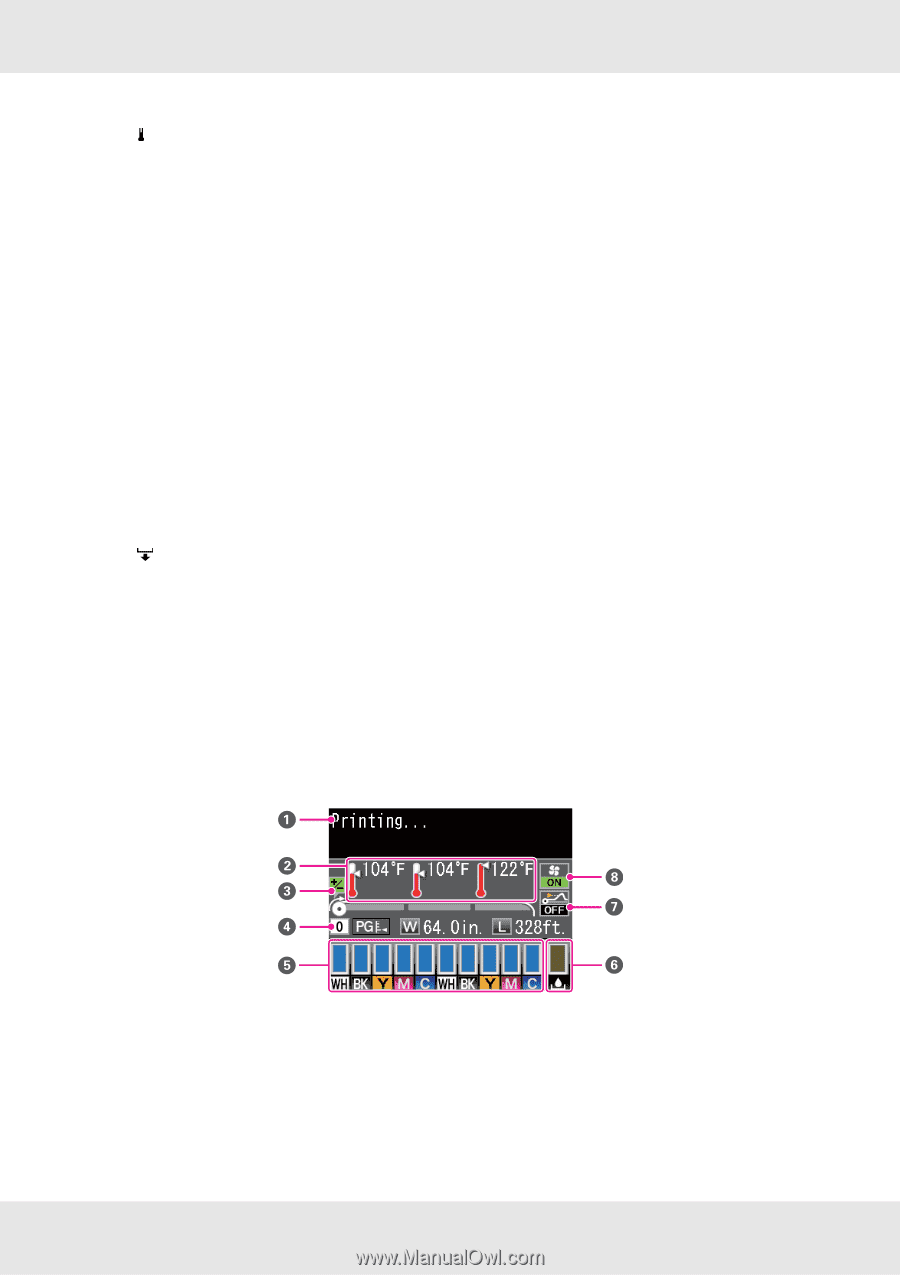
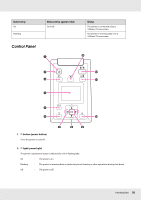
Understanding the Display, The following illustration shows the display for the S50675.
 |
View all Epson SureColor S70675 manuals
Add to My Manuals
Save this manual to your list of manuals |
Page 22 highlights
10 button (heating and drying button) Pressing this button displays the Heating & Drying menu, where you can adjust the Heater Temperature. If the optional additional print drying system is attached, you can also adjust Additional Dryer settings. These options can be adjusted during printing. See "Heating & Drying" on page 114. 11 # button (maintenance button) Pressing this button displays the Maintenance menu, which contains such items as Nozzle Check, Cleaning, Head Washing, Head Maintenance, and Waste Ink Counter. This button is disabled during printing. See "The Maintenance Menu" on page 211. 12 W button (pause/cancel button) The printer enters pause status if this is pressed while printing. To release the pause status, press the W button again, or select Pause Cancel on the screen and then press the Z button. To cancel print jobs being processed, select Job Cancel on the screen and then press the Z button. Pressing this button when menus are displayed closes the menus and returns the printer to ready status. 13 button (media feed button) When the printer is in the ready state, you can feed the media to the cut position by pressing this button and then Z. See "Cutting media" on page 88. When printing is in progress, you can use this button to adjust media feed. See "Feed Adjustment" on page 117. Understanding the Display The following illustration shows the display for the S50675. 1 Messages Displays the printer's status, operation, and error messages. See "When a Message Is Displayed" on page 215. Introduction 22
-
 1
1 -
2
-
3
-
4
-
5
-
6
-
7
-
8
-
9
-
10
-
11
-
12
-
13
-
14
-
15
-
16
-
 17
17 -
 18
18 -
 19
19 -
 20
20 -
 21
21 -
 22
22 -
 23
23 -
 24
24 -
 25
25 -
 26
26 -
 27
27 -
28
-
29
-
30
-
31
-
32
-
33
-
34
-
35
-
36
-
37
-
38
-
39
-
40
-
41
-
42
-
43
-
44
-
45
-
46
-
47
-
48
-
49
-
50
-
51
-
52
-
53
-
54
-
55
-
56
-
57
-
58
-
59
-
60
-
61
-
62
-
63
-
64
-
65
-
66
-
67
-
68
-
69
-
70
-
71
-
72
-
73
-
74
-
75
-
76
-
77
-
78
-
79
-
80
-
81
-
82
-
83
-
84
-
85
-
86
-
87
-
88
-
89
-
90
-
91
-
92
-
93
-
94
-
95
-
96
-
97
-
98
-
99
-
100
-
101
-
102
-
103
-
104
-
105
-
106
-
107
-
108
-
109
-
110
-
111
-
112
-
113
-
114
-
115
-
116
-
117
-
118
-
119
-
120
-
121
-
122
-
123
-
124
-
125
-
126
-
127
-
128
-
129
-
130
-
131
-
132
-
133
-
134
-
135
-
136
-
137
-
138
-
139
-
140
-
141
-
142
-
143
-
144
-
145
-
146
-
147
-
148
-
149
-
150
-
151
-
152
-
153
-
154
-
155
-
156
-
157
-
158
-
159
-
160
-
161
-
162
-
163
-
164
-
165
-
166
-
167
-
168
-
169
-
170
-
171
-
172
-
173
-
174
-
175
-
176
-
177
-
178
-
179
-
180
-
181
-
182
-
183
-
184
-
185
-
186
-
187
-
188
-
189
-
190
-
191
-
192
-
193
-
194
-
195
-
196
-
197
-
198
-
199
-
200
-
201
-
202
-
203
-
204
-
205
-
206
-
207
-
208
-
209
-
210
-
211
-
212
-
213
-
214
-
215
-
216
-
217
-
218
-
219
-
220
-
221
-
222
-
223
-
224
-
225
-
226
-
227
-
228
-
229
-
230
-
231
-
232
-
233
-
234
-
235
-
236
-
237
-
238
-
239
-
240
-
241
-
242
-
243
-
244
-
245
-
246
-
247
-
248
-
249
-
250
-
251
-
252
-
253
-
254
-
255
 |
 |