HTC S743 HTC S743 ROM Upgrade (For Brightpoint only) - Page 109
Set up a custom domain email, Start > All Programs > Messaging > New Email Account
 |
UPC - 821793002237
View all HTC S743 manuals
Add to My Manuals
Save this manual to your list of manuals |
Page 109 highlights
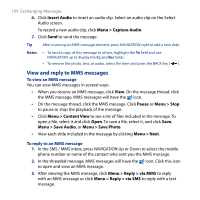
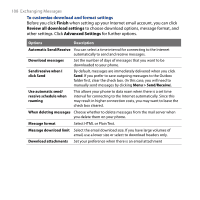
Exchanging Messages 109 Set up a custom domain email When you are using an email domain name that is hosted by a different email provider (for example, your email address may be [email protected] but Email.com hosts the email account and provides email services), select the Custom Domain option in the Email Setup wizard to set up your email account on your phone. 1. Click Start > All Programs > Messaging > New Email Account. 2. Enter your Email address and the Password for your email account and select the Save password option. Click Next. 3. Clear the Try to get email settings automatically from the Internet and then click Next. 4. In Your email provider, select Custom domain and then click Next. 5. Enter the domain of your email provider and then click Next. 6. The Email Setup wizard then tries to find the email provider settings on your phone or from the Internet. If the settings are found, it shows a successful message. Click Next. 7. Enter Your name and the Account display name and then click Next. Note If the Email Setup wizard was unsuccessful in finding the settings, you will be prompted to enter email server settings on the succeeding screens. See "To specify email server settings" for details. 8. In the Automatic Send/Receive list, choose how frequent you want email messages to be automatically sent and downloaded on your phone. Note Click Review all download settings to select download options, set the email format as HTML or plain text, and more. For more information, see "To customize download and format settings." 9. Click Finish.
-
 1
1 -
2
-
3
-
4
-
5
-
6
-
7
-
8
-
9
-
10
-
11
-
12
-
13
-
14
-
15
-
16
-
17
-
18
-
19
-
20
-
21
-
22
-
23
-
24
-
25
-
26
-
27
-
28
-
29
-
30
-
31
-
32
-
33
-
34
-
35
-
36
-
37
-
38
-
39
-
40
-
41
-
42
-
43
-
44
-
45
-
46
-
47
-
48
-
49
-
50
-
51
-
52
-
53
-
54
-
55
-
56
-
57
-
58
-
59
-
60
-
61
-
62
-
63
-
64
-
65
-
66
-
67
-
68
-
69
-
70
-
71
-
72
-
73
-
74
-
75
-
76
-
77
-
78
-
79
-
80
-
81
-
82
-
83
-
84
-
85
-
86
-
87
-
88
-
89
-
90
-
91
-
92
-
93
-
94
-
95
-
96
-
97
-
98
-
99
-
100
-
101
-
102
-
103
-
 104
104 -
 105
105 -
 106
106 -
 107
107 -
 108
108 -
 109
109 -
 110
110 -
 111
111 -
 112
112 -
 113
113 -
 114
114 -
115
-
116
-
117
-
118
-
119
-
120
-
121
-
122
-
123
-
124
-
125
-
126
-
127
-
128
-
129
-
130
-
131
-
132
-
133
-
134
-
135
-
136
-
137
-
138
-
139
-
140
-
141
-
142
-
143
-
144
-
145
-
146
-
147
-
148
-
149
-
150
-
151
-
152
-
153
-
154
-
155
-
156
-
157
-
158
-
159
-
160
-
161
-
162
-
163
-
164
-
165
-
166
-
167
-
168
-
169
-
170
-
171
-
172
-
173
-
174
-
175
-
176
-
177
-
178
-
179
-
180
-
181
-
182
-
183
-
184
-
185
-
186
-
187
-
188
-
189
-
190
-
191
-
192
-
193
-
194
-
195
-
196
-
197
-
198
-
199
-
200
-
201
-
202
-
203
-
204
-
205
-
206
-
207
-
208
-
209
-
210
-
211
-
212
-
213
-
214
-
215
-
216
-
217
-
218
-
219
-
220
-
221
-
222
-
223
-
224
-
225
-
226
 |
 |
