HTC S743 HTC S743 ROM Upgrade (For Brightpoint only) - Page 127
Set permissions on an email message
 |
UPC - 821793002237
View all HTC S743 manuals
Add to My Manuals
Save this manual to your list of manuals |
Page 127 highlights
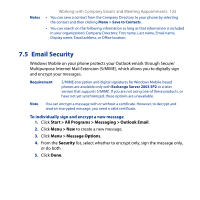
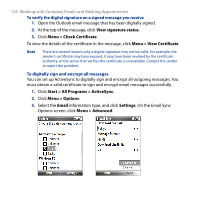
Working with Company Emails and Meeting Appointments 127 4. Select Encrypt messages to protect your emails from being viewed except by the intended recipients. Select Sign messages so that recipients are certain that emails are sent by you and have not been altered. 5. Click Menu > Choose Certificate to select a certificate for signing or encrypting outgoing email messages. Set permissions on an email message Another way of protecting your email messages is to send messages with restricted permissions using Information Rights Management (IRM). Requirement This works only with a Microsoft Outlook email account and if your company is using RMS Server SP1. 1. Click Start > All Programs > Messaging > Outlook Email. 2. Create a message, then click Menu > Message Options. 3. In Permissions, do one of the following: • To allow anyone to read the message, select Unrestricted Access. • To prevent the message from being forwarded, printed, or copied, select Do Not Forward. 4. Click Done. Tip An IRM-protected message received on your phone can only be replied to or forwarded if the message permits it.
-
 1
1 -
2
-
3
-
4
-
5
-
6
-
7
-
8
-
9
-
10
-
11
-
12
-
13
-
14
-
15
-
16
-
17
-
18
-
19
-
20
-
21
-
22
-
23
-
24
-
25
-
26
-
27
-
28
-
29
-
30
-
31
-
32
-
33
-
34
-
35
-
36
-
37
-
38
-
39
-
40
-
41
-
42
-
43
-
44
-
45
-
46
-
47
-
48
-
49
-
50
-
51
-
52
-
53
-
54
-
55
-
56
-
57
-
58
-
59
-
60
-
61
-
62
-
63
-
64
-
65
-
66
-
67
-
68
-
69
-
70
-
71
-
72
-
73
-
74
-
75
-
76
-
77
-
78
-
79
-
80
-
81
-
82
-
83
-
84
-
85
-
86
-
87
-
88
-
89
-
90
-
91
-
92
-
93
-
94
-
95
-
96
-
97
-
98
-
99
-
100
-
101
-
102
-
103
-
104
-
105
-
106
-
107
-
108
-
109
-
110
-
111
-
112
-
113
-
114
-
115
-
116
-
117
-
118
-
119
-
120
-
121
-
 122
122 -
 123
123 -
 124
124 -
 125
125 -
 126
126 -
 127
127 -
 128
128 -
 129
129 -
 130
130 -
 131
131 -
 132
132 -
133
-
134
-
135
-
136
-
137
-
138
-
139
-
140
-
141
-
142
-
143
-
144
-
145
-
146
-
147
-
148
-
149
-
150
-
151
-
152
-
153
-
154
-
155
-
156
-
157
-
158
-
159
-
160
-
161
-
162
-
163
-
164
-
165
-
166
-
167
-
168
-
169
-
170
-
171
-
172
-
173
-
174
-
175
-
176
-
177
-
178
-
179
-
180
-
181
-
182
-
183
-
184
-
185
-
186
-
187
-
188
-
189
-
190
-
191
-
192
-
193
-
194
-
195
-
196
-
197
-
198
-
199
-
200
-
201
-
202
-
203
-
204
-
205
-
206
-
207
-
208
-
209
-
210
-
211
-
212
-
213
-
214
-
215
-
216
-
217
-
218
-
219
-
220
-
221
-
222
-
223
-
224
-
225
-
226
 |
 |
