HTC S743 HTC S743 ROM Upgrade (For Brightpoint only) - Page 188
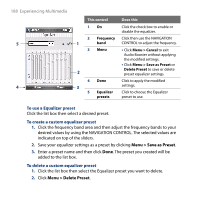
Menu > Save as Preset, To use a Equalizer preset, To create a custom equalizer preset
 |
UPC - 821793002237
View all HTC S743 manuals
Add to My Manuals
Save this manual to your list of manuals |
Page 188 highlights
188 Experiencing Multimedia 5 4 This control Does this 1 On Click the check box to enable or disable the equalizer. 2 Frequency Click then use the NAVIGATION 1 band CONTROL to adjust the frequency. 3 Menu • Click Menu > Cancel to exit Audio Booster without applying the modified settings. • Click Menu > Save as Preset or Delete Preset to save or delete 2 preset equalizer settings. 4 Done Click to apply the modified 3 settings. 5 Equalizer Click to choose the Equalizer presets preset to use. To use a Equalizer preset Click the list box then select a desired preset. To create a custom equalizer preset 1. Click the frequency band area and then adjust the frequency bands to your desired values by using the NAVIGATION CONTROL. The selected values are indicated on top of the sliders. 2. Save your equalizer settings as a preset by clicking Menu > Save as Preset. 3. Enter a preset name and then click Done. The preset you created will be added to the list box. To delete a custom equalizer preset 1. Click the list box then select the Equalizer preset you want to delete. 2. Click Menu > Delete Preset.
-
 1
1 -
2
-
3
-
4
-
5
-
6
-
7
-
8
-
9
-
10
-
11
-
12
-
13
-
14
-
15
-
16
-
17
-
18
-
19
-
20
-
21
-
22
-
23
-
24
-
25
-
26
-
27
-
28
-
29
-
30
-
31
-
32
-
33
-
34
-
35
-
36
-
37
-
38
-
39
-
40
-
41
-
42
-
43
-
44
-
45
-
46
-
47
-
48
-
49
-
50
-
51
-
52
-
53
-
54
-
55
-
56
-
57
-
58
-
59
-
60
-
61
-
62
-
63
-
64
-
65
-
66
-
67
-
68
-
69
-
70
-
71
-
72
-
73
-
74
-
75
-
76
-
77
-
78
-
79
-
80
-
81
-
82
-
83
-
84
-
85
-
86
-
87
-
88
-
89
-
90
-
91
-
92
-
93
-
94
-
95
-
96
-
97
-
98
-
99
-
100
-
101
-
102
-
103
-
104
-
105
-
106
-
107
-
108
-
109
-
110
-
111
-
112
-
113
-
114
-
115
-
116
-
117
-
118
-
119
-
120
-
121
-
122
-
123
-
124
-
125
-
126
-
127
-
128
-
129
-
130
-
131
-
132
-
133
-
134
-
135
-
136
-
137
-
138
-
139
-
140
-
141
-
142
-
143
-
144
-
145
-
146
-
147
-
148
-
149
-
150
-
151
-
152
-
153
-
154
-
155
-
156
-
157
-
158
-
159
-
160
-
161
-
162
-
163
-
164
-
165
-
166
-
167
-
168
-
169
-
170
-
171
-
172
-
173
-
174
-
175
-
176
-
177
-
178
-
179
-
180
-
181
-
182
-
 183
183 -
 184
184 -
 185
185 -
 186
186 -
 187
187 -
 188
188 -
 189
189 -
 190
190 -
 191
191 -
 192
192 -
 193
193 -
194
-
195
-
196
-
197
-
198
-
199
-
200
-
201
-
202
-
203
-
204
-
205
-
206
-
207
-
208
-
209
-
210
-
211
-
212
-
213
-
214
-
215
-
216
-
217
-
218
-
219
-
220
-
221
-
222
-
223
-
224
-
225
-
226
 |
 |
