HP 6125XLG R2306-HP 6125XLG Blade Switch Fundamentals Configuration Guide - Page 38
Logging in through SSH, Configuring SSH login on the device
 |
View all HP 6125XLG manuals
Add to My Manuals
Save this manual to your list of manuals |
Page 38 highlights
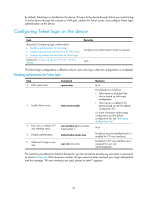
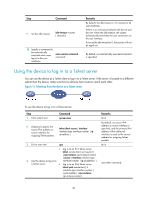
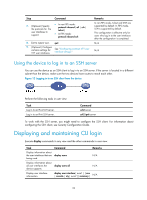
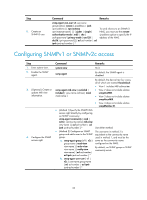
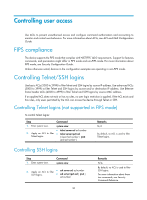
Logging in through SSH SSH offers a secure method for remote login. By providing encryption and strong authentication, it protects devices against attacks such as IP spoofing and plain text password interception. For more information, see Security Configuration Guide. You can use an SSH client to log in to the device for remote management, or use the device as an SSH client to log in to an SSH server. By default, SSH login is disabled on the device. To log in to the device through SSH, you must log in to the device through the console or AUX port and configure SSH login on the device first. Configuring SSH login on the device This section provides the configuration procedure for when the SSH client authentication method is password. For more information about SSH and publickey authentication configuration, see Security Configuration Guide. To configure SSH login on the device: Step 1. Enter system view. 2. Create local key pairs. 3. Enable SSH server. 4. Create an SSH user and specify the authentication mode. 5. Enter one or multiple VTY user interface views. 6. Enable scheme authentication. Command system-view public-key local create { dsa | rsa | ecdsa } [name key-name ] ssh server enable • In non-FIP mode: ssh user username service-type stelnet authentication-type { password | { any | password-publickey | publickey } assign publickey keyname } • In FIP mode: ssh user username service-type stelnet authentication-type { password | password-publickey assign publickey keyname } user-interface vty first-number [ last-number ] authentication-mode scheme Remarks N/A By default, no local key pairs are created. By default, SSH server is disabled. By default, no SSH user is configured on the device. N/A In non-FIPS mode, password authentication is enabled for VTY user interfaces by default. In FIPS mode, scheme authentication is enabled for VTY user interfaces by default. 31
-
 1
1 -
2
-
3
-
4
-
5
-
6
-
7
-
8
-
9
-
10
-
11
-
12
-
13
-
14
-
15
-
16
-
17
-
18
-
19
-
20
-
21
-
22
-
23
-
24
-
25
-
26
-
27
-
28
-
29
-
30
-
31
-
32
-
 33
33 -
 34
34 -
 35
35 -
 36
36 -
 37
37 -
 38
38 -
 39
39 -
 40
40 -
 41
41 -
 42
42 -
 43
43 -
44
-
45
-
46
-
47
-
48
-
49
-
50
-
51
-
52
-
53
-
54
-
55
-
56
-
57
-
58
-
59
-
60
-
61
-
62
-
63
-
64
-
65
-
66
-
67
-
68
-
69
-
70
-
71
-
72
-
73
-
74
-
75
-
76
-
77
-
78
-
79
-
80
-
81
-
82
-
83
-
84
-
85
-
86
-
87
-
88
-
89
-
90
-
91
-
92
-
93
-
94
-
95
-
96
-
97
-
98
-
99
-
100
-
101
-
102
-
103
-
104
-
105
-
106
-
107
-
108
-
109
-
110
-
111
-
112
-
113
-
114
-
115
-
116
-
117
-
118
-
119
-
120
-
121
-
122
-
123
-
124
-
125
-
126
-
127
-
128
-
129
-
130
-
131
-
132
-
133
-
134
-
135
-
136
-
137
-
138
-
139
-
140
-
141
-
142
-
143
-
144
-
145
-
146
-
147
-
148
-
149
-
150
-
151
-
152
-
153
-
154
-
155
 |
 |