HP 6125XLG R2306-HP 6125XLG Blade Switch Fundamentals Configuration Guide - Page 81
Configuring the device as an IPv6 TFTP client
 |
View all HP 6125XLG manuals
Add to My Manuals
Save this manual to your list of manuals |
Page 81 highlights
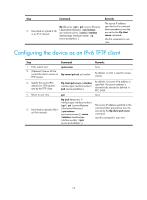
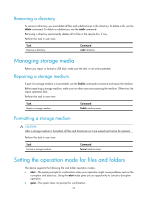
Step Command tftp tftp-server { get | put } source-filename 5. Download or upload a file [ destination-filename ] [ vpn-instance in an IPv4 network. vpn-instance-name ] [ source { interface interface-type interface-number | ip source-ip-address } ] Remarks The source IP address specified in this command takes precedence over the one set by the tftp client source command. Use this command in user view. Configuring the device as an IPv6 TFTP client Step Command Remarks 1. Enter system view. system-view N/A 2. (Optional.) Use an ACL to control the client's access to tftp-server ipv6 acl acl-number TFTP servers. By default, no ACL is used for access control. 3. Specify the source IPv6 address for TFTP packets sent by the TFTP client. tftp client ipv6 source { interface interface-type interface-number | ipv6 source-ip-address } By default, no source IPv6 address is specified. The source address is automatically selected as defined in RFC 3484. 4. Return to user view. quit N/A tftp ipv6 tftp-server [ -i interface-type interface-number ] { get | put } source-filename The source IP address specified in this 5. Download or upload a file in [ destination-filename ] an IPv6 network. [ vpn-instance vpn-instance-name ] [ source command takes precedence over the one set by the tftp client ipv6 source command. { interface interface-type interface-number | ipv6 Use this command in user view. source-ipv6-address } ] 74
-
 1
1 -
2
-
3
-
4
-
5
-
6
-
7
-
8
-
9
-
10
-
11
-
12
-
13
-
14
-
15
-
16
-
17
-
18
-
19
-
20
-
21
-
22
-
23
-
24
-
25
-
26
-
27
-
28
-
29
-
30
-
31
-
32
-
33
-
34
-
35
-
36
-
37
-
38
-
39
-
40
-
41
-
42
-
43
-
44
-
45
-
46
-
47
-
48
-
49
-
50
-
51
-
52
-
53
-
54
-
55
-
56
-
57
-
58
-
59
-
60
-
61
-
62
-
63
-
64
-
65
-
66
-
67
-
68
-
69
-
70
-
71
-
72
-
73
-
74
-
75
-
 76
76 -
 77
77 -
 78
78 -
 79
79 -
 80
80 -
 81
81 -
 82
82 -
 83
83 -
 84
84 -
 85
85 -
 86
86 -
87
-
88
-
89
-
90
-
91
-
92
-
93
-
94
-
95
-
96
-
97
-
98
-
99
-
100
-
101
-
102
-
103
-
104
-
105
-
106
-
107
-
108
-
109
-
110
-
111
-
112
-
113
-
114
-
115
-
116
-
117
-
118
-
119
-
120
-
121
-
122
-
123
-
124
-
125
-
126
-
127
-
128
-
129
-
130
-
131
-
132
-
133
-
134
-
135
-
136
-
137
-
138
-
139
-
140
-
141
-
142
-
143
-
144
-
145
-
146
-
147
-
148
-
149
-
150
-
151
-
152
-
153
-
154
-
155
 |
 |
